Showing posts with label Tim Holtz-GrungePaper. Show all posts

Friday, March 25, 2011

Embossed Metal Tape Tag Tutorial


Time for a tutorial.  This is the tag I made for SNR a couple of weeks ago. It's based on the piece I created for Ranger's booth at CHA using their new Metal Foil Tape.

It is fantastic to work with!!! And with the Texture Fades and Alcohol Inks....Well, you be the Judge.

Way easy, and Way fun!!!


Supplies you will need:
·         Alcohol Inks and Ink Applicators with Felt of your choice – I used Lettuce, Denim, Wild Plum, and Purple Twilight


 ·         Various Texture Fades plus Artful Dwellings, Tattered Florals and On the Fence Dies– Tim Holtz Alterations

·         Gold Acrylic Paint Dabber, Metal Foil Tape, Jet Black Archival Ink,  Manila Tag, and Glossy Accents from Ranger

·         Fine Grit Sanding Block and Distress Tool


·         Stamps of your choice – I used Elegant Ledger from Stampington for background

·         Chipboard, Pop Dots, Ribbons, Rhinestone Brad, White Pen, Embossing Machine-I used   the new Vagabond


Here we go!
 

I start with 3 different dies from Tim. The On the Fence, the Tattered Florals and the new Artful Dwellings. 

Here I cut the fence out of thick chipboard and added Picket Fence Crackle Paint. Set aside to dry. Trim to width of tag.


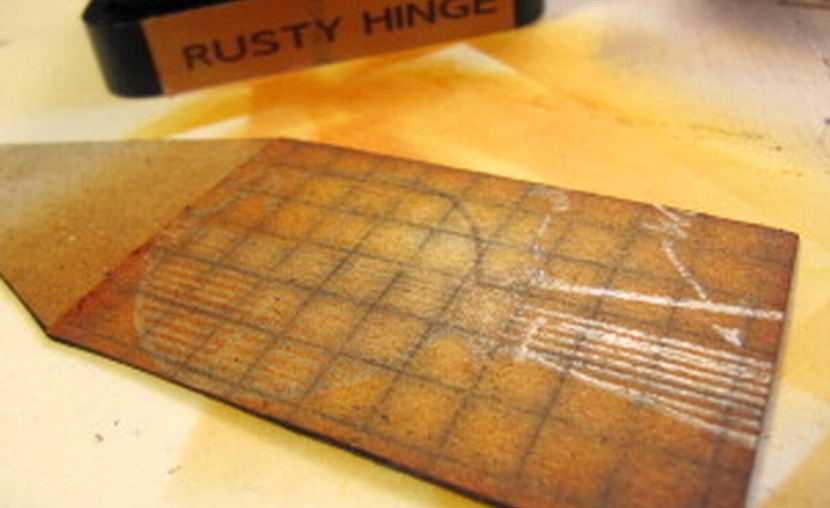
Next I cut the tall skinny house out and added a piece of Kraft Resist Paper Stash. Glue to the bottom and trim. I added Rusty Hinge Distress Ink to edges. Add white pen dots and a stamped image as you like.

I took a large Manila Tag #8 and added Distress Inks Dusty Concord, Chipped Sapphire, and Broken China. A bit of Black Soot over the distressed edges makes the colors pop.

The stamp is Elegant Ledger from Stampington & Company stamped it twice with Jet Black Archival Ink...(couldn't live without that ink)


Cut a piece of metal and emboss it with the Texture Fades Damask. I have the Vagabond and it's a dream to work with...I'm just sayin'.

Using the the Ink Applicator and felt apply alcohol inks of several colors. Let dry and add a 2nd layer. This creates back washes of patterns that are very cool! 


Sand off top layer with fine grade sand paper or leave as is. I also use a brush to add ink into the crevasses where I can't get the color I want.


Lay the metal face down on worktable and peal off backing paper. Lay tape over top part of house at roof level. Trim edges and add ribbon trim.

I like to add the house to black heavy chipboard and cut out 1/8" all around.


Add the tape to Grungepaper, die cut with Tattered Florals die, emboss, and add Alcohol Inks as before. Use Distress Inks on the backs.


Curl and pinch the flower petals and layer up with a Rhinestone brad.


Add glossy accents to back of Fragment and glue to vintage picture. Let dry. Cut around edges and add Chain Tassel with a jump ring. (I trimmed mine here a tiny bit)

Add with pop dots to the house.


Use Gold Metallic Paint Dabber to add a light dab of paint to the black Ransom Letters.

Now we're ready to assemble!!!

Glue the house to the tag with peak slightly above the top. Add more white pen dots.

Use pop dots to add the fence and flower.  Add the letters down the side.

Tie 2 ribbons to the tag top and you're done!

Hope you enjoyed this project. Let me know what you think, and if you make one, we'll share!

Linda


Monday, June 21, 2010

What Can You Do With LUMINARTE?


Well, to begin with, you can paint chipboard, as I've done here in the background. You can paint Petaloo flowers. These are all painted with Twinkling H2O's except the green one in the center. VERY vibrant colors from LUMINARTE!!!

The birdcage, fancy flourishes, and baroque are from
TIM .The birdcage is crackle painted then the dark blue Ocean Wave was used over the crackle. This collage is done on an 8x8 canvas board.

And this is just a craft store unfinished wooden birdhouse painted with various colors of Luminarte paints. The butterfly is also painted after being stamped on Grungepaper and cut out.

This is a tag page from the Bare Elements Brenda book from that I cut apart. Various H2O's were painted randomly on the tag and the overlay, Antique Floral transparency from Narratives, is added with brads. I used a black Faber-Castell PITT artist pen to add more leaves to fill out the design. It doesn't have to be perfect, just capture the main design of the flowers.

So, that's just a few things you can do with Luminarte! Give it a try. I've been running around all day, so later in the week we'll get a picture of the prizes and get that going.

Stay tuned!


Thursday, March 25, 2010

Potion Bottle and Tim's New Dies!!!


Got a big box from Ranger yesterday!!!!! YEA!!!!!!!!!!!!!

Full of Charms and Buttons and Dies, Oh MY!

I had to try the dies on the Grungepaper and it cuts like BUTTAH!


I cut out the Styled Lable, Distress Inked, misted with Ink and Perfect Pearls, and Stamped. (It says Potion, but it's hard to see. And the Perfect Pearls are sooooo hard to get to shine in a photo!)


Then I used the Dimensional Pearls to add some dots. I had to have some bling, so 2 Rhinestones were added.


The lower piece was cut using the Ornate Border cut twice, once for the top and once on the bottom edge. Turned out kinda cool!


I used one of Tim's GORGEOUS buttons tied to the neck of the bottle. And a Color Me Crazy flowers are painted with Luminarte for the accents.


Fun, Fun, Fun!!! Worked with the Birdcage die for a collage, coming up next!


CREATE ART!

Sunday, March 14, 2010

Class Pictures


Here's Jean's project, her Tool caddy, from the front.


This is the back...she added a metal heart...very cool! See Tim's new Urban Chic stamps!!!


Took my camera.....forgot to take pictures. But they were all VERY different, but extremely GREAT!!!!


BUT, Jean from the class, sent me pics of her project!!! Yea!


She took hers home and added micro-beads....since she's a beader...it figures. She did a FANTASTIC job. We Distress Inked, Stamped with some of Tim's new Urban Chic, Embossed some Metal with Ten Seconds Studios new molds.

Take a look and enjoy. BYW....they used the same wooden box at Ranger U this week...I'm just sayin'. Ha...who knew????? It wasn't Ranger U, but you did get to work with the same box! Check out Suze's blog.


Have a good one!


Linda


Sunday, February 28, 2010

Upcoming class


Time has really gotten away from me. The Olympics, the kids updating their house for market...SELLING the house!!! And it's almost spring!!!


By the end of next week it should be warming up a bit....then it will finally feel like Spring might be on the way.


In light of that, I thought I'd remind you of the TWO projects in the upcoming class on MARCH 13th at Scrapbook Friend'z. Not one, but TWO!


So the pictures are here for you to look at. Spring colors of Green and Pink. Happy colors and couple of fun things to learn with Metal, Grungepaper, Perfect Pearls, and Flowers.


I have all the new molds from Ten Seconds Studios you can use!!!!!!!!!!! And I'll show you the new colors of metal, too. GORGEOUS colors!!!!! I'll post a project I made later in the week with the new colors and molds.


Of course, we'll have to Distress Ink, Stamp, and glue to keep it interesting.


Hope to see you there!

Tuesday, November 17, 2009

Random Thoughts

So much going on here and in my head. But here are a few things I'd like to share with you.....

Busy Betty in California has asked if I'd consider mailing her a GrungeBoard Wallet kit. I had a couple other people asking, so I did some research today.


After a trip to the local Post Office, I found the GB will fit nicely into the small Flat Rate box that ships anywhere in the US for $4.95!


So.....Betty can have her kit sent out by the end of the week. She's getting the kit for $30. With the kit, you can make one wallet and have a choice of the 2 different flowers. Then use the pattern to make more!!! If the other gals that asked about these are interested, email me. cain81@mtco.com You know who you are.
~
These things are sooooo easy once you figure it out, you could make several for Christmas gifts. Always fun. The girls from Sat. have plans to make several to hold Gift Cards and one will take it clubbing...with ID and some cash. (Mom was there, so she already knows...didn't compromise her here.)


Whatever works..............

Next, we think of making cute or flowery things for girls gifts. But sometimes the boys get overlooked. So I came up with a bracelet designed for the teenage boy in your lives.


This is GrungeBoard and a HitchFastener. Simple, but kind of rugged for the Teen Set...I bounced it of my teenage Grandkids 15 and 17!!!! Ha! Loved them! They can make them at Thanksgiving when they come down!
The girls want them, too.


Moving right along.....the class for this Saturday at Prairie Art Stamps has only a couple of seats left. Kits are made and we're ready to go. If you have put off calling, I suggest you call now. We had 19 show up for 16 seats the last time!


I'm just sayin'.......

Friday, October 2, 2009

Christmas Wall Banner


I fell in love with the Christmas Past papers from Graphic 45....as you will too when you see them. AMAZING!

I've put together a class that will have Maya Road Coasters as the base for a multi-piece wall hanging.

I think you'll enjoy it. Here are a couple of more peaks at the different sections that will hang down.

Thanks to my shopping in St. Cloud, I got some nice floral pieces. They spruce it up along with some GrungePaper, Tim's Reindeer Flight stamps, and lots of pen work dots and stitches.....which I love.

December 5th at Scrapbook Friend'z....save the date!

Sunday, August 23, 2009

Rock Candy Crackle+GrungePaper=Fun


Is this a cool effect or what?????


This is Grungepaper cut with the Cuttlebug Astericks die-cut. I added Distress Ink. Stamped. Then coated with Tim's great new Rock Candy Crackle Paint.

Add a brad and its the cutest little 1 1/2 inch flower you ever saw!

I'm so easily amused. My husband will tell you....sometimes he has no idea why something tickles me. Comes from having been poor as a kid. We had to make our own fun....I guess.

Anyway...had to share this. I think it should go on something for a class somewhere. Maybe an ATC. I think I've said that before.

Have a great weekend...and one other little note...check out the new addition to Tim's Blog roll. OMG! I almost fainted!

Got 3 new sets of Tim's stamps. Maybe tomorrow!

Have a great weekend!