Friday, December 16, 2016

A Small Memory Canvas

 I started this small canvas months ago.

Then I just set it aside.


I had painted it with Heavy Black Gesso, added some stenciling with modeling paste, and started adding Mica Powder Sprays on top.

Then I used a sponge to add Metalliques in various blues, greens, and purples. Some splashes of white paint brightened it up a bit, and then a layer of black ink stamping.


 Then it got pushed around on my desktop for months. Many months. But I found it just laying there, and decided it needed to be finished.

So I got out the Mechanicals and the Art Pebbles, some gold ric-rac and a paper doily and set to work.

The silver Steampunk Blade was painted with white gesso and Pink/Blue Opal Magic paint. The Pebbles are painted with different Metalliques and the stars have Gold Opal Magic Powder layered onto them. 


Some Glass Glitter and Micro Beads with a few strands of metallic thread finish off the background. 

The little girl is from the Finnabair Vintage Collectibles set in the small watch face with glitter and beads. 

You get a different color every time you turn it with the metallic paints and sprays.

Hope you enjoy!

Linda

Thursday, December 8, 2016

Etching and Cold Connections from the Studio

Hi everybody!

It's been a while.....again, but somehow I think people don't have the time to go to blogs much any more. I'll share with you what I've been up to for the last few
weeks. It's been wonderful getting back to working with metal, cold connections
and etching again.

I'm not setting up an Etsy account but if you're interested in these pieces, you can
email me or private message me for information. However, the 1st on is already
gone. It's a vintage tin type made into a pin with etched brass.


This is etched copper on embossed brass with a brass star and wings. The large 
ball chain is 24" and a vintage brown. The Swarovski crystals are wrapped and hung with copper jump-rings. I like contrast and several colors of metal.


This is a stamped image that's etched into brass and layered onto a copper heart.
The beads are wire-wrapped and added to a gunmetal chain.


And this is the girl again etched in copper this time on a pounded brass plate. The arrow is "stitched" onto the brass with silver wire. This is a pin.


And these bracelets were simple, but fun. The bottom one is gone now, too.


So back to the work table to make something else. I cannot wear necklaces after a neck injury, so I'll either give them as Christmas gifts or sell to you guys to give this season.

 It all works!

Your Friend in ART,

Linda

Friday, November 11, 2016

A Lady of Grace

Time for some Mixed Media Fun!

I took this stretched 6x6 canvas and turned it over to use the back with the little niche. Then I layered on Modeling Paste over the Ripped Fishnet Stencil.

Top it off with layers of ArtAlchemy Metalliques and some white splatters of  Heavy White Gesso, and you have a luscious background.


I added a gorgeous picture of a lady from Retro Cafe Art Gallery with keyholes and corners painted and waxed with Inka Golds.

The Mechanical Pendant had an antique lace trim looped through it and
 laid into the niche onto pieces of wood to create height.


I used paper clay and Iron Orchid Design moulds for the other pieces. Two are sealed with Soft Matte Gel before I added an antiquing creme.

The other 2 started out with layers of gold. But I decided they needed to be darker, so more layers of paint were added.

 Inka Golds and Metalliques with Heavy Black Gesso create the rich dark colors.


It's all put together with Heavy Body Gel....It is amazing!


I love the contrast of the dark metallic colors and vintage lace that make for dramatic contrast in
The Lady of Grace.

I hope you enjoy the project and are inspired to
Create ART.

Linda

Friday, November 4, 2016

It's Been A While....Some Fun Jewelry Makes

It's been a while....

..having said that I thought I'd share with you a few things I've been creating.

These are my earrings and bracelets that have kept me happy in my Studio.

The top left has fun colors. 

The top right is to replace one I lost on my trip to Niagara Falls. Apparently when short people lean over a tall deck rail, it pushes their coat collar up enough to PUSH your earring right out of your ear. And it will drop way to the ground where you can see it, but you'll never wear it again!


 The top left is a metal piece with embossing powder and Patina.

The above set on the right starts with a blank brass piece from Vintaj. I use a DecoEmboss folder to emboss and then sand and polish
with a reliefing block.

The copper dapped discs with green beadwrap are pretty nice, and the brass embossed tags with copper wings really polished up great.


These were just some of the pieces I gathered from my trip to 
Galena and Rustic River Finds.


I also wanted to try my hand at making a couple of bracelets
using some word plates I had in my stash.

A few tiny brass charms were easy to add.


The lower one has Vintaj Patinas on it. It started out as plain silver. I used 2 colors of the Patina to create a mottled color. Simplicity is achieved with a small brass charm.

So, I just thought I'd let you know I took a little vacation, played with
some tools and products I'd had quite a while in my Studio,
and found my Muse again.

I'll be back with a Mixed Media project in a week or so.

Your Friend in ART,

Linda

Monday, October 17, 2016

A Journey with a Lovely Lady and an Announcement

Well all good things must come to an end...as they say.... today is my last post
as a Finnabair Creative Team member.

 I'm thrilled to have been on this amazing team of such talented 
Artists. But even more thrilled to have had the chance to work for, and with,
the lovely Anna Dabrowska.

For that, I am eternally grateful. 

This is not the end of our relationship, however, as we will still share many 
things with the Art World. (read to the end for announcement)

This is my favorite type of Art: Assemblage. So let's get started!


I use a laser-cut box shrine to start and applied Soft Gloss Gel to the Vintage Collectible lady. Then I added 2 coats to the top to seal.

Next I painted the side sections with 2 coats of the ArtAlchemy Metalliques using a sponge square.


The German Dresden was black, so I added the Brass Hardware first, and then the Rusty Red to create contrast.


The Dresden was added to frame the lady, and white and black rubons decorate the inside of the shrine.


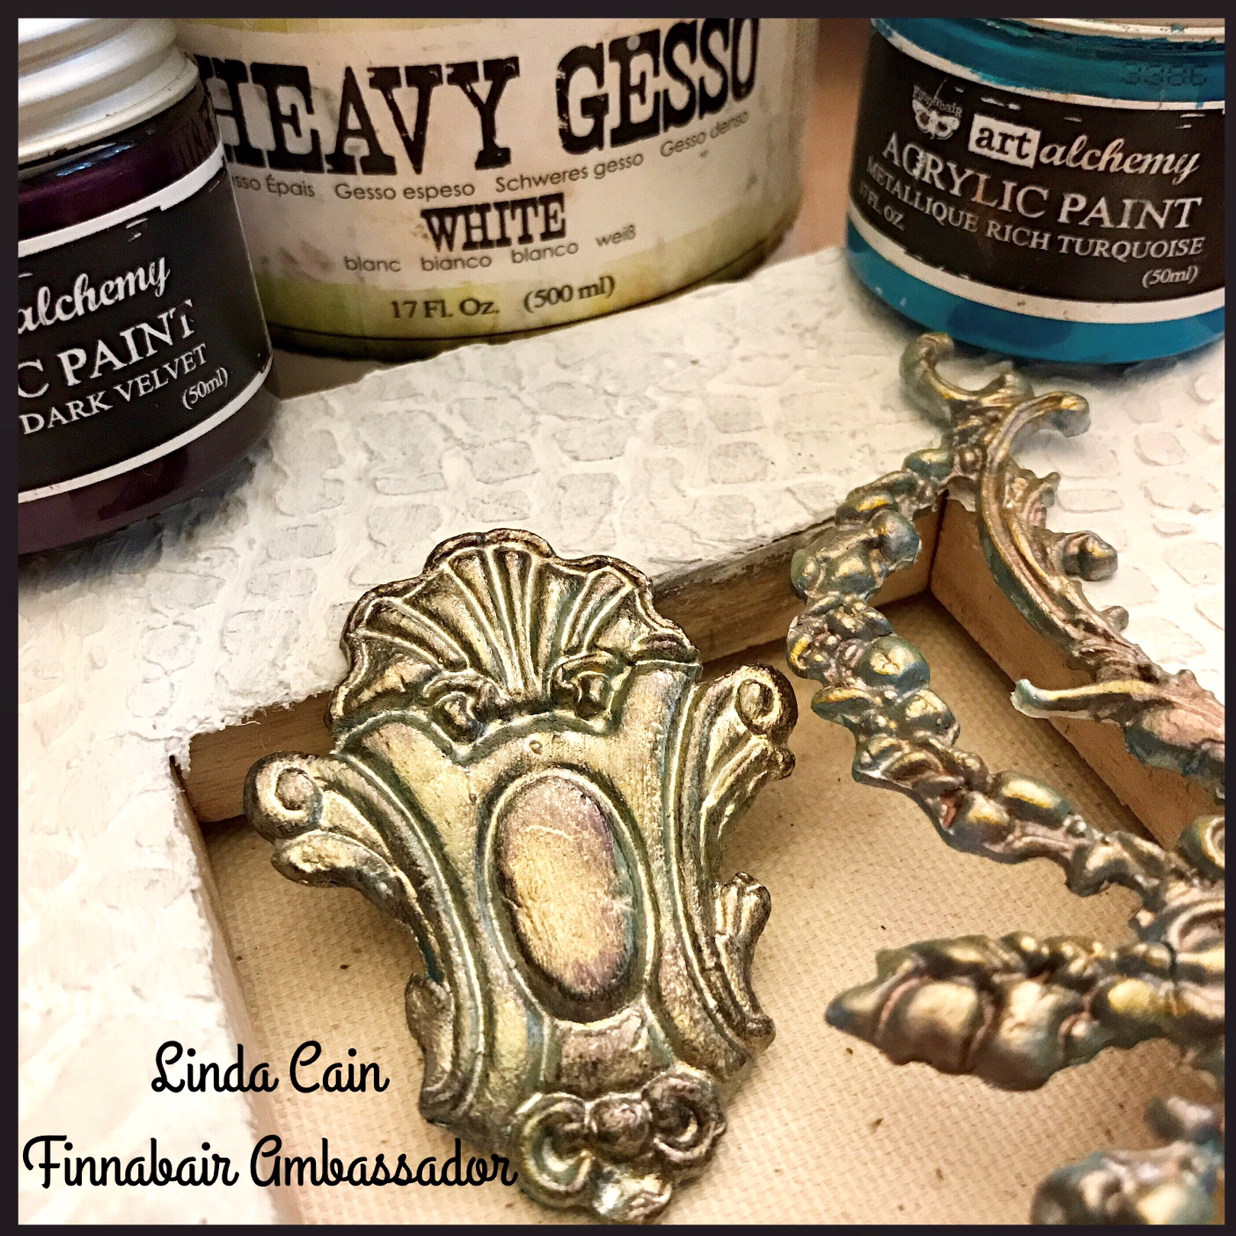
I coated the masonite door plate and flourish with White Gesso, and the vintage square nails with Black Gesso.

Then the masonite pieces were painted with blue and gold metalliques, and the nails had Opal Magics dusted on for color.


The tiny Tin Heart has 2 coats of White Gesso painted on before adding the 2 different colors of red Metalliques.


I wanted the Leaves #1 to stand out more, so I added the red paint that created the
3 spots of red for the project. The Mini Flower is layered with bits of ephemera.

I added Mechanicals and other metal found objects from my collection to adorn the shrine using Heavy Body Gel and 3D Matte Gel.


I stamped the side with the edge stamp from the Hello Pastel set using Jet Black Archival Ink.

The Large Flowers were cut to add trim on the sides and top of the shrine.


You can paint the Plated Label with Heavy Black Gesso and then remove some of the paint with a light sanding block to create a vintage look.

Here you see another Large Flower cut to fit under the shrine box. The nails have Pink/Blue and Yellow/Blue Opal Magics lightly painted on and small Gold Rush dots.


The tiny gold metal squares and Steampunk Blades with Mini Knobs give the piece a bit of shine to lighten up the whole piece.


As I said at the beginning, it's been a great journey with a lovely lady who has taught me so much, and just let me create whatever I wanted.

I am humbled and thankful to have been on this wonderful team.

Now, here's the GREAT NEWS!

I am thrilled to be in a new group called
Finnabair Brand Ambassadors.

See all the talented ladies on this team and find out all the details here.


Your Friend in ART...always,

Linda
Finnabair Products:
Vintage Collectibles
Opal Magics-Pink/Blue and Yellow/Blue

Retro Cafe Art Gallery Products:

Other Products:
Vintage Square Nails
Tiny Brass Flower
Rubons
6 Sided Brad

Friday, September 30, 2016

Tombstone ATC Challenge

Hi everybody! 
It's time to share my contribution to the 
Tombstone Challenge for

And I must say, these were the most fun to create of all the ones that 
I've done.

I've made a collage for you of the four tombstones
and a list with all the links to the supplies.

The Skellies are PERFECT to use on these 
Tombstone ATCs.


I created backgrounds....


with different clear crackle and then rubbed dark paint
into the cracks....


stamped images onto painted stands with archival ink....


painted black gesso onto charms and then added ArtAlchemy Paints....


 used my digital applicator, aka finger, to apply
Inka Gold waxes to a cameo....


 outlined several black mat board cut outs with a white pen,
 and added lots of white dots around the edges.


 The glass vial was filled with Violet Micro Beads and
a rub-on was added to the front.


So check out the links below, start making your list, and get busy
making some really fun and easy Tombstones to share
or keep for yourself.

Your Friend in ART,

Linda
Opal Magic-Yellow/Blue


Monday, September 19, 2016

Bloom Where You're Planted

Hi everyone, it's my turn again to share a fun project with all of you for the 
Finnabair Creative Team on
 Finnabair's Blog.

I really added lots of color here and love how this turned out. I see the Universe as the background and the Resin Flower symbolizing me trying to bloom where I've been planted. 


I like to start with a 6x6 inch canvas board. I made 2 decorative pieces using paper clay and an Iron Orchid Art Decor Mould Baroque 6 and glued them to the sides of the board. 

I used the Mechanica stencil with Modeling paste to add a background. Before it dries, I added Mini Art Stones in several areas. When it was dry, I painted everything with Heavy Black Gesso. Here you can see the beginning of the layers of texture of Rust Paste and ArtAlchemy Paints.


The Rust Paste adds the color and tiny granular texture to the stenciled area.  The Opal Magics and Metalliques add more color.


Each time you add the Opal Magics to the Black Gesso, you get an amazing metallic color. Darker Metalliques can be added to break up the edges.


This close-up lets you see the lightly brushed on paints.


I wanted to break up the darkness by adding white heavy body acrylic paint using a couple of small circular cups.


I coiled up some rusty wire as a base, but it needed to be painted in spots to make it stand out better on the darker background.


I gave the Art Pebbles 2 coats of Heavy White Gesso and the 3 different colors of gold ArtAlchemy paints. 


 Then I added some Steampunk Blades, Mini Knobs, Barn Stars, and the Pebbles with 3D Matte Gel.


The Prima Flower with Resin Face Babs was completely painted with Heavy White Gesso and the ArtAlchemy Paints. A mixture of Copper Glass Glitter and Copper Micro Beads are glued on with Soft Gloss Gel. 

I added more Mechanicals, the coiled wire, and some gauze under the Resin Face.  A few more Mini Art Stones and a several more colors of paint were lightly brushed onto many areas of the collage.


Just a note, I burned my fingerprint off when I  foolishly tried to move the gauze I'd laid down into hot glue, then pulled the hot glue off my finger along with all the layers of skin.....so heed my warning and use the glue gun carefully. Or just use Heavy Body Gel!

The Industrial Strength glue gun has been banished to the garage. The fingerprint is coming back, but I will never use that gun again. Low-temp is a bit safer. I need all the help I can get. 

Your Friend in ART,

Linda


P.S. For those in the USA that have been asking, the Rust Paste is back in STOCK at Retro Cafe Art Gallery

Friday, September 2, 2016

Embossed Metal Butterfly Shrine

Hi everyone, it's time for another project for 
and today I'm using the 
Large Divine Antiquity Shrine Kit.


I started by painting the large butterfly from Relics and Artifacts with Heavy Black Gesso.

Then I actually used a pick to roll or lay the Opal Magic paints onto the surface. The colors are brilliant and change with the direction of the light.

Dots were added with the paints as well as some Art Stones in the wing cavities.

The antennae were covered with micro beads I had strung on tiny wire and wrapped around. The ends have a larger tear-shaped crystal. Beads and glass glitter fill the body cavity and another bead creates the head.


I used metal foil tape. You can buy this at the hardware store in the duct work section. Craft companies have also sold it.

I use an embossing folder to make the pattern in the metal. You can see the shiny metal on the left, then the metal with the black gesso on it, and when nearly dry, you wipe it off leaving just the paint in the recessed areas.

The last step is on the right, where you can see I add Inka Gold waxes in layers to give some parts color.


Then the metal is cut into pieces resembling tiles to add to the front of the shrine.


The Gothic stencil was used on the inside of the shrine with Opal Magic paint.

Strips of the metal (not cut into tiles) were added to the outsides.


I painted the back of the shrine with the Opal Magics in  strips of color. Parts of  the front were completed with them, too.

When dry, you can stamp to your hearts content with Black Archival Inks. It shows up perfectly.


The base is stenciled with the Latticework stencil and Opal Magic paints of various colors.

I drilled a hole through the shrine for the butterfly to stand on and glued into place.


That's about it....you can glue it all together with a bit of white glue when you're happy with the sections.

Let us know what you think!

Your Friend in ART,

Linda

Products from Retro Cafe Art Gallery:

ArtAlchemy Paints Opal Magics - Aqua/Rose, Yellow/Blue, Blue/Gold, Violet/Green, Pink/Blue, Rose/ Gold, and Violet/Blue
Micro Beads - Copper
Stencil - Latticework and Gothic
Inka Gold - Hydrangea, Copper, Gold and Turquoise

Other Products Used:
Beads and Wire
Metal Foil Tape
Embossing Folders
Embossing Machine
Stamps
Jet Black Archival Ink