Wednesday, June 27, 2018

A Texture-Layered Tag

This is a collaboration of many of my favorite products.

And I love how it turned out.

It starts with a plain manila tag, some Plaster Texture paste and a stencil. The Rust Pastes and Metallique paints are added for color and contrast. It's then glued to a larger piece of white chipboard.

The Baked Texture embossing powders from Seth Apter are the next step. You're gonna love how these babies add texture and dimension to your projects.


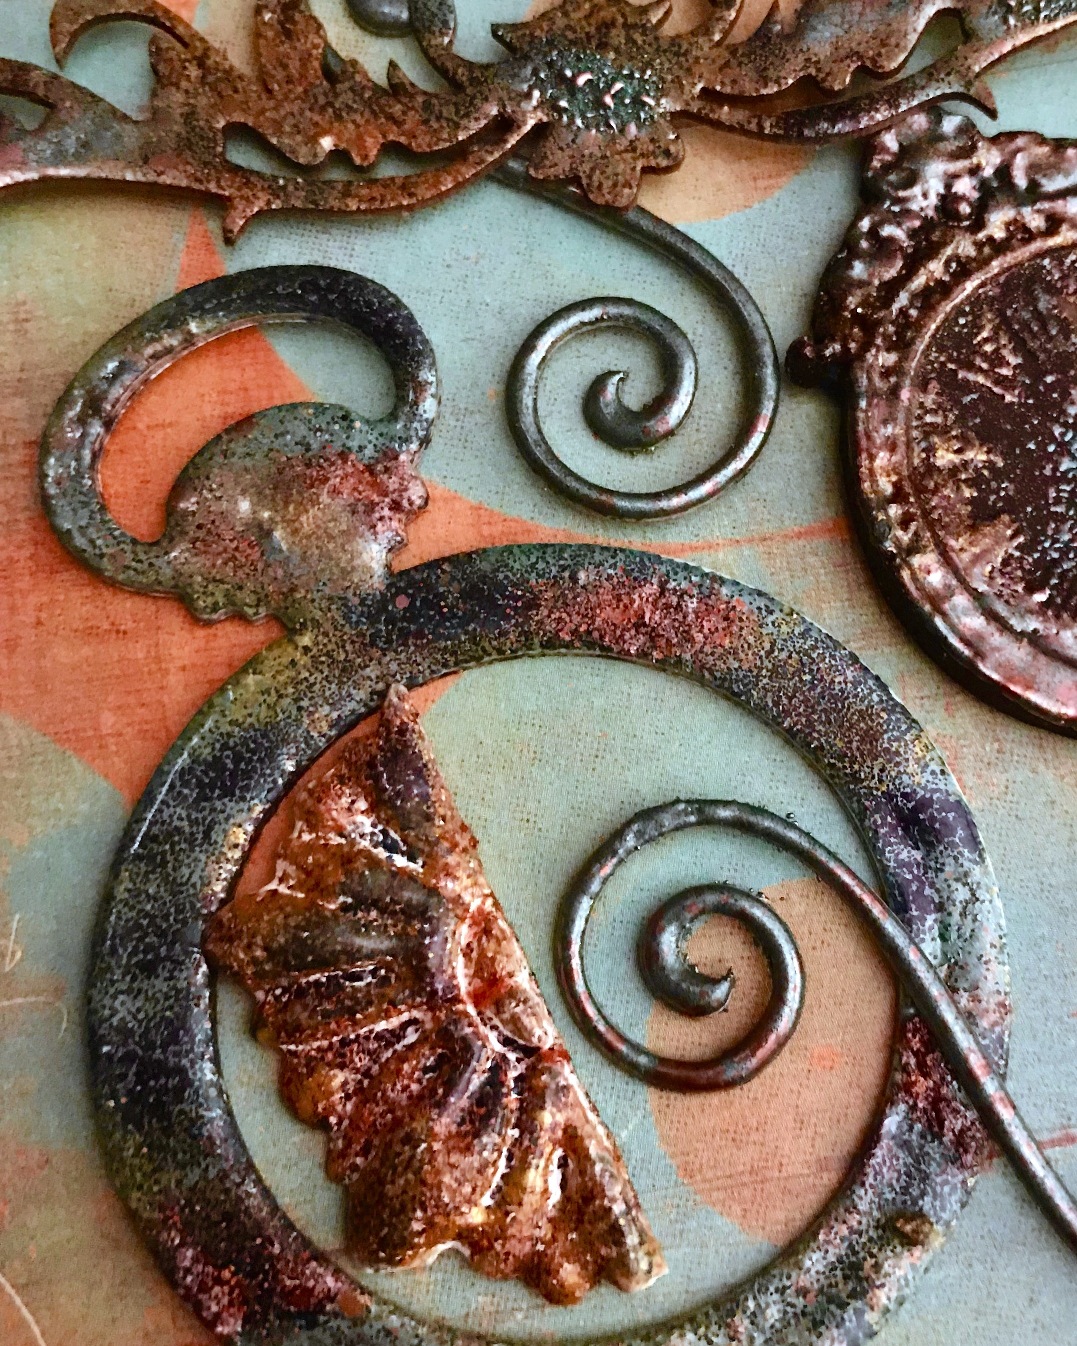
This is the center section of the tag showing the first layer of Plaster Paste and several layers of Rust Pastes and paints from Finnabair.


These are the paper clay wings made in a Prima silicone mold.


I used two colors to create these wings.


Now this was really fun! I added embossing ink to chipboard and paper clay pieces, then I sprinkled the gorgeous Baked Texture embossing powders
on them and heated.

VERY cool results with different heating times can be achieved.


The metal elements are Mechanicals from Finnabair and the vintage picture is
from Retro Cafe Art Gallery.

I had several clay pieces I made up from Iron Orchid Designs with different
paint combinations, and this beautiful red piece was perfect for the tag.


I hope you enjoyed this collection of products and will try out the different
ideas I touched on here.

Your Friend in ART,

Linda

Wednesday, June 20, 2018

Rediscovering Vintage Journals

Just a note to tell you how thrilled I was to have 2 of my new-found and uncompleted Art Journals published in the July/Aug issue of
Somerset Studio.

Years ago I made several journals of different sizes and shapes. Some I sold, and others were given as gifts. 

This one is a Barnes and Noble kraft-colored journal refill. It was only partly
decorated before I put it in a box with the other journal and placed them on a 
shelf.....years later I found them and decided to finish them.

Old and new elements are used to embellish the covers and backs. The Vintaj 
Brass pieces on the cover here and the Finnabair stars are always my favorite additions. The hand-dyed ribbon with luscious layers of colors from rich purple to brilliant orange is tied over the gold and black metallic trim. 


This small Zutter-made book also uses the linen-like papers with stamped images and a couple of Vinaj brass pieces. 

I've used white and black pen dots for a decade and added more to this one when I found the basic start. 

The trim and brass key was used to divide the two papers, and the black gems creates a little more contrast.


Sadly I didn't photograph this little book before I sent it off, so this is a picture
of the spread in the magazine.

All the products and instructions are in the magazine with many more pictures.

I hope you enjoy all the wonderful Artist's creations that were so brilliantly
displayed in this great publication. On newstands for you July 1st.

Your Friend in ART,

Linda

Friday, June 1, 2018

Turning a Project Around

Hi everyone!

This post is all about taking a project that you've put lots of time and effort into, only to see it ruined by a blotch of paint, a blob of glue, or other "can't fix this" misstep along the way. 

This started out on a 4x8" stretched canvas with lots of scrap papers, tissue paper, and stenciling for a background. It also was running the opposite direction with a stunning vintage lady on the right side where the metal turn is now. 

I had applied soft matte gel and then decided to spray some blue around her base. Well, long story short, it ruined the image of the lady and would not budge. That having been said, I ripped her off!!!

And the canvas then sat on my desk for weeks......usually I don't give up that easily, there's always a way to cover a mistake up, but in this instance, I pushed it aside. Rather gave up on it for a bit.


But then weeks later I decided to "turn this piece around."  Literally.  I added more tissue paper, some script and number stamps, a new vintage image, and we were off to the races!!!

I dug into my metal ephemera stash from picking my brother-in-laws garage years ago. I used this antique brass plate, and added a turn with a tiny number. Both pieces have Metallique Waxes on the high points to make them shine.

(If anyone knows the significance of the numbers on the plates that were nailed to a cabinet with many drawers, please let me know. We found no rhyme or reason to them.)


I wanted bright colors to offset the sepia-toned photo, so the butterflies took center stage. The Art Stones with various Metallique and Impasto paints got surrounded with a mixture of Micro Beads and Glass Glitter.

Shading brought the piece some dimension, and white splatters broke up the background just a bit.


I guess the lesson here is ~ never give up. Much like all events in life, there's usually a better day coming. Things will look different tomorrow. Hopefully you can take something that didn't quite work, and "turn it around" to create a whole new situation that makes you happy.

That's what I did here. That's what I hope you can do in your situations when life gives you lemons ~ you can make lemonade.

Be well and be good to each other.

Your Friend in ART,
Linda


Other Products Used: Butterfly Paper Cuts, Tim Holtz Vintage Paper Dolls, PaperArtsy Mini Stamps, Black Archival Ink, Tissue Papers, Washi Tape, Tom Bow Markers.