Thursday, February 14, 2019

Starlight Princess

Hi everyone! I think it's time for a few pictures and links from one of my new projects.

This is a 3x5' wooden plaque from from a craft store. I found them and picked up a few. They have backs like a canvas so they're easy to hang when you're done.

I was the lucky girl to get a rather large stash from Finnabair and Prima the other day, and I'd also ordered several of her new products from Retro Cafe Art Gallery, so I'll begin with a fun
little project here.

The new moulds were used to make the Princess, stars and flowers. I tried 3 different kinds of clays this week, so the stars are porcelain , flowers are paper clay, and I just got light weight stone clay today so I'll let you know about it.


I've never tried pouring resin, but I hear it works the best in these moulds according to several other people. I may give that a go next. 

I applied the tissue paper with matte get and added a few bubbles with at stencil and plaster paste.

When it was dry I added some of the new Liquid Acrylics, that I love, from Finnabair, and let them run and drip. A bit of white paint splatters and some waxes were the next step.


I glued the Princess and the flowers on after I painted and waxed them. The micro beads and glass glitter are used as filler.

The crown is a Mechanical Vintage Snowflake I cut apart, painted and waxed as well. It was glued on with 3D Matte Gel.

The waxes and a wash of umber paint created the gorgeous combination for the Princess. I was just lucky the way it turned out. The darker paint and wax went right where it should creating the shadows on her face and neck. 

I really love how that turned out.


So this is just a quick look at all the possibilities you could come up with using the new moulds, waxes and paints. So check them out at Kristin's shop -
Retro Cafe Art Gallery. And Finnabair has her shop as well in Ireland - Mixed Media Place. The links below are to both shops.

I hope you're inspired to play and have creative day. 

Your Friend in ART, 

Linda

Finnabair Moulds - Fairy Garden, Stars and Moons
Finnabair Antique Brilliance Wax - Firebird, Mint Sparkle, Peacock, Rich Copper, and Aged Brass
Finnabair Tissue Paper - Solar 
Finnabair Liquid Acrylics - Tiger Orange, Umber, Deep Turquoise 
Finnabair Micro Beads - Black, Copper
Finnabair Glass Glitter - Gold Rush
Finnabair Stencil - Bubbles
Finnabair - Plaster Paste
Finnabair Metallique Acryic Paints - Gold Rush, Brass Hardware, Rustic Brown
Finnabair Mechanicals - Vintage Snowflakes
Finnabair - Soft Matte Gel, 3D Matte Gel
Creative - Paperclay
Model Air - Porcelain Clay

White Acrylic Paint

Thursday, February 7, 2019

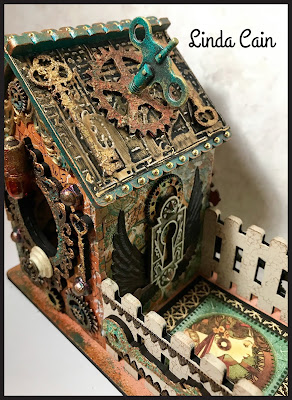
Steampunk Cottage House

When I started out in Mixed Media, the first thing I created was a wall hanging with houses. It is my blog header and reminds me every time I come here of where I began. 

So when Kristin decided to make these adorable ATC Cottage Houses from Retro Cafe Art Gallery, I was in heaven!!!


I couldn't possibly list all the colors or products for every layer I used here, but I'll do my best to lead you in the right direction. Please feel free to ask any questions, too.

So grab a cuppa or a glass of wine.....this is a long post, but it's been a while. Enjoy.

The embossed metal for the roof is from Ten Seconds Studio and it's a Tim Holtz embossing folder. The chipboard keys and plaques all around this piece are from RCAG.


 There were lots of chipboard and masonite cutouts with keys and gears using rust pastes from Finnabair and metallique paints.
The Keyhole and the Steampunk papers are from my stash of Graphic45 treasures. Always love their products. 
(Click on the links and you'll go to the general area for these products.)


This of course is an Ideology clock key from Tim Holtz with metallique paints. The keys and gear are RCAG. The roof comes off and here it's laying on the table while the railheads dry.


I hoarded these imitation vintage keyholes I found in an antique shop for years, and this was a great place to use one. It has a Finnabair rusty heart on top of the Label Pull Style Frame Cut-Out with rust pastes. The Dresden is rubbed with Art Alchemy waxes


The Clock Hand cut-outs from masonite are used here on the fence with rust pastes. The heart keys are also from masonite. The mini hardware knobs are from Finnabair. 


Lots and lots of things are from my ancient stash of stuff, like the little star, and all the gold nail heads that I wish I'd bought a million of since they are flat on the bottom and glue on easily.


Gears, gears, and more gears. They're from all over. Kristin carries all kinds from cut-out to copper, brass and silver mixes and much more. The link will get you started.


The black Dresden swan wings are stash I bought years ago, but Kristin has them in brown. How cool is that?!?! And the rusty skeleton key is here, too.


I probably love the clock key and nail heads the most.....


The vintage button on the ivory button are from a friend. I love the colors in the glass inserts. And you've gotta love the little lightbulb that's antiqued with alcohol inks and rust pastes.

The Clockhands are chipboard cut-outs that were trimmed down. 


This is a shot of the end before all the other embellishments were added to the roof. I used Baked Texture embossing powders from Seth Apter with a stamp and on the metal gear. They are amazing to work with. 


This is the chipboard gear with at least 6 or 7 different Rust Paste colors added. Fun.


And the amazing Baked Texture embossing powder Patina Oxide by Emerald Creek Craft Supplies is used here. All the background paints are from PaperArtsy. There is nothing like Fresco Paint when it comes to stamping on images. And the blending is just amazing. 


This is the beginning of the layout stage. I had to show you how beautiful the vintage button really is since I could not capture it in the other photos. I ran out of steam......


And these are the wonderful little metal mini stars from Finn with embossing powers.


Well, ladies and gentlemen, that's all I've got for today. I hope you are inspired to play and create your own little cottage. They hold ATC coins and cards perfectly, but take the roof off and you can put treasures or gifts inside, too.

I had a blast with this. Let me know what you think and as always, ask questions.

Your Friend in ART,

Linda