Tuesday, December 1, 2020

Trying to "Be In the Moment"

The Finnabair Ambassadors post is up and the theme was "Lush layers with Art Alchemy, papers, lace and a touch of frost." Pretty cool idea, eh?  I loved the idea. So here is my story and some thoughts along the way. Links and tips of course, as well.

Bill and I moved to a new place very close to the Mississippi River where he was raised. We find a kind on peace driving along the riverfront near us in the evening to watch the beautiful sunsets and check out the boat-launch area. We've seen deer roaming along the bike paths, 
coyotes running across the railroad tracks, kids catching frogs, barges and watercraft of all sorts, on our journeys. 

This trip I decided to grab some dried blossoms and twigs for my project.


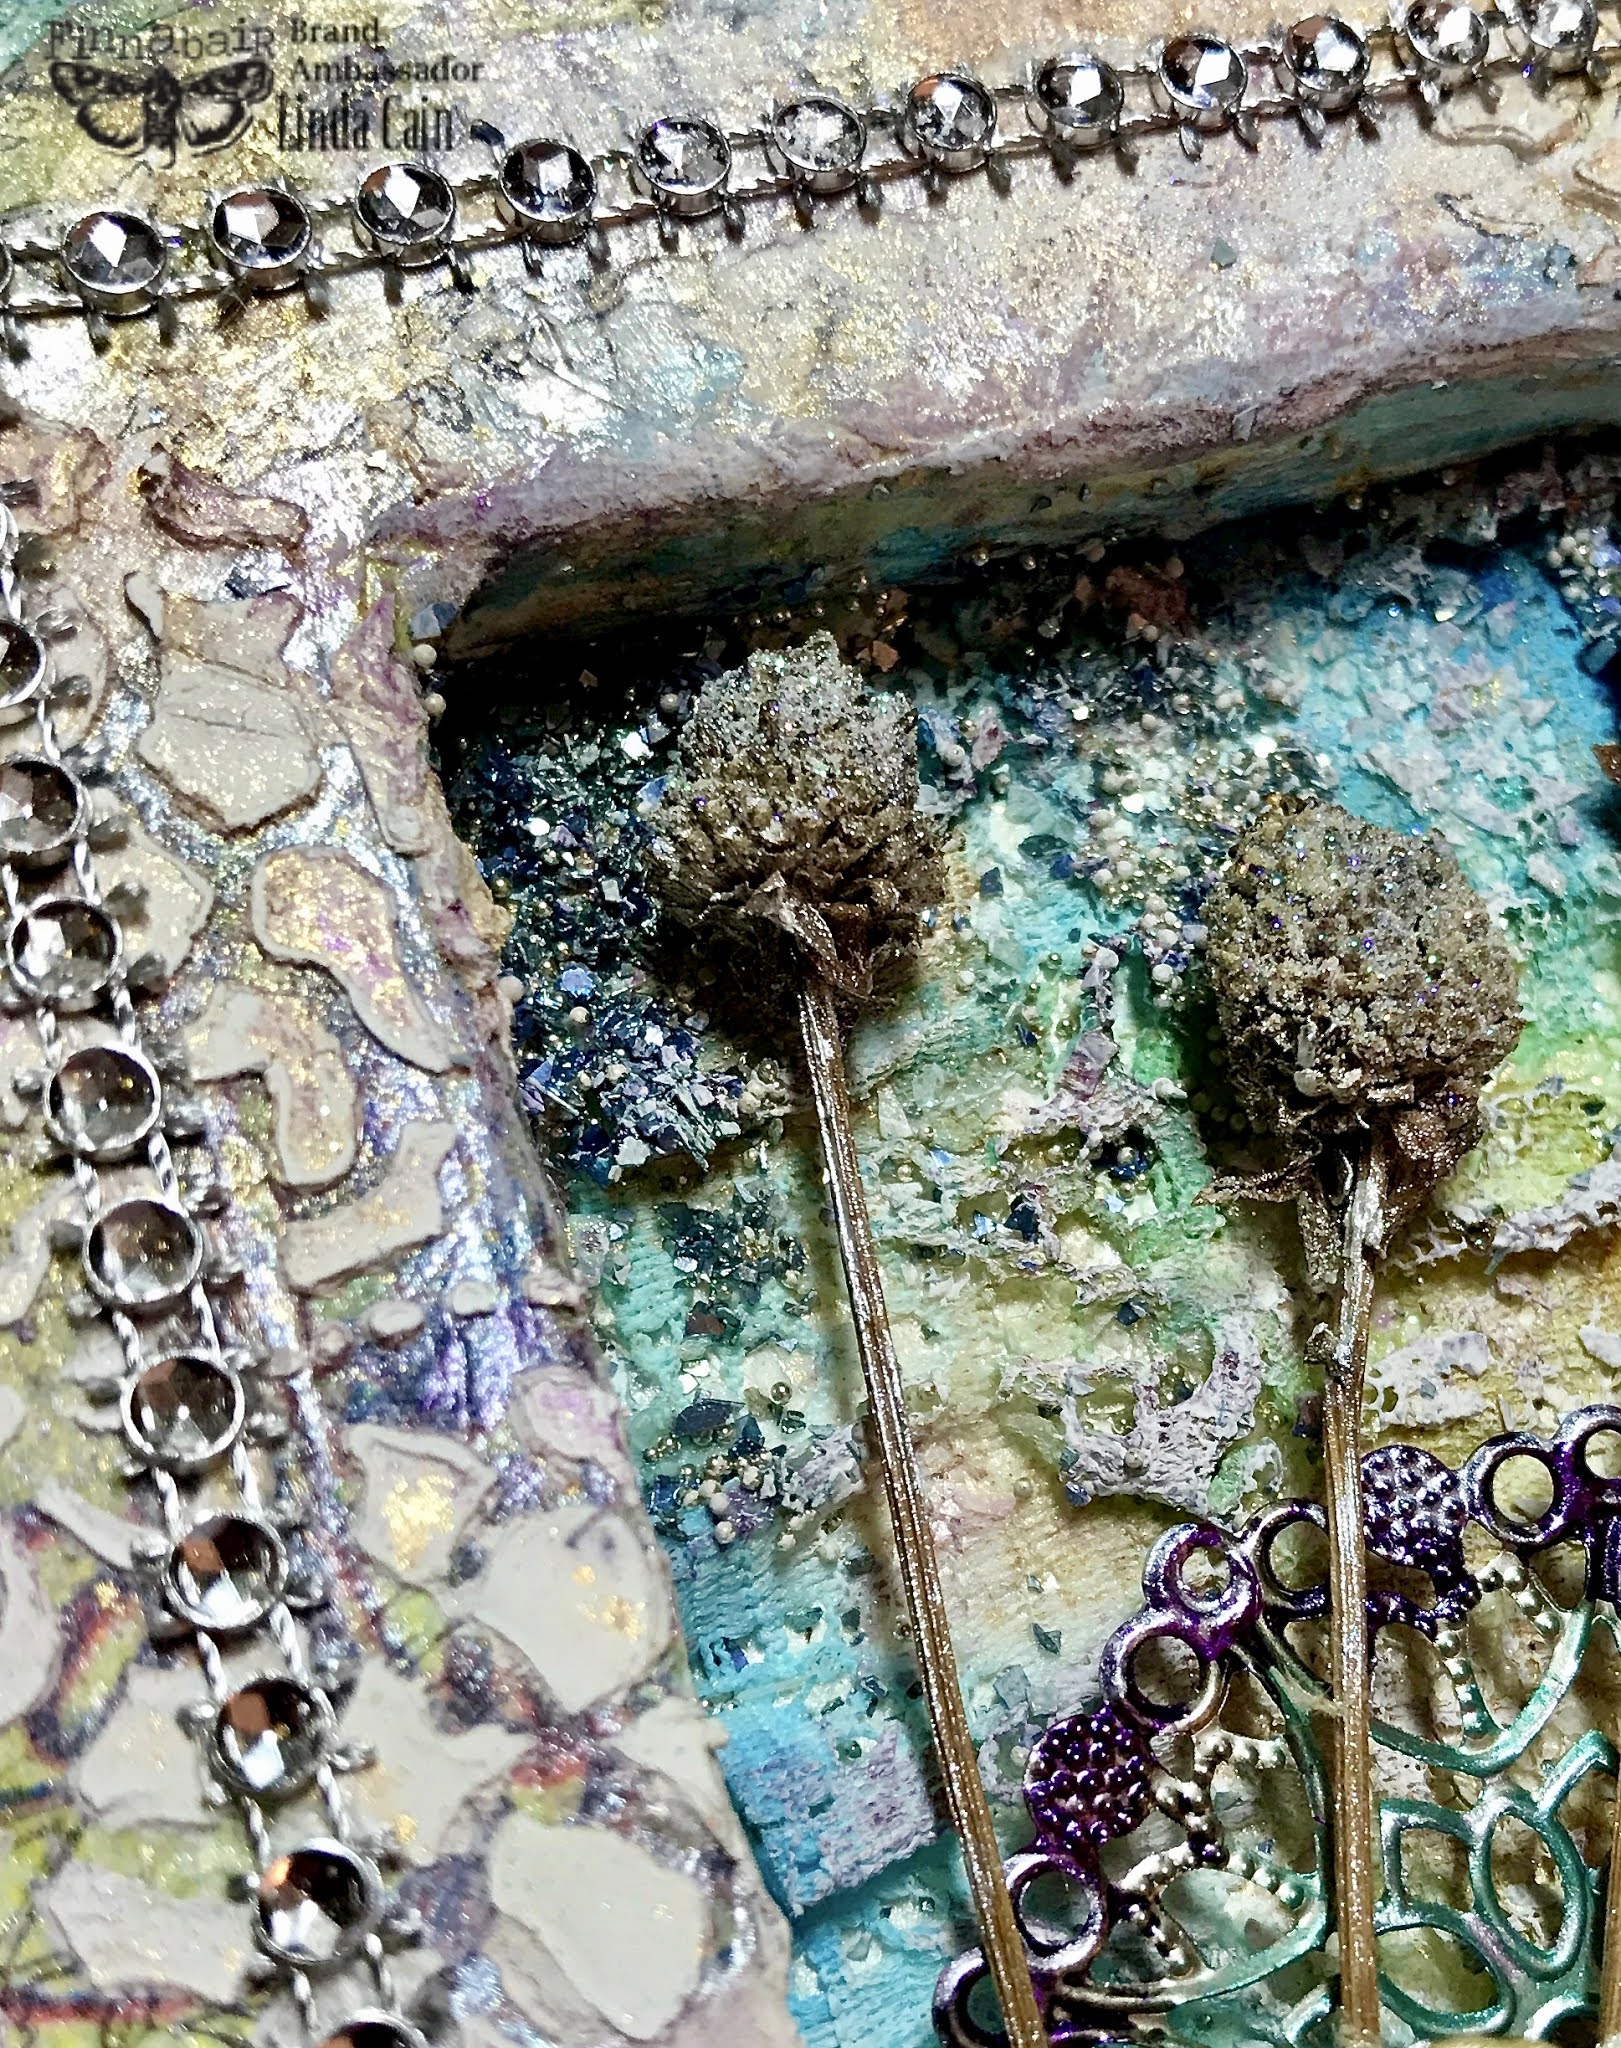
I started with a 5x7wrapped canvas using the back side with the hollow inset. I coated it with soft gloss gel and wrapped tissue paper all around the canvas area. Various scraps of torn papers were also added with the gel utilizing their bright colors. 


I sprayed the piece with a mixture of water and pale silver mica powder. When dry I added paper paste and the floral net stencil to sections. The next layer is with metallique paints and some stamped images.


In the center section I glued in layers of lace. When it was dry, I added more paints and a mixture of glass glitter and micro beads. 


The trim was glued in place with 3D matte and gloss gels as well as the antique label and cheesecloth. 

The casting is painted with white pearl metallique paint and accented with a wash of umber liquid acrylic paint. The paper flower is painted and adorned with more glass glitter and micro beads. 


I added Art Sugar, an extra fine glitter, to the buds of the wild flowers and some spray mica powders. 

The mechanical is also painted and it's all put together with the 3D matte gel. I was going to add several more mechanicals, but this time I went with "less is more" giving it a more simpler touch than I'm generally used to. 

I did have to add the silvery trim as the last layer just to add a bit more sparkle. 


That about does it. I hope you're inspired to get out your supplies and create something just for fun. 

Now, here's the great thing about being on Finnabair's Brand Ambassador's Team AND Retro Cafe Art Gallery's Team......YOU get to see links to both sites here! Finn loves RCAG, and RCAG loves Finn. So it's a win, win for everybody. Mixed Media Place is in Ireland, so if that works best for you, great. If Indiana, USA is closer to home....check out the links to Retro Cafe Art Gallery. I love them both. 

Links to Mixed Media Place - Finnabair's Site 

Finnabair Stencil-Floral Net -

Finnabair Tissue Paper- Musica 

Finnabair - Art Basics - Mixed Media Silicone Brush 1”

Finnabair Art Basics-Soft Gloss Ge

Finnabair Art Basics-3D Matte Gel 

Finnabair - Art Extravagance Paper Paste 

Finnabair Art Ingredients - Mica Powder Pale Silver 

Finnabair Art Ingredients - Glass Glitter- Pearl , Platinum

Finnabair Mechanicals - Antique Labels, Vintage Snowflakes

Finnabair Cling Stamps - Beautiful Story 

Finnabair Art Alchemy Paints- Liquid Acrylic Deep Turquoise , Tiger Orange, Umber 

Finnabair Art Alchemy Paints - White Pearl , Mermaid Teal, Amethyst

Finnabair Art Alchemy Paints-Sparks-Magical Pond 


Links to Retro Cafe Art Gallery-USA
Finnabair Tissue Paper-Musica
Finnabair Mould-Fairy Garden
Finnabair Soft Gloss Gel
Finnabair Soft Matte Gel
Finnabair Antique Labels
Finnabair Metallique Acrylic Paint-Mermaid TealWhite PearlAmethyst
Finnabair Liquid Acrylics-Tiger OrangeDeep TurquoiseUmber

Monday, October 19, 2020

My Witch Shall Have Wings

 Hi Friends in ART!

This has been a challenging time for us all. But we still need to roll up our sleeves and dig into our ART stashes to create projects that take us to a different plane. I finally got myself together, so to speak, and created a Halloween piece that was much needed therapy. 

I hope you have the time to play, create, and recharge your batteries by 
Creating ART.

This is a Medium Articulated Brush Doll that I changed the wings on to make her just a bit more diabolical looking. 

I used several different cut-outs from black chipboard and masonite. I painted the Spells and Engraved Pumpkins with different acrylic colors. The ferrule of the brush was painted with Amethyst metallique paint, and the German Dresden is glued on top with a heavy white glue. 

The really, really cool Witch Boot stickers were perfect for the bottom of the brush. Sadly they're no longer available that I am aware of. 


Here you see the painted handle of the brush. I used 2 colors of acrylic paint and added tiny German Dresden around the edge. The wonderful green glitter is used on the Steampunk Wings, and the spider has 2 colors of Sparks. I layered gold paint to one strip of the larger German Dresden. 

Use a White Pen to outline the Cat and Bats.


I used some heavy black paper to cut out the hat that had to fit over the rather large head of the Witch. She is actually a vintage graduation picture of a graduating class that is over 100 years old. (if I remember correctly) She needed to be "lightened up" a bit, in my opinion, so I added the black brad glasses. 

The 2 colors of black glitter are from Finnabair. I love her fine glitter. 


The Graphic45 Steampunk Spells paper was perfect for the bodice of the Witch. It's definitely one of my all-time favorite collections from G45. I always use Tombow pens to add shadows and more color.

A rhinestone and metal stud give the spider some dimension, and the black glaze dots around the body just add to the papers. Alcohol Inks can change the color of the brads. 


I gathered up some torn tulle and added a bit of a skirt to soften the look. The carved ivory skull brings you right back to the Halloween mood. 

Stamps were used to add the look of netted gloves and a checkered edge to the doll body.


So put it all together with a heavy white glue and you're done. Since there's a hole in the top of the paintbrush, you can easily hang this gal anywhere you want. I hang mine on the side of my shelf unit in my studio, or above a light switch would be a cool idea as well. 

I hope you're inspired just a little bit to create and play. I'm sorry I am posting this so late in the game, but there's always next year, right?!? Or just use your imagination and create a Christmas doll. 

Give it a go. It's always good to 
CREATE ART. 

Linda

Products Used from RCAG:

Other Products:
Witch Boots Stickers
Black Tulle
Graphic45 Steampunk Spells Paper
Colored Rhinestones
Black Glaze Pen and White Pen
Purple Acrylic Paint
Various Background Stamps and Black Archival Ink
Green Alcohol Ink

Thursday, July 2, 2020

Steampunk Bird for Ambassadors Post

Hi everyone! 
Well, its been a long time since I contibuted to the Finnabair Ambassadors blog, but it's finally getting somewhat settled here in the new house with my studio. Somewhat....so I jumped in this month to join the crew.

The theme was Steampunk using a Recycled or Repurposed product.  I used the wonderful computer parts that a friend gave me after her husband tore apart several computers. You'll see them throughout the piece in the eye, headdress, tail feathers, chain attachment and other curly little things. I used jewelry tools to curl the wires. 


The ornament comes with 2 layers. The solid back one is painted with black gesso. The top laser-cut piece starts with white gesso and then gets highlights of Mint and Jade impasto paints, and Emerald Fluid Acrylic paint from Finnabair. 

(You can see some of the pieces from the computer stash in the background.)


3D Matte Gel is a great glue when using heavy ephemera. Gears, buttons, numbers, clips, hearts and stars are laid out and glued onto the base. Rust Effects Paste, Metallique paints, and Sparks, add color and highlights to the pieces.


 You can see the difference in the above picture and this one after the pastes and paints are added.


The eye and head feathers can be noted here as some of the computer parts. 


Layer after layer of texture and paint create this wonderful feeling of rust and corrosion. The feather above the clock is an older element I created from a Vintaj piece of brass with embossing powders. Kinda cool....and now it's found a home.

The Game Spinners are used for the wing feathers. 


This detail shot shows more buttons, charms, snaps and computer parts as well as lots of gears in metal and masonite. 

The star, of course, is a Finnabair mechanical. Can never have too many stars. 

I added a piece of fishing line to the top watchkey holes and this beauty is now hanging in my studio window. Perfect. 


Finnabair has listed Retro Cafe Art Gallery as one of her distributors in the US, and so I'll list links here for them as well as other links for supplies you can get elsewhere. 
Hope that works fairly for everyone.

Be Safe and Be Well.

Your Friend in ART,

Linda

Finnabair Products Used:
Heavy Gesso - White, Black
Sparks Paint - Ginger Magic, Night Shadow
Patina Effects Pastes - Red Rust, Brass, Green, Blue, and Brown Rust
Metalliques Paint - Flame
Fluid Acrylics - Emerald 
Mechanicals - Mini Knobs, Mini Flowers, Mini Stars
3D Matte Gel
Impasto Paints - Mint and Jade

Retro Cafe Art Gallery Products:
Steampunk Layered Bird Ornament
12mm Fancy Gear Charms Silver and Brass
Silver Gear Mix
Tim Holtz Mini Gears

Tim Holtz - Game Spinners, Ring Fasteners, Swivel Clasps, and Hitch Fasteners

Various computer parts and other ephemera from my stash

Monday, June 29, 2020

Studio Time Tag and Footrest

 Since we've moved into the new house, I haven't had much time to create anything in my studio. I've spent most of the time finding things and sorting out drawers of product and treasures. 

Finally I think the chests are arranged and the pictures are hung.

I decided to create just a simple, one dimension tag with paints, stamps and pens.

Nothing fancy or elaborate.....Ha! As if I could know when to stop.

Here's the tag with PaperArtsy Fresco Paints and Lynne Perrella stamps. The finishing touches are with a white paint pen and a fine line black permanent ink pen.


Just lay down some paint on a large tag and then start stamping. The images aren't perfect, but I don't care. It felt good to be playing. 

This kept me busy for the afternoon and off the internet. A good day. 


This project was also fun. I've used and old "in box" turned upside down as a footrest since I have short legs. It helps to keep my legs level under my desk. Best for long episodes of working without being smart enough to get up and move periodically. Guilty.

This plain box was painted black and then stenciled with icing paste from Finnabair. The color is Fire Ruby that has hints of gold when the light shines just right. Amazing colors. 


The stencil is Dandelions from Finnabair.


I added some metal tape that I'd embossed using a Tim Holtz folder with black paint in the recessed areas. Now it's a bit more decorative and it kept me off the streets for a bit during the process. 

Good times again.


Be well and find time to do something you love every day. That saying hangs on my wall in the studio and I should remember to do just that....every day.

Your Friend in ART,
Linda

Thursday, June 11, 2020

A Chunky Steampunk ATC

Hi everyone, and welcome back to my neglected blog as a long-lost Design Team Member! 

I decided to get some Chunky Dimensional ATC kits from Retro Cafe Art Gallery, and play around. Here I have used the one that's .75" thick.

(All links are highlighted throughout so you can see them as you go. Just click the link.)


I also used the Limited Edition of Large Steampunk Gears and Steampunk Gears II, to load up on the ATC base. You can also see the Vintage Pocket Watch Key on the very top. 


I used a small lightbulb, a vintage bead, and a Finnabair Mechanical - Antique Label

TIP: Rub a bit of black gesso into the phrase to get it to stand out more. 


There are Steampunk Gears, Sprocket Gears, and Mini Gears on the bottom of the legs and around the ATC. 


This is a piece of Ten Seconds Studio turquoise metal that I embossed ages ago. I added several layers of Metallique paints to it on the raised areas. Mermaid Teal, Hazelnut, Brass Hardware, and Flame. The sides have embossed metal that's been painted as well. 


 If you haven't lost interest yet, I'll lead you through a few more steps now.

This is how I like to lay out things before I glue them together or paint. Just trying to get a design concept in mind. It's all subject to change, of course.


Unlike how I generally work with the Retro Cafe Art Gallery kits, this time I glued it all together first and then painted it with heavy black gesso. I added various colors of Patina Effects pastes, some Mini Art Stones and regular Art Stones.


These are a few of the supplies and a shot of the project with more layers of paints applied. 
I started with these Rust Pastes and built up with paints. (Blue, Mint Green, Red Rust, Brown Rust, and Brass.) 

Layers, layers, layers.


Next I started to think about the back of the ATC. Originally I was going to hang it on the wall, but with this piece of embossed metal I found in a collection, I decided I'd finally found a place for it. So I added more layers of paint to the images. (Brass Hardware and Flame Metalliques)


What's a Steampunk project without metal??? Since I have lots of gears hanging around, I decided to use some of Seth Apter's amazing Baked Texture powders on a couple. These are the coolest embossing powders to play with...IMHO. (Chunky Rust, AncientAmber and Patina Oxide)


Just couldn't leave the piece alone, so I added some more vintage ephemera and metal gears to the layout. Still not all glued down yet. Always a "walk-away and look" process. I'm slow, but deliberate. 

It looked like it had a bit too much Flame Metallique paint, so out came the darker colors and some darker paint layers. 


Then I decided it needed to be taller. So I found one of my favorite keys ever, the vintage pocket watch key, and then I thought it needed legs. Sooooooo, open the drawer of wooden pieces and the Unfinished Wood Spools looked more like pipes than anything, and the choice was made. I wanted a bit more pizazz so I opted with the Lime Peel with the Brass Hardware and Hazelnut. They're finished off with stamped images using black archival ink. 

A couple of more gears on the bottom of the Spools, and they were done. 


The last step was gluing it all together and hoping it still stands upright!!! It worked out well and it does stand up. One last look at the little guy. Hope you're inspired to play and enjoyed the journey as much as I did. 


As always, let me know what you think, or if you have any questions. I love to hear from you.

Check out the supplies at Retro Cafe Art and get your Steampunk on!

Be Safe. Stay Well. Love to all.

Linda

Thursday, February 20, 2020

Finally Another Project to Share

Oh, it's been so long since we chatted. So much water has gone under that bridge. After looking at houses for years in our old stomping ground, we fell into a deal where all the planets seem to have aligned. We've since sold our house and are nearly done building a new one 100 miles north in the small town Bill grew up in. So, in other words, we're going home. We're thrilled. However, packing away all my art supplies aka "happy crap" (my daughter's term) it became too hard to find time or supplies to create any reasonable art....until Finnabair , our friend Anna Dabrowska, came out with a new release that showed up just when I needed it. All these lovely products can be found at Retro Cafe Art in the States and Finn's site Mixed Media Place in Ireland.

This is almost exclusively done with Finnabair products. (and a bit of chipboard)


This is the wonderful goodie box I received from the lovely Finnabair. She has new matte waxes and the most gorgeous stencils. The beautiful decorative papers, aka tissue papers, are detailed and easy to work with. 


 I started with a house shaped chipboard piece that I painted with heavy white gesso. Then I used a UHU glue stick to add the tissue paper Notes and gently smooth it down. I trimmed the edges and rolled them to the back. This has the pretty red writing at the bottom .

Next I added Plaster Paste with the new Laurels stencil on the majority of the house. The antique staining is already part of the tissue paper and it looks gorgeous at this stage....I always hate to cover up backgrounds......


The next step when the plaster paste is dry is to add color with the Liquid Acrylics and a spritz of water to get them to run and blend. Just drop in the color, spritz, and let it move around. I added Old White Matte Wax, Rusty Brown and Charcoal Black to the edges and high points.

The Art Alchemy Liquid Acrylics here are Carmine, Tiger Orange, Deep Turquoise, and Umber


The girl was cut from the tissue paper and painted with acrylics on the back. Then she was glued to a smaller piece of chipboard that was painted with Mint Impasto Paint. I used stamps from Now is the Right Time and Dream On from Finnabair with black archival ink. The little lace stamp at the bottom is a long ago clear stamp from Finn.


The wings were cast using paper clay and the Wing and Locket silicone mould months ago and sealed with heavy black gesso. Then comes the magic adding the Patina Blue, Patina Green, and Old White Matte Waxes. When they're dry, add a bit to Brass Hardware Metallique paint for some highlights.

The Keys and Keyholes mould created the key, and the star is from the Stars and Moons mould. The Heart, from the Anabelle mould, is painted with Metallique Rusty Red paint and distressed with the White Matte Wax. 


This is how beautiful the Notes Decorative Paper really is. 


And this is a full shot of the Laurels Stencil. They are all truly gorgeously detailed.


Put it all together with a bit of 3D Matte Gel and layer it onto a piece of black chipboard. I think I've covered it all. It's been quite a while since I've written a blog post. If I've missed something, or you have any questions, don't hesitate to leave me a note and I'll try to answer it. 

Now I'll get back to all the wonderful things that have to be figured out to pack up and move to the new house.  Yesterday we put together 4 new bar stools and 2 lamps. Tomorrow it's a headboard.  Here's the latest outside picture, the door will be red and the Craftsman pillars white. My little Studio has the arched window! And soon we'll have some sod. (fingers crossed for early spring)


 Hopefully all the selecting colors and doorknobs are done. It's been exhausting, but fun none the less.

Be Well and Be Good to Each Other. 

Linda

Retro Cafe Design Team Member 
and
Finnabair Ambassador