Monday, August 12, 2019

A Halloween Cottage House

It's that's that time of year again....I know....it still feels like summer, but we always have to get a jump on the holiday creating, right?!?!

So off we go on a Halloween Cottage creation starting with a Retro Cafe Art Gallery ATC Cottage House. I've been trying to find inspiration, and I guess I just have to be patient and wait for it to hit me when it feels like it.

This took me a week to finally find what I was looking for in elements, and it just kept evolving.


I've had people ask how I start with the Masonite pieces from RCAG. So here I shared the 1st of the initial steps on this project. It's just how I do it. Do what works for you. 

                                1.  Base coat with gesso - here heavy black gesso
                                2.  Stipple on several colors of metallic paints  
                                3.  Stamp with embossing ink and embossing powder


I used several different sheets of Graphic45 papers and some Tim Holtz stamps to decorate the insides of the house.


The outside sections get more complex with cut outs, German Dresden, embossed metal and more.


Here are a few shots of the embellished sides as they are coming along.


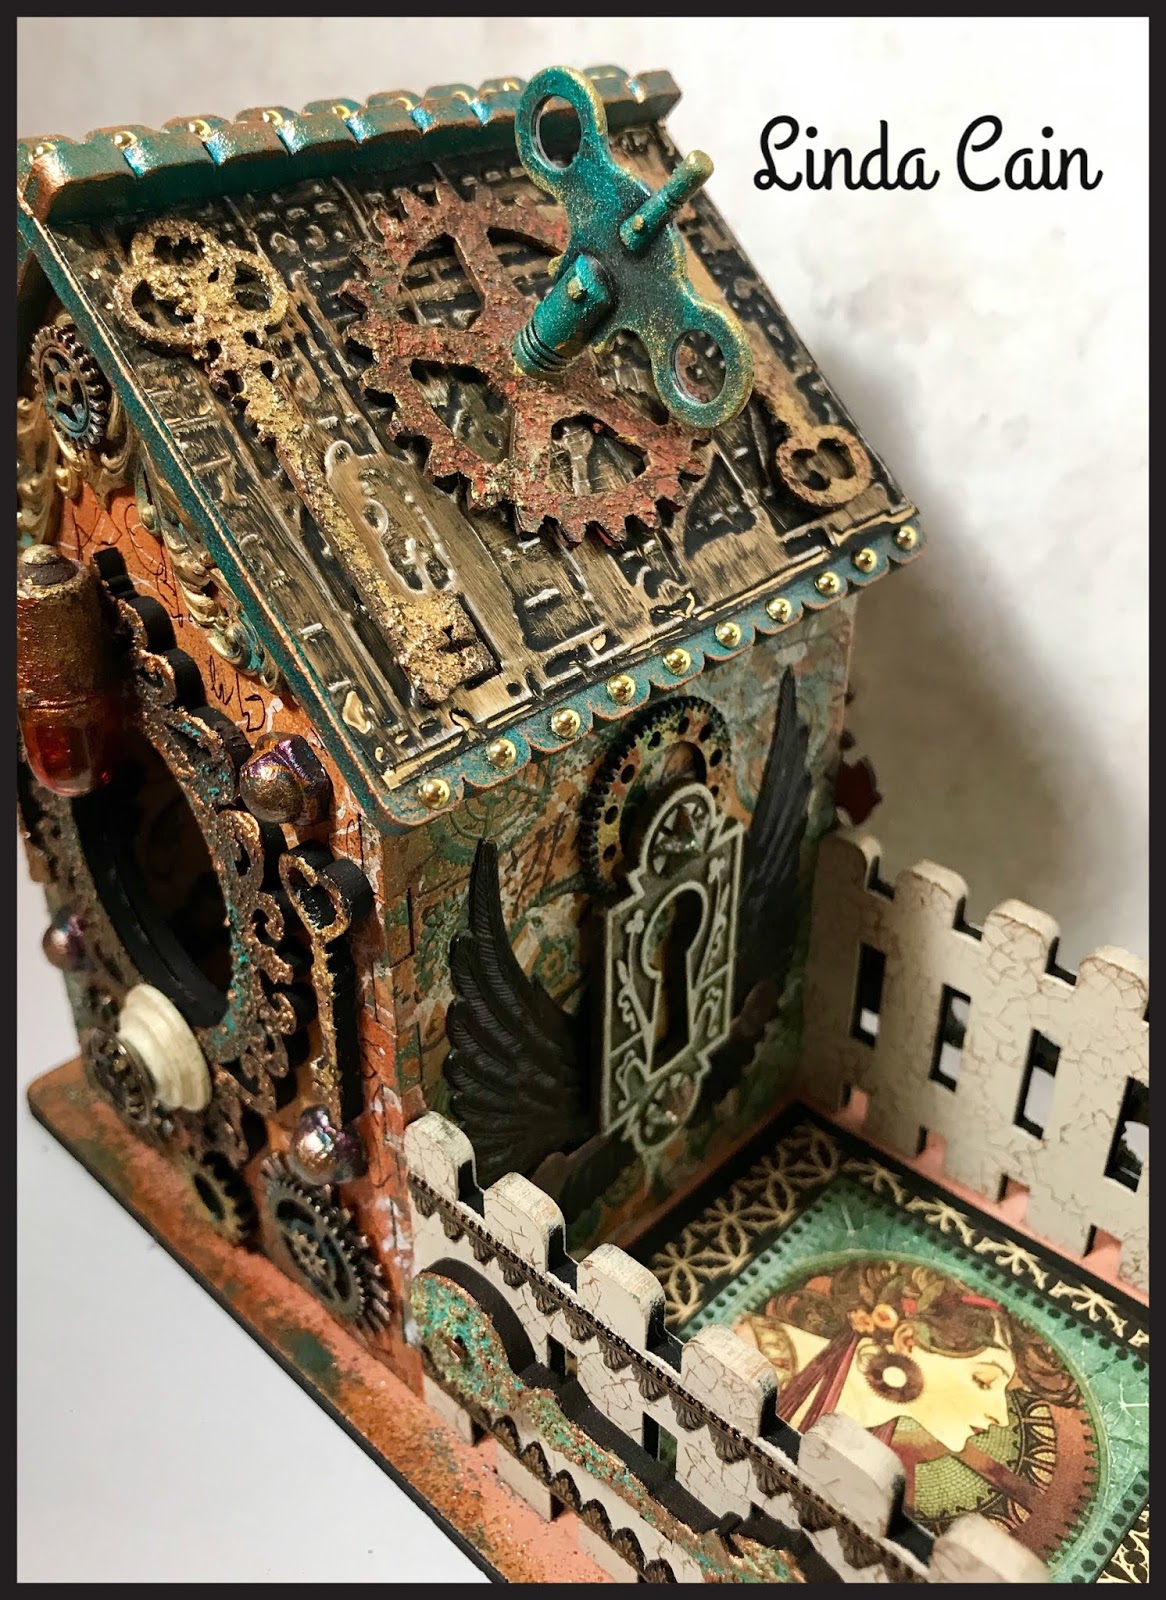
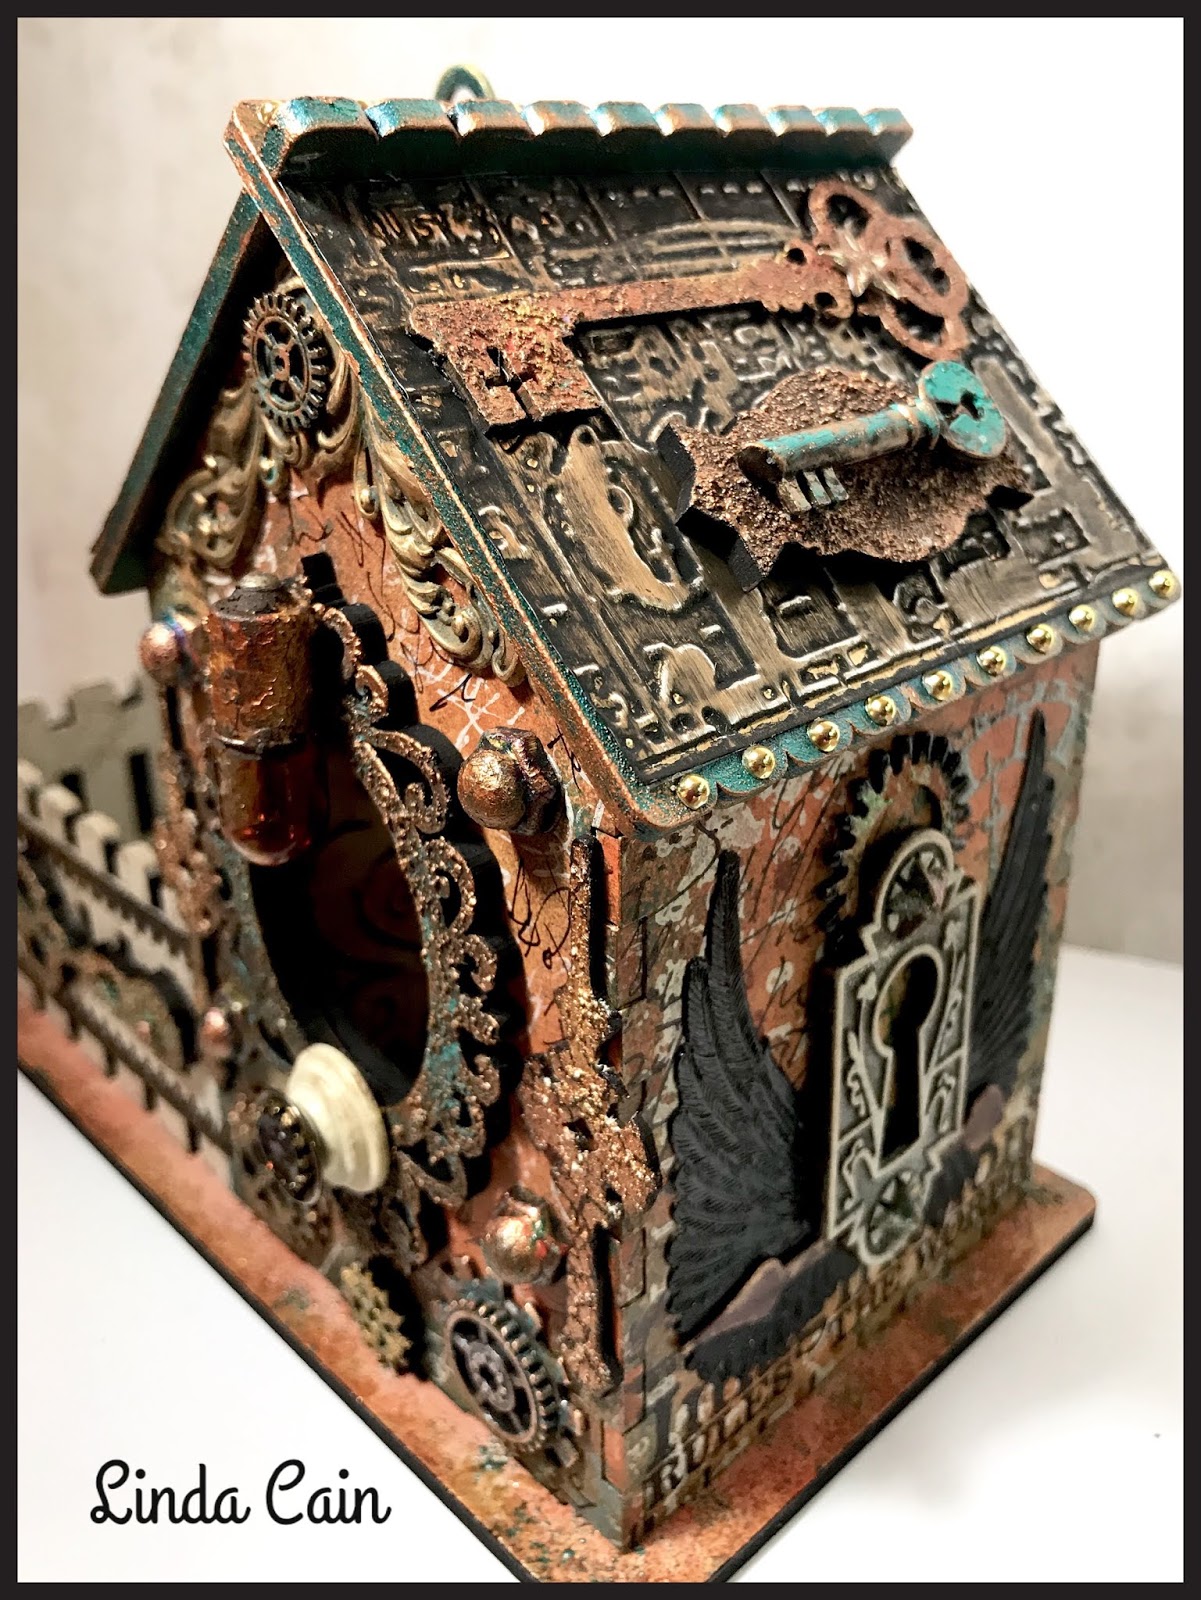
I always have a time with getting good pictures without glare when using metal, so concentrate on the roof here. It looks pretty good. 

The bats, ornate flourish, clock hand, and spider are all cut outs from RCAG. The Witch and Iron Fence top are die cuts from Sizzix. 

The roof is embossed metal strips that have 2 colors of paint added. The colorful paints are metatlliques from Finnabair and liquid pearls. 


The G45 papers are stamped, and the front has a spider web heat embossed with embossing powder. The spiders, cat on a fence, webs, engraved pumpkins, label pulls, and bat are from RCAG.

The window frames are painted with Amethyst metalique paint and the spiders are brightened up with coral reef. A Mini Knob makes for a great door knob.

Here area few shots with the roof off.


I wanted something dramatic on the fence posts, and I think you'll agree, skulls on a stake are what I would call a dramatic accent. Agreed??? These are beads I found a few years back on a fishing trip.

Anyway, Madame Macabre rounds out the inside courtyard all framed up in an extra window frame.  I scrounged up some Skull and Crossbones charms to add to the fenceposts. I've been saving them for just this occasion.

The engraved pumpkins on label pull frames are added with 3D Matte Gel.


Put it all together with a small amount of glue and I'd call it finished....but you never know. The courtyard was originally designed to place ATCs in - cards and coins, but let your imaginations go wild with ideas to hide or display your treasures.

That pretty much sums it up for this project. If you have any  questions, you can always find me on FB, Instagram and here. Check out all the links to the wonderful Retro Cafe Art Gallery shop. I enjoy being your Retro Cafe Art Gallery Design Team member and a Finnabair Ambassador.

I hope you've been inspired to play.

Your Friend in ART,
  Linda


RCAG Products Used : 

Finnabair/Metallique Paints - Coral ReefDragonfly, Amethyst, Gold Amber (new)
Finnabair - 3D Matte Gel

Other Products: 
Graphic45 Papers - Rare Oddities and others
Rocky Road - Emerald Creeks Embossing Powders/Seth Apter
Sizzix Die/ Tim Holtz - Witch and Iron Fence/On the Edge
Liquid Pearls/Ranger - various colors
Tim Holtz - Ideaology- Crossbones Skulls

Metal Tape 
White Sharpie, Black Archival Ink, Embossing Ink, Embossing Powders
Flat pearl, rusty wire, kabob skewers, hairy spiders black chipboard, Vagabond Machine

Friday, June 7, 2019

Overcoming the Evil Beast with Paint and Pen

 HELLO EVERYBODY! 

Do people still blog or even read blogs??? I don't know. Who has the time?!?!

Well, I must admit, I don't do a lot of creative things like I used to, but I still find time to play now and then. We've had quite year with a wedding and 3, yes 3, high school graduations! Now we're getting ready for a trip to Mt. Rushmore. The garden is in as well as I'm going to get it, and the rabbits and bugs are really enjoying it. Oh, well.....

Anyway, this is a piece of rapidograph paper from one of my forays into a different art medium. It is like watercolor paper, but has a bumpy look to it. (why, I don't know) But it has a wonderful texture already built in. The color is off-white, but not quite ivory. I'd liken it to old paper found in the pages the monks created, but that's just me. This is not up everyone's alley, but I really enjoy doing these. It's liberating.

I started with watered down Liquid Acrylics from Finnabair, then used several different black archival pens of all sorts to add the fine lines and doodles. I also used a white poster paint sharpie. I have always loved to do this type of project - as a telephone long distance operator (that's really aging me) I would be bored and doodle at the board resulting in a reprimand from the night supervisor. That and chewing gum didn't go over well with Velma. 


This shows you the puddles of color, some have been doodled on and some have not. It just gives you an idea of what is underneath the penwork. The Carmine was amazing when only slightly diluted here. I see a pattern of rust on the horizon.

The evil beast is gradually being pushed out and covered up with joy and happiness in the flow of colors and designs.....there ya go!


This is another area that has been worked on. The process could go on forever, but I chose to leave some of the larger background areas just as they were. The blended colors of the liquid acrylics was really amazing. 

As a watercolor artist, I enjoyed this type of work. The difference here is the acrylics LOOK like water colors, but when dry are permanent and will not affect your white pen-work by soaking up the color. You can see this in the Carmine color on the left with the textured paper. I used Tombow pens here and there, but most all of the color is from the paints.


You can find these fun paints at Retro Cafe Art Gallery and I'm positive they will be just as wonderful on watercolor paper since I've used them there in the past. They are really concentrated and highly pigmented paints that do not lose their richness with water. AND the best thing...right now they're ON SALE at 30% OFF!!!

Finnabair Liquid Acrylics Used:

Your Friend in ART, 
Linda

Monday, March 18, 2019

Door Plate Wall Plaque or Scarf Hanger ?!?!

Hi everybody, you're probably wondering just what this is. Well, I originally thought it would be a great idea for hanging your necklaces or scarves. You know, hang it by your jewelry armoire or on a narrow bedroom wall.....I don't know. 

Anyway, I just wanted to use the door plates and the wooden knobs from Retro Cafe Art Gallery with the clay moulds to create a plaque or wall hanging, and this is what it morphed into. So, call it what you want. I found it very fun to create, and hope you enjoyed the journey on FB and IG with stages of the design.


Here we go. I started with a 7 3/4"square wooden canvas frame. It's nice and sturdy, unlike canvases, when it comes to gluing on heavy objects. I base coated it with buttercream acrylic paint and some Inky Pool Fresco Paint on the edges Then I used soft Matte gel to glue it to all sides of the base. You can add pieces of torn tissued paper any way you like and seal with the gel on top. 

I created some clay pieces using the Curio Knobs mould and modeling material,  then glued them to the wooden knobs while still wet with 3D matte gel. 


Next I bought out the Icing Pastes and stencils. Here is the new Vintage Gold and Rose Gold pastes with the Tapestry and Bubble stencils. 


Now, live and learn. I found the crackle paste adheres best with a gesso primer. Duh. Imagine scraping off all the crackle when you realize you should've added the black gesso first. Anyway, when it was dry, I made keyhole moulded pieces and glued onto the plates after they'd dried a bit. 


Turned out pretty cool, if I do say so.


Now some more elements. These were my experiments for color. The watered down Umber made a wonderful vintage glaze here. 


I used the same glaze on these and then added Metallique paints. 


You can see all 3 keyholes here and the 3 knobs I chose to use in the background all painted up and ready to finish with some color.


The knobs and the frames were painted with Metallique paints and waxes. 


This is just another combination of paints you could use. I used liquid acrylic here and it turned out amazing. The possibilities are endless. The frames were painted with 3 shades of gold paint and edged with some black archival ink. The Emerald looks blue in the bottle, but it's the gorgeous green on the knob. 


I splattered some buttercream acrylic paint in spots to break up the color and added white dots to the frames with a gel pen.


I added bits of ephemera, the Mini Knobs on the door plates, and Brad Screws on the Rusty Label that I enhanced with Metallique paints. You could use different colors of metallic Crackle Paste like Platinum or Copper that would be really fun, too. Imagine!


It's all put together with 3D Matte Gel and set to dry. That stuff is AMAZING. 

I think that's it. I don't think I can bore you any longer, but if you have any questions or comments, just let me know and I'll get back to you. Be sure to check out the links below for supplies at

Your Friend in ART,

Linda

Retro Cafe Art Gallery - Escutcheon door plate frame- 1, 2 and 3
RCAG - Wooden knobs
Finnabair - Tissue Paper-Musica
Finnabair - Liquid Acrylics - Tiger Orange, Umber, Emerald
Finnabair - MĂ©tallique Paints - Brass Hardware, Steampunk Copper, Gold Rush, Mermaid Teal
                             - Opal Magic Paint - Violet/Green
Finnabair Stencil - Tapestry
Finnabiar - White Crackle Texture Paste (platinum paste in stock here)
Finnabair - Soft matte gel
Finnabair - Mechanicals-Rusty Labels
Finnabair - 3D matte gel
Prima Art Decor Mould - Key Holes, and Curio Trinkets
Iron Orchid Designs Mould - Keyholes
ReDesign with Prima - Modeling Material
Finnabair - Icing paste - Vintage Gold and Rose Gold (also add mica powders to modeling paste here)
Finnabair - Heavy Gesso - white and black
Finnabair Vintage Trinkets - Sunrise Sunset Mini Brad Screws (or use Mini Hardware here)
Finnabair Mechanicals - Mini Knobs (or use new Hardware Accents here)
Tim Holtz Layering Stencil - Bubble

7 3/4” square wooden canvas from Michael's
Palette knife
Buttercream acrylic paint

Thursday, March 7, 2019

An Ornate Fairy Box

Hello everybody, and welcome to my blog. It's been a really amazing time here in my Studio with all kinds of new products, and old friends I haven't worked with, combined into a fun project that's really pretty easy to accomplish. No heavy lifting, just simple paint and stamp instructions. 

So let's get started!

This is an oldie but goodie Ornate ATC Fairy Box Kit from


Just a few tips here; I always base-coat my kits. Here I used Heavy White Gesso. They're laser-cut Masonite that come flat. You can paint, stamp, paper, whatever you want, and then glue them together. 

These are just a few of the main stamps I used from Finnabair. LOVE them.


Here are the insides of the box all painted up with PaperArtsy Fresco Chalk Paints and stamped with black archival ink. You have to try these great paints to see how wonderful they are to stamp on...nothing like them. 

The inside stamping is with Dare to Dream and Old Paperwork stamp collections.


Here it is all glued together with a small bit of glue, and the great Antique Label is glued in place with 3D Matte Gel. The Hardware Accents added a bit of "shine" that I like to incorporate into my pieces. You can see several more of them in front of the box. Always a bit of metal.....


This was my favorite color combination on the box. The Dragonfly and Butterfly really stand out on the Haystack yellow paint, but the Lavender and Beach Hut make for beautiful contrast. Your colors are always more vibrant and brighter when painted onto a white background. 

(That's Finnabair peeking out from between the butterflies on her new stamp...gorgeous)


Metallic waxes are perfect for adding or changing the color of so many things. Here on the Antique Brass feet, I used Rich Copper, but you could try any number of colors to enhance the metal.


The precise images created by these stamps are wonderful. I love script of any kind. And of course, ART is the ANSWER, just says it all on the antiqued label.


I hope you've enjoyed the post and the tips. Check out the links below, and as always, feel free to leave a comment or question and I promise to get back to you.

Your Friend in ART,

Linda

Products used:
Retro Cafe Art Gallery - Ornate ATC Fairy Box Kit
Finnabair Stamp Collections - Dare to Dream, Wild and Free, Old Paperwork
Finnabair Mechanicals - Hardware Accents, Antique Labels 
Finnabair - Rich Copper Metallique Wax 
Finnabair/Art Basics - 3D Matte Gel
PaperArtsy Fresco Chalk Paints - Haystack, Smoked Paprika, Lavender, Beach Hut, Inky Pool, Baltic Blue
Ranger - Archival Ink Jet Black
White Acrylic Paint or Heavy White Gesso

The Feet I used here are out of stock but you could use Antique Silver Box Feet or Antique Brass Rose Box Feet and add metallic paint or wax to create any color you like. 

Thursday, February 14, 2019

Starlight Princess

Hi everyone! I think it's time for a few pictures and links from one of my new projects.

This is a 3x5' wooden plaque from from a craft store. I found them and picked up a few. They have backs like a canvas so they're easy to hang when you're done.

I was the lucky girl to get a rather large stash from Finnabair and Prima the other day, and I'd also ordered several of her new products from Retro Cafe Art Gallery, so I'll begin with a fun
little project here.

The new moulds were used to make the Princess, stars and flowers. I tried 3 different kinds of clays this week, so the stars are porcelain , flowers are paper clay, and I just got light weight stone clay today so I'll let you know about it.


I've never tried pouring resin, but I hear it works the best in these moulds according to several other people. I may give that a go next. 

I applied the tissue paper with matte get and added a few bubbles with at stencil and plaster paste.

When it was dry I added some of the new Liquid Acrylics, that I love, from Finnabair, and let them run and drip. A bit of white paint splatters and some waxes were the next step.


I glued the Princess and the flowers on after I painted and waxed them. The micro beads and glass glitter are used as filler.

The crown is a Mechanical Vintage Snowflake I cut apart, painted and waxed as well. It was glued on with 3D Matte Gel.

The waxes and a wash of umber paint created the gorgeous combination for the Princess. I was just lucky the way it turned out. The darker paint and wax went right where it should creating the shadows on her face and neck. 

I really love how that turned out.


So this is just a quick look at all the possibilities you could come up with using the new moulds, waxes and paints. So check them out at Kristin's shop -
Retro Cafe Art Gallery. And Finnabair has her shop as well in Ireland - Mixed Media Place. The links below are to both shops.

I hope you're inspired to play and have creative day. 

Your Friend in ART, 

Linda

Finnabair Moulds - Fairy Garden, Stars and Moons
Finnabair Antique Brilliance Wax - Firebird, Mint Sparkle, Peacock, Rich Copper, and Aged Brass
Finnabair Tissue Paper - Solar 
Finnabair Liquid Acrylics - Tiger Orange, Umber, Deep Turquoise 
Finnabair Micro Beads - Black, Copper
Finnabair Glass Glitter - Gold Rush
Finnabair Stencil - Bubbles
Finnabair - Plaster Paste
Finnabair Metallique Acryic Paints - Gold Rush, Brass Hardware, Rustic Brown
Finnabair Mechanicals - Vintage Snowflakes
Finnabair - Soft Matte Gel, 3D Matte Gel
Creative - Paperclay
Model Air - Porcelain Clay

White Acrylic Paint

Thursday, February 7, 2019

Steampunk Cottage House

When I started out in Mixed Media, the first thing I created was a wall hanging with houses. It is my blog header and reminds me every time I come here of where I began. 

So when Kristin decided to make these adorable ATC Cottage Houses from Retro Cafe Art Gallery, I was in heaven!!!


I couldn't possibly list all the colors or products for every layer I used here, but I'll do my best to lead you in the right direction. Please feel free to ask any questions, too.

So grab a cuppa or a glass of wine.....this is a long post, but it's been a while. Enjoy.

The embossed metal for the roof is from Ten Seconds Studio and it's a Tim Holtz embossing folder. The chipboard keys and plaques all around this piece are from RCAG.


 There were lots of chipboard and masonite cutouts with keys and gears using rust pastes from Finnabair and metallique paints.
The Keyhole and the Steampunk papers are from my stash of Graphic45 treasures. Always love their products. 
(Click on the links and you'll go to the general area for these products.)


This of course is an Ideology clock key from Tim Holtz with metallique paints. The keys and gear are RCAG. The roof comes off and here it's laying on the table while the railheads dry.


I hoarded these imitation vintage keyholes I found in an antique shop for years, and this was a great place to use one. It has a Finnabair rusty heart on top of the Label Pull Style Frame Cut-Out with rust pastes. The Dresden is rubbed with Art Alchemy waxes


The Clock Hand cut-outs from masonite are used here on the fence with rust pastes. The heart keys are also from masonite. The mini hardware knobs are from Finnabair. 


Lots and lots of things are from my ancient stash of stuff, like the little star, and all the gold nail heads that I wish I'd bought a million of since they are flat on the bottom and glue on easily.


Gears, gears, and more gears. They're from all over. Kristin carries all kinds from cut-out to copper, brass and silver mixes and much more. The link will get you started.


The black Dresden swan wings are stash I bought years ago, but Kristin has them in brown. How cool is that?!?! And the rusty skeleton key is here, too.


I probably love the clock key and nail heads the most.....


The vintage button on the ivory button are from a friend. I love the colors in the glass inserts. And you've gotta love the little lightbulb that's antiqued with alcohol inks and rust pastes.

The Clockhands are chipboard cut-outs that were trimmed down. 


This is a shot of the end before all the other embellishments were added to the roof. I used Baked Texture embossing powders from Seth Apter with a stamp and on the metal gear. They are amazing to work with. 


This is the chipboard gear with at least 6 or 7 different Rust Paste colors added. Fun.


And the amazing Baked Texture embossing powder Patina Oxide by Emerald Creek Craft Supplies is used here. All the background paints are from PaperArtsy. There is nothing like Fresco Paint when it comes to stamping on images. And the blending is just amazing. 


This is the beginning of the layout stage. I had to show you how beautiful the vintage button really is since I could not capture it in the other photos. I ran out of steam......


And these are the wonderful little metal mini stars from Finn with embossing powers.


Well, ladies and gentlemen, that's all I've got for today. I hope you are inspired to play and create your own little cottage. They hold ATC coins and cards perfectly, but take the roof off and you can put treasures or gifts inside, too.

I had a blast with this. Let me know what you think and as always, ask questions.

Your Friend in ART,

Linda

Friday, January 25, 2019

A Vintage Canvas Finally Done...

This piece has finally come together. It was pleasing to my eye, but dark, and "just needed something more.” It sat on my desk for weeks calling to me, and it finally hit me. I mull things over and over; I’m very slow to create. It drives me crazy but it’s who I am.

Here are a few of the shots I took along the way. 


When you use metallic paints, it is very hard to get a good photograph without total glare, so these are the best I could come up with. The edges are the great Rocky Road Baked Texture embossing powders. These are so cool! A brilliant product.


The little bottle is painted and crackled. It looks old, but it isn't of course. However, the key and the keyhole are vintage finds. The little chipboard squares are painted and then have Baked Texture Embossing Powders on them from Seth Apter.

The other metal elements are from Finnabair and her Mechanicals line.


This is a shot before I added the White Gold Metallique wax, and a few other colors, to the piece. It gave the metal elements a bit more contrast and shine. I think this is what I was waiting for. I always go for the contrast. I love how the dragon fly landed on the locket.


 The Platinum Texture Paste - Antique Silver was slathered onto the 8x8 canvas board and left to dry overnight. The thicker the paste, the larger the cracks. That's the secret to the great crackle. IMHO. This is a closeup of a small section. After it dries, I add paints and embossing powders,


A few months back, I was thrilled to get some of Seth Apter's new Baked Texture Embossing Powders. This shows you a plain piece of ruler from Finnabair that has been inked, stamped and then covered with the Vintage Beeswax. Pretty cool! 


I hope you enjoyed this little walk-through. It always takes me a long time to become satisfied with a piece. I look at it; walk away; come back and move things around; walk away again; sleep on it; and hope for an epiphany!!!

Sometimes it works, and sometimes it doesn't, but this time I'm glad I kept coming back. Let me know what you think.

Your Friend in ART,
Linda