Showing posts with label Julie Balzer. Show all posts

Thursday, May 10, 2012

New Distress Inks From Tim-Can You Keep a Secret?

I recently got my new Spring Seasonal Distress pads from Inspiration Emporium!

Now I LOVE, LOVE, LOVE the Peacock Feathers....it's right up my ally....but I wasn't so sure about the other 2  colors....until I put them on a tag.

And YES, they are SUPER!!!! The Squeezed Lemonade is wonderful for that spot of "light" that you need to give contrast to your other colors.

And the Shaded Lilac, well it just speaks for itself....SEE BELOW....


Here's the "Can You Keep a Secret" part of the post.

This is going on my Grandson Alex's Graduation card.....and he, I'm sure, doesn't read my blog, so I'm pretty sure he won't see it.

And I'm positive he wouldn't care anyway!

So here's a little tutorial on the process...


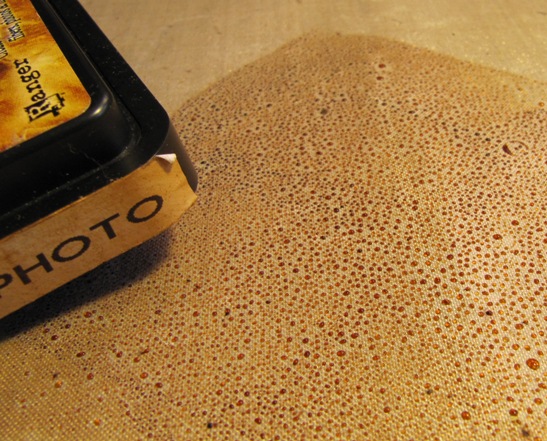
Now, I started with the 3 new colors all around the tag.

As you can see, a single swipe shows the lightness of the 2 on the left, and the intense color of the Peacock Feathers on the right.

Also see how the overlap of the 2 on the right make a FABULOUS color.

I NEVER use just one color, or one layer of color. It's always several colors to create the intensity that I want.


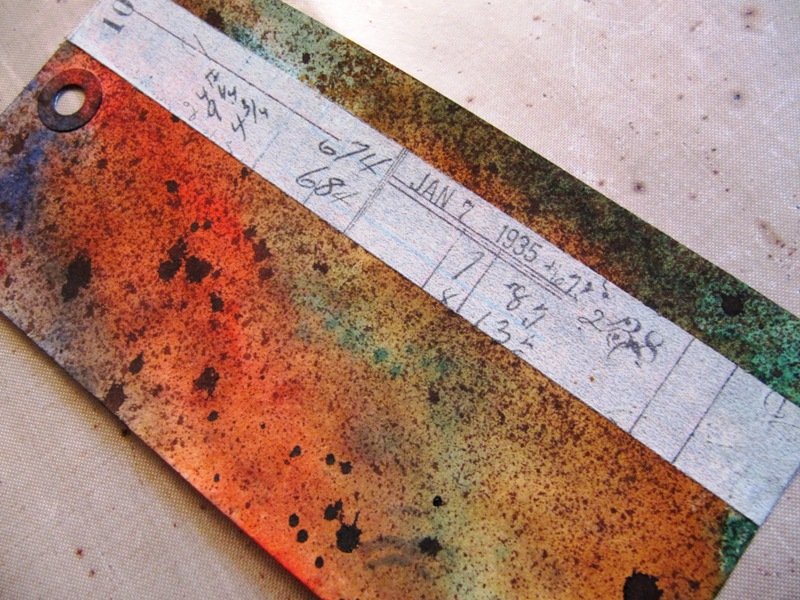
Then I started adding more colors here in the sample to show how the colors mix.


 Last I show you how Seedless Preserves and Ripe Persimmon from the Autumn Collection pads effect the other colors.


 Here is the end result of my tag. Dark in some areas and rather translucent in others.


To lighten it up, I laid my Dylusions Number Jumble stencil over it and sprayed with water.

Then blotted it and hit with the Heat-it Tool.

You can see the difference and the outline of the stencil.


Then the Dusty Concord came out with  Julie Fei-Fan Balzer's The Crafter's Workshop-Mini Gears and the magic begins.

This stencil is TOO COOL!

I stamped the Chicken Wire stamp from Tim's Mixed Media set with Jet Black Archival Ink, and began using a black permanent pen to outline some parts of the stencil elements.
I heat set all the Distress Inks before I get out the white pen. Here the Sharpie Poster Pen.

Let your mind go to the ARTISTIC side of your brain and just have fun.

Squint...see where the piece "needs" something...color, white, a stamp....?


"Enjoy the Journey" and have fun.

The letters are cut from Grungeboard and Metal Foil Tape (thank you Mario) and the new Sizzix Bigz XL Alphabet Die - Word Play from Tim.

VERY fun! Then they're embossed with the Gridlock Texture Fade folder.

I layered up the tag onto 2 pieces of cardstock...I almost could not cover up the gears....

But, it needed to be for Alex, so on went the letters.


You can add some jute and a Locket Key to the top to balance out the space, and it's done.

I photographed it here on one of my favorite sheets of Tim's paper from the Kraft Resist pad that I've colored with Distress Markers.

So...give it a go.

Get your ink pads ordered and make some fun cards for all those
"grads to be" out there.

Now for Brittany's 21st Birthday card..

She literally threw herself on the ground and cried when I sent her a card that had "a BAR CODE on it, for Pete's sake!"  That was several years ago, but the picture is still in my head. They have their way, don't they?

Yes, she's an actress with several productions in her life, but she made her point.

And so, I'm off to make something for her as well.

Cause that's what Grandma's do!

And one last note....if you have not read this post by Lisa M. Pace, you should. She said it all, and she said it brilliantly. I personally spend at least 3-4 hours on a post...from start to finish. And the comments you leave us is what makes it all worthwhile...and not much more.

PLEASE read it here..... http://lisapace.com/2012/05/today/

Linda

Products Used:
Tim Holtz Distress Inks - Seasonal Spring Pad set, Seasonal Autumn Pad set, Dusty Concord
Tim Holtz Alterations - Sizzix Bigz XL Alphabet Die - Word Play, Texture Fade- Gridlock
Tim Holtz Stamps - Mixed Media
Dylusions Stencils - Number Jumble 5x8
The Crafter's Workshop-Julie Fei-Fan Balzer Stencils - Mini Gears
Tim Holtz - Grungeboard - Basics, Kraft Resist Paper Stash
Ranger - Metal Foil Tape, #8 Manila Tag, Jet Black Archival Ink
Tim Holtz - Distress Markers
Tim Holtz Idea-ology - Locket Keys
Sharpie-White Poster Pen-Fine Point (discontinued and hard to find...I'm just sayin')

Thursday, March 29, 2012

New Supplies in the Studio----PLAYTIME!

I received a shipment of new and exciting goodies last week.

After a crazy weekend...HS play, 2 soccer games, yard duties, etc....I finally got down to playing in the studio.


This is a picture I took on my "Oh So Smart" phone. Tiny but better than I could get today.

It's using the new and wonderfully creative Patina's from Vintaj and Ranger.

I painted them on with a brush...we'll talk later on that.


 Then I opened the Spray Inks from Dylusion and Dylan Reaveley.

Oh My Gosh....the COLORS are AMAZING!!!!

Trying to watch Tim's video class Creative Chemistry 101 and play at the same time.

Ha! REWIND is wonderful.

I sprayed several colors, dried, and sprayed again with a Crafter's Workshop/Julie Balzer Stencil.

LOVE!


In my box of goodies I got my set of Remnants Stamps from Tim.

The Old by Fav, Fancy Flourish, stamp and Black Archival Inks added the swirls.

Foamies also added here and there for fun.


Here's another shot of the 2nd layer with stamps and Archival Ink.


This is over another Julie Balzer Stencil and more black ink...LOVE the contrast.

So, that is just the beginning. If you want to follow along, go make a page with just color all over it.


Add some stencils with sprays or Distress Inks and Applicator, and then give a favorite stamped image a spot in 3 places. Overlap off the page for composition and we'll be back later.

I left a lighter spot in the middle of one page to write some words....

I'll be back later with some more steps to add to this page.


NEXT


Remember this bracelet I made last summer?

Well I had to try the new Patinas on it.

There's terrific step-by-step instructions from Jess at Vintaj here.


Look at the dramatic difference now! It REALLY shows off the turquoise and amber beads.

I used Cinnabar, Rust and Verdigris on a tiny brush.

Heat set, sand, and polish with the the Metal Reliefing Block. (this block is a MUST...unbelievable when used to sand and polish detail. Different than any other on the market.)


Then here's a bit of fun.

The Owl was embossed using Moonlit Night Deco Embossing Folder, a Square Blank, and the Vagabond Machine.

Then using a small brush again, I added several layers of color, sanded, and polished.

The result is a cute little owl in a fun outdoor setting....leaves and such.

 I had a fun day with my new supplies and therefore had to share with you. Check out the links below to find these products.

You can also find many Vintaj products at Hobby Lobby.

Go and Create ART!

Linda

Vintaj - Deco Embossing folder - Moonlit Night by Sizzix
VintajAltered Blank
Tim Holtz - Stamp set Remnants, Fancy Flourish by Stamper's Anonymous
Ranger - Archival Inks - Deep Purple and Jet Black
Ranger - Distress Inks and Ink Blending Tool
The Crafter's Workshop/ Julie Balzer - Stencils- Mini Daisy Doodle, Numbers Collage
 Sizzix - Vagabond Machine


Thursday, March 1, 2012

The Rest of the Story....

I really am having fun with the Journaling.

This is the other page.


All kinds of other stamps, stencils and watercolor crayons found their way to spots along the journey.


I LOVE the raindrops!!


Julie Balzer's stencils are so fun....and the other ones are from YEARS ago.

Dyan's Dylusions stamps are great to add....the leaves are wonderful.


I added old foam stamps and used black pen to make the colors pop.

The white Sharpie is still my favorite for adding highlights.


Erin had to try her hand at making a page.

I LOVE the colors she used.


Kids have no fear of color....great job ERIN!!!


Off to a Symphonic Band Concert tonight.

Support the ARTS!

Linda

Sunday, November 6, 2011

Who Wants a Tutorial????


Thankful, I am so very thankful for all my blessings, especially my wonderful family and friends.

So, for you peeps out there who want to CREATE, here's a tutorial using some fantastic products from Ranger and the talented Mr. Tim Holtz.

I love using my favorite Tool-the Vagabond to die cut and emboss for this tutorial.


First I  took a #8 Manila Tag, spritzed it with water, and swiped several colors of Distress Stains over the tag letting them blend slightly.

I used Chipped Sapphire, Barn Door, Broken China, Tea Dye and Pine Needles. Spritz a bit more and dry with a Heat It tool.


Then swipe your Distress Ink Pad Vintage Photo on your Craft Sheet and spritz with water. Dip the tag in it, heat set, and pick up a few more dots of color for interest. Dry again.


Then I sprayed a slight mist and drops of Espresso Adirondack Color Wash. Dry again.


Add a strip of Traveler Tissue Tape to one side. If you're really reading this...you don't have to dry here....that's a joke.


OK, this is upside down to some people...I used the new Thankful Texture Fades on the tag. Then carefully...carefully swiped Black Soot DI across the raised letters with the Blending Tool.


You've seen this technique before, but here it is again. Die cut leaves from packaging plastic with the Tattered Leaves die.

Add Alcohol Inks to the back.


Then add Copper, Gold and Lettuce paint dabbers OVER the Alcohol inks....this is all on the back of the leaves.


Flip it over and add vein lines with a permanent pen. I like the Write4All by Stabilo.  Add a bit of Gold Paint dabber to the edges, too, for contrast.


A dash of heat from the Heat It Tool and you can curl the leaves as you like.


I added Gold Acrylic paint dabber over the embossed area...kind of hard to see the contrast here.

The cool stencil is from Julie Balzer -Time Travel, (they have a whole ton of new stencils in at Inspiration Emporium in the Just In section) added with Jennie Bowlin Malted Milk paint dabber.


I pushed the Spinner into embossing ink, then into the jar of Spruce Green UTEE and hit it with the Heat gun.

 Sprinkled a few bits of Butterscotch Adirondack embossing powder. And heated it again.


Then I decided it needed better contrast, so I took the top off the Copper paint dabber and painted the word Thankful.

Now you wonder, why then should I go to all the trouble to add the Black Soot DI???

Because it has created the perfect shadow outline to the raised letters!!!!

I would like to tell you I planned it that way all alone, but it's just a happy result of constant layering.


Since there's a lot of metallic color and plastic, there is a lot of different colors that show up in different angles of shooting the photos.

I think the copper lettering and the gold paint on the leaves shows up best here.

Layer up your leaves, a Timepiece and brad with your spinner. Add some Copper paint dabber around the edge of the tag.

I like to add my tags to a piece of black chipboard for stability.

And a row of Gold nailheads from Mark Richards is at the bottom for one last section of Bling.

That's my Thankful Tag Tutorial.

What are you thankful for??????????

Type a comment and let me know. Do you want to see more tutorials or just pictures?

It's no fun talking to yourself....all you bloggers out there know what I mean.

Your Friend in ART,

Linda

Monday, October 17, 2011

Pondering Petunia Tag-And the WINNER!

Well, it was really fun reading all the posts. I wish everyone could have won, but the magic number picked belonged to CHAR!

Char- The Mad Shopper said... 


The new magazine sounds interesting. It would be fun to win it, and the kit is adorable. Thanks for this chance to win.

So Char, send me your address and we'll get that prize kit out to you this week before I head to Ankeny, Iowa.


Yep, I'll be at Memory Bound for classes this weekend. Hope to see you there! Looking forward to seeing all my wonderful friends again!!!!


When I was in Elmhurst at Creative Cuts and Crafts...I snagged some stamps from the delightful Dyan Reaveley. This set is Pondering Petunia.

Fun????? Oh, yeah!!


Then I used Julie Balzer's template to add the chicken wire, stars, and dots with paint dabbers, Pitch Black and Malted Milk.

They just got a TON of templates in at Inspiration Emporium from The Crafter's Workshop hereAnd $5 shipping within the U.S.

Oh, and the Tim Holtz District Market totes are in there, too !


I added Little Labels stamps from Tim. And of course some Distress Inks here and there....can't work without DISTRESS INKS!!!!


Stamp the hand and Petunia on manila cardstock and cut out.


The TomBow markers added all the color to Petunia.


Her hair, that turned out great, is Sticky Back Canvas from Claudine Hellmuth. It's leftover from another project I painted and sprayed. I just frayed it out and it worked great for my Punky Lookin' Gal.


Boots, Glasses and Lipstick are all highlighted with Turquoise, Burgundy, and Tiara (Glitz) Stickles.


Layer it onto some black chipboard, add some pen marks, and add cutouts with pop dots for dimension.


That's it for today. Kits are all packed and ready to go.

Going to go sit on the sunporch, read the Help, drink coffee, and watch the leaves fall.

Be well, and be good to each other. We're all we have that matters.


Erin Elizabeth and I at WICKED.....she loved it. And that made my very, very happy!

Linda