Saturday, June 29, 2013

Bloom-Soar-Live and Believe in Dreams Tags

 It's been a rainy day. Bill's watching Wimbledon and I've been playing in the Studio.
 
I got a stash yesterday from Kristin and Retro Cafe Art, so my desk is covered in projects.
 
But these two were well on their way, and of course the fabulous Fresco Paints from PaperArtsy come together and create magic....IMHO.
 
You people here in the States, don't forget to check out the Frantic Stamper links below for all the fantastic Fresco Paints. She has them all!!!  And lots more stamps are on the way!!!!!
 
 
This one starts with Grunge Paste and the Boogie stencil on a tag.
 
Then all the gorgeous paints are added when it's dry...right over the whole thing - Grunge Paste and all.
 
If you want a bit of a tutorial on how to add the layers of paint to your projects...check out this post
 
When it's dry, sand away predominately on the edges.

 
I outlined in Grey Tombow pen and Black permanent extra fine pen.
 
Stamp with Archival Inks and PaperArtsy stamps. And add some Guacamole Paint stamping as well.
 
The Words (you get a whole pile of them already cut apart) are glued on last and then the whole piece is layered onto black chipboard (of course).
 
I edged the tag with Tarnished Brass Distress Paint and added a bow.
 
 
This one started much the same way, only on a larger tag. Add the Grunge Paste with the XY-XX Stencil and let it dry. The stroke marks in the paste create a very interesting texture. I LOVE it.
 
Sponge on the Fresco Paints in a pattern I would call a celestial. But that's just the way I see it.
 
 Sand it to reveal what you like.
 
It needed something, so I hit it with a spritz of Black Marble Dylusions Spray. It broke it up.
 
 
The RAC Star Mix Cutouts are painted and the smaller ones on top have just a dot of Glitter Glue in the center.
 
  
The words are layered onto black chipboard that's had the Brass Distress Paint painted on the top.
 
Add to a piece of plain chipboard that's been painted around the edges, punch a hole, add some Tulle, and it's a done deal.
 
As always, I love to know what you think.
 
Have fun........stay dry!
 
Linda
 
Products Used for Boogie:
Products Used for Believe Tag:
 Both Projects:

Wednesday, June 26, 2013

A 4th of July Patriotic Journal Page

I needed something different to do today. Just a project to sit down and not think about a whole lot.
 
Just-let-it-flow-type piece.........make a Journal Page!
 
So I dragged out my Watercolor Paper Journal by Pentalic.
 
It's not your typical Red-White and Blue, but I like the Sea to Shining Sea colors...shall we say.
 
 
This is the left side of the finished layout.
 
 
Bright, bright colors by Dylusions are sprayed onto damp watercolor pages. Since the paper is white, the colors stay really brilliant.
 
I  LOVE bright!
 
I blotted it and sprayed some more yellows into the paper.

 
I used stencils and stamps to add another layer with Archival and Distress Inks.
 
I just like numbers.....so they're there.
 
The phrases ring true as a result of where I am blessed to live.

 
The White Posca pen makes the colors pop and gives certain thoughts a chance to flow.
 
The Black Posca pen is used to trace the diamonds here and ther and fill in spots.


I used Tissue Tape on white cardstock that I cut out and layered onto the page. Tombow pens add bright colors to the Tissue Tape on the stars.
 
Stamps are rolled here and there with Coffee and Olive Archival Inks. My "go to" phrase stamp is actually in the Halloween set. I love it.  
 
Lastly white Gelly Roll Pens are used to write some freedom phrases.
 
Things that matter most....should never be taken for granted....Freedom Rings!
 
Linda
Products Used:

Friday, June 21, 2013

GREAT NEWS! Paper Artsy Fresco Paints and Stamps are here in the USA!!!!

All you people who have been salivating over the fabulous Fresco Paints and Lynne Perrella, Jofy, and Hot Picks Stamps.....well they are HERE in the USA!
 
Fran the Frantic Stamper  has all the colors you could ever want...and Treasure Gold...and Grunge Paste...OH!
 
 
 These are just two examples of the Fresco Paints, Grunge Paste and Stamps from PaperArtsy.
 
 
They are a perfect combination with the Retro Cafe Art pieces....PERFECT!
 
I use the Gears shown here all the time..Mini 60.
 
I LOVE them all, but the new ones she has in from Lynne Perrella are just drop-dead gorgeous!
 
So check them out, and send an order to Fran...I'm betting they'll go fast.
 
Linda

Thursday, June 20, 2013

An Album Souvenir Necklace

When I saw this little Locket Book from Tim Holtz, I immediately knew I wanted to drill a hole in it!
 
I wanted to hang it on a necklace with SOMETHING hanging from the bottom....hmmmmm.....
 
Then the Buckle came to mind.


 I also wanted a Vintage Pocket Watch Key from the Retro Cafe Art shop....something shiny and bright and vintage looking.
 
So that's why I chose this key...I LOVED it the second I saw it.
 
 
I really like to add color to metal.
 
Sharpie Pens work perfectly on tiny detailed spots.
 
And polish the metal Buckle with the Detailing Block.

 
PaperArtsy Fresco Paints and Lynne Perrella stamps adorn the little book insert.
 
And of course, some White Posca Pen detailing.
 
 
This shows two Ink and the Dog stamps, too.

 
The little book folds up and fits into the locket.
 
 
I added a couple of Jump Rings and a dyed silk ribbon.

So check the links below. Many pieces from several different places that all work wonderfully together.
 
That's the way I LIKE it!
 
Linda
(Added note: I received word today that another popular US company will start carrying Fresco Paints!!!! Shipment is on the way!!!
 
Products Used:
Tim Holtz Idea-ology - Buckles, Locket Book
PaperArtsy - Fresco Paints
PaperArtsy - Ink and the Dog Stamps - Mini 18 and Mini 22
 
Other Materials:
Jump Rings
Drill Press (thank you Bill)
Dyed Ribbon
Metal Brad
Sharpie Permanent Pens
White Ultra-Fine Posca Pen 


Friday, June 14, 2013

A Little Hand - Eye Co-ordination

This piece from Retro Cafe Art stands about 2 1/4" tall.
 
Just because projects are smaller, doesn't mean they're faster or easier to create!
 
Sometimes they take me a lot longer to be satisfied with them. But this one came together rather quickly, for me, last night....very late last night.

 
I basecoat all the Masonite with Snowflake Fresco Paint. Then add colors.
 
This has 2 hands in each kit and can be either a little shrine OR a fabulous necklace!
 
Brilliant design to that necklace idea!

 
This is the back.
 
The hand has 3 layers that creates the little niche on the front, and a wide enough base to glue onto a blank oval piece of Masonite.
 
Everything else is a Remnant Rub from Tim Holtz. No stamps this time.


So jump over to Retro Cafe Art and have a look at all the fabulous products Kristin has.
 
You can get the Rubons  and Mini Black Dice there, too!
 
Linda
 
Materials List:
  Blood Red, Snowflake, Smoked Paprika, Limelight, and Beach Hut

Wednesday, June 12, 2013

Father's Day Card Tutorial

Father's Day is fast approaching.
 
So if you want some ideas for a card, check out the Ranger Ink Blog for a tutorial I have up there today.
 
 
A Double Embossed card to make for your guy.
 
Linda

Sunday, June 9, 2013

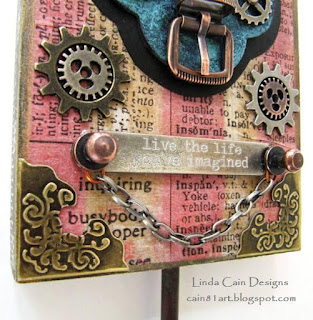
Never Too Much Metal - IMHO


I LOVE Metal. I LOVE Steampunk.  I LOVE to layer. I LOVE Mixed Media Assemblage.
 
So......I REALLY loved doing this piece.
 

No stamps....oddly. Just lots of contrasting colors and metal. 

 
Shiny metal and Perfect Pearl Mists.


Tissue Wrap and Distress Paints.


Gears and Clocks and Buckles....OH MY!


Chain and Corners....Hitch Fasteners, too!

 
I'll give you a bit of a tutorial here. Started with an unfinished wall plaque that has a hook hanger knob. I painted it with Distress Paints ...Antiqued Gold and Tarnished Brass.

 
Then swipe a piece of Tissue Wrap with Fired Brick Distress Stains on the BACK.

 
Flip it over and it looks like this.

 
Black chipboard with PP Mists...Blue Patina and Turquoise on die cut Styled Label.

 
Black cardstock cut to enlarged Label shape.

 
Bend open Corners so they're flat.

 
Cut off edge with Tim's Tonic Scissors and flatten out again. (Use side facing you without Tim's name to keep serrated edge from showing)

 
Polish EVERYTHING with the Reliefing Block.

 
Assemble Timepiece, Spinner and Clock Key AFTER you polish them.
 
And then put it all together!!!!


I used Glue n Seal to add the Tissue Wrap to the plaque, and Matte Medium for adhering the other pieces. Check out the links below for products.
 
Metal to Metal I used Crafter's Pick the Ultimate for glue.
 
Fun or What???
 
Let me know what you think....
 
Linda

Products Used:
Tim Holtz Idea-ology- Corners
  Tissue Tape - Elements
  Buckles
  Hitch Fasteners
  Clock Key
  Game Spinner
  Timepiece
  Word Band
  Mini Gears
  Sprocket Gears
  Lace Chain
  Long Fasteners and Mini Fasteners
  Tissue Wrap - Terminology
  Ornate Plate
Tim Holtz Micro Serrated Scissors
Ranger - Perfect Pearl Mists - Turquoise and Blue Patina
Tim Holtz Distress Paints - Fired Brick, Antique Bronze and Tarnished Brass
Tim Holtz Alterations - Styled Label Die
Matte Multi-Medium and Glue n Seal
Vintaj - Metal Reliefing Block
Black cardstock
Various brads
White acrylic paint
Crafter's Pick - The Ultimate Glue

Monday, June 3, 2013

Mixed Media House Ornament

 Hey everybody....having a great summer out there?

Well it's been raining for 2 days here, so you know what that means! Time in the Studio to Create ART!
   

  This House Ornament is from Retro Cafe Art Gallery and it's just too stinkin' cute!

Comes flat, as most of you know, and you paint, stamp, or whatever, then glue it together with a tiny bit of glue.

I like to base coat with Snowflake Fresco Paint from PaperArtsy then add color. I used several blues here for the top.

I used the Otomotohole Stencil and Grunge Paste to add the 5 circles along the sides. When dry, I painted the middle section with Antique Bronze Metallic Distress Paint.

The gorgeous stamps on top and bottom are from Prima Hello Pastel Cling Mount Set. I added a bit of the Bronze and some Guacamole paint as high-lights.


The door and other red pieces are painted with Blood Orange Fresco Paint and have Pen dots plus Rubons. There's a large Rubon in the middle section that shows through the door windows.

Paint the 2 pieces you removed initially from the house, white, and put them back in the holes to make the rubons show up better behind the door and transom window.

Since this is intended to be an ornament, it has a hole in the top of the house that is perfect for the Mechanicals Roses and Brad.


The base is another piece of Masonite I had left over from something...so I painted it green, and added the Brown Script Washi Tape.

The Limelight translucent paint went over the stamped area at the bottom, but did not cover up the image. THAT'S  the beauty of Fresco Paints!

The little pieces you pop out of the windows are painted white and have either rubons or pen dots on them....never throw anything away!

The copper star and flowers at the base complete the ensemble!


The door adds thickness to the house, but I used a triangular piece of leftover Masonite that worked well to prop the piece up and let it stand on the oval base. (You can see the 2 pieces I replaced after painting them white here.)
 
You could also cut a piece of cardboard or chipboard and glue to the back without using the oval.

Whatever works....or display it on a small easel.

Take care, and any questions I'll try to answer from your comments or just email me here.

Cain81@mtco.com

And check out the WINNER - Deb Moon of the Gift Certificate!!!

Linda
 
Products Used from Retro Cafe Art: 

TIME FOR ANOTHER WINNER!

 
So, without further ado, I give you the winner of the $25 Gift Certificate from Retro Cafe Art.........
 

Pure eye candy! The helmet and light bulb are brilliant.
 

Enter a lower limit:
Enter an upper limit:
Random Number:
 
 So, send your address info to me at cain81@mtco.com and I'll forward it to Kristen.
 
Thanks again to Kristin, and to all of you who took the time to leave a comment.
 
Come back tomorrow and I'll show you a gorgeous little house you can make all your own!
 
 Or maybe I'll post it now!!! Why not!
 
Linda

Saturday, June 1, 2013

AND THE WINNER IS..........................

OK.....the WINNER IS as of NOON!!!!
 
KAY WALLACE!!!
Love these projects, Linda! Great techniques, especially the shirt tail technique!! Thanks for the great creative details. Thanks, too, for the opportunity to win this oh-so-fab Ranger giveaway!!
 
 
Enter a lower limit:
Enter an upper limit:
Random Number:
 
 
Congratulations to Kay! And thanks to Ranger Ink.
 
Email me your address at cain81@mtco.com so Ranger can mail out your PRIZE!!!
 
And THANK YOU soooooo much for everyone who entered. There's still a couple of days left to enter the Retro Cafe Art contest with a $25 give certificate.
 
Big Hugs,
 
Linda