Monday, January 11, 2021

Angel of Peace

 Here we are again. It's a new year, but it's still a crazy year. The United States has had some horrific and sadly historic events lately, but it seems to have driven me into a shell/studio phase to create.

So here is my Angel of Peace. She is a Paintbrush Doll from Retro Cafe Art Gallery as a base that's loaded with Finnabair products in layers. I hope you enjoy.

Oddly, I started out wanting this to be more of a "simple" creation. (who was I kidding) That's why she has no real physical face. She morphed.....that's all I can say. I have no defense. 

The Mechanicals are painted and some are wire-wrapped. The collar is a piece of the Vintaj Passion Flower Filigree. Usually an epiphany comes to me at night when I'm trying to go to sleep. Hence the wire. It just needed something. 


The black paper dress for the angel was stenciled with the gorgeous new Effect Pastes from Finnabair. The brush is painted with Metallique Paints and the wings are screwed onto the handle. I applied clear gesso to the metal part of the brush.


I cut apart the flower for the collar and painted it and the Steampunk Gear for her halo. The Wings mechanicals have White Pearl paint and wax added to make them shine.


A painted star was the last element to be added. Almost went with a heart, but the star just looked better in this space. It's made with a mold and paper clay. 

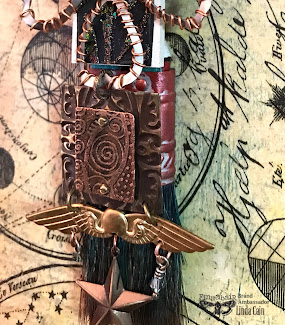
You can also see the cold connection here with the copper etched piece and the embossed brass piece from Vintaj where I used a Sizzix DecoEmboss folder by Vintaj. 


The wire is a decorative wire I bought years ago on a trip to Galena. 


I learned to etch metal in my lovable and crazy, dear friend's class, the infamous Jen Crossley. She also taught us to make the cold connections. There's no glue involved in this type of art form. It's very challenging, but so cool. Check out her classes. I've saved this piece for just the right spot, and now it's where it belongs. I enjoy creating things that dangle with wrapped beads. Don't know why....

 I added rhinestones around her neck for some additional sparkle. The large metal Mechanical flower is from a discontinued set. 


This is the original photo I took, but when I laid her down on the new and fabulous Journaling Minis Celestial Music tissue paper, well it was just, WOW! So I used an 8x8 wooden canvas and some soft gloss gel to glue it on, and the rest is history. Who knows where this will lead.


Last shot here shows the Rusty Red Metallique Paint and Burgundy Wax on the ferrule and crimp of the brush. The etched piece has brass Pilot Wings with 2 Swarovski crystals that were wire-wrapped. The dangle is added with a jump ring as was the star. I didn't hang this up straight on a wall, so the beads aren't hanging well, but you get the idea. Forgive me there. It will some day.


I guess that's all for today. I hope I've inspired you in some small way. Check out the product links below. You can find them at Finnabair's Mixed Media Place and in the USA at Retro Cafe Art Gallery.

Be well. Stay safe. And wear a mask.
 Hugs to all,

Linda

Product List Retro Cafe Art:
Finnabair Mechanicals - Steampunk Gears, Winged
Finnabair Effects Pastes - Mermaid, Golden Dragon and Phoenix
Finnabair Metallique Paints - Mermaid Teal, Steampunk Copper, Rusty Red, White Pearl, Royal Red
Finnabair Metallique Wax - Burgundy and White Pearl
Finnabair Stencil - Laurels
Finnabair Decorative Paper - Journaling Minis Celestial Music
Finnabair Moulds - Stars and Moons 
Brass Pilot Wings

Mixed Media Place:
Finnabair Effects Pastes - Mermaid, Golden Dragon and Phoenix 
Finnabair Metallic Waxes - White Pearl, Burgundy 
Finnabair Tissue Paper - Journaling Minis Celestial Music
Finnabair Stencils - Laurels
Finnabair Mechanicals - Steampunk Gears, Wings
Finnabiar Moulds - Stars and Moons 
Finnabair Metallique Paints - Mermaid Teal, Rusty Red, Steampunk Copper, Royal Red

Other Products:

Tuesday, December 1, 2020

Trying to "Be In the Moment"

The Finnabair Ambassadors post is up and the theme was "Lush layers with Art Alchemy, papers, lace and a touch of frost." Pretty cool idea, eh?  I loved the idea. So here is my story and some thoughts along the way. Links and tips of course, as well.

Bill and I moved to a new place very close to the Mississippi River where he was raised. We find a kind on peace driving along the riverfront near us in the evening to watch the beautiful sunsets and check out the boat-launch area. We've seen deer roaming along the bike paths, 
coyotes running across the railroad tracks, kids catching frogs, barges and watercraft of all sorts, on our journeys. 

This trip I decided to grab some dried blossoms and twigs for my project.


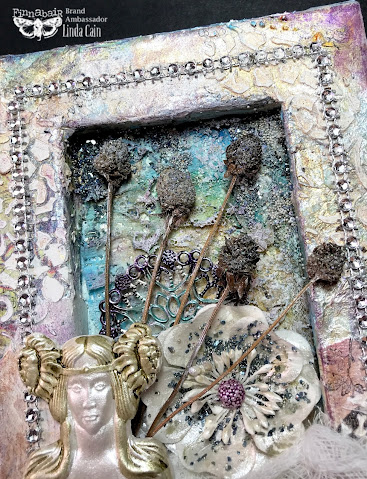
I started with a 5x7wrapped canvas using the back side with the hollow inset. I coated it with soft gloss gel and wrapped tissue paper all around the canvas area. Various scraps of torn papers were also added with the gel utilizing their bright colors. 


I sprayed the piece with a mixture of water and pale silver mica powder. When dry I added paper paste and the floral net stencil to sections. The next layer is with metallique paints and some stamped images.


In the center section I glued in layers of lace. When it was dry, I added more paints and a mixture of glass glitter and micro beads. 


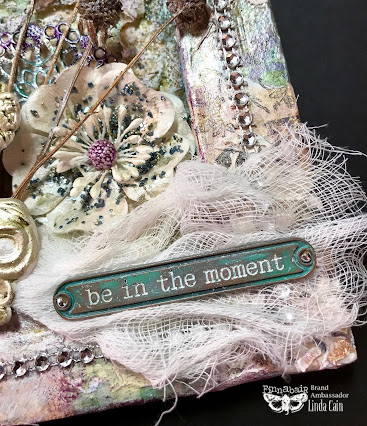
The trim was glued in place with 3D matte and gloss gels as well as the antique label and cheesecloth. 

The casting is painted with white pearl metallique paint and accented with a wash of umber liquid acrylic paint. The paper flower is painted and adorned with more glass glitter and micro beads. 


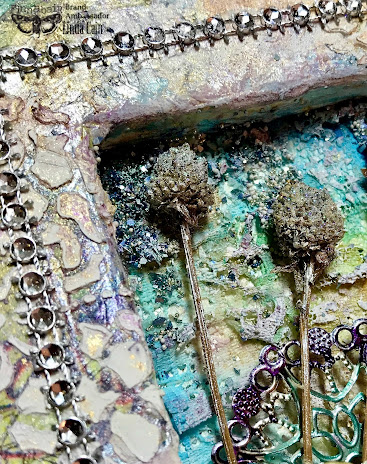
I added Art Sugar, an extra fine glitter, to the buds of the wild flowers and some spray mica powders. 

The mechanical is also painted and it's all put together with the 3D matte gel. I was going to add several more mechanicals, but this time I went with "less is more" giving it a more simpler touch than I'm generally used to. 

I did have to add the silvery trim as the last layer just to add a bit more sparkle. 


That about does it. I hope you're inspired to get out your supplies and create something just for fun. 

Now, here's the great thing about being on Finnabair's Brand Ambassador's Team AND Retro Cafe Art Gallery's Team......YOU get to see links to both sites here! Finn loves RCAG, and RCAG loves Finn. So it's a win, win for everybody. Mixed Media Place is in Ireland, so if that works best for you, great. If Indiana, USA is closer to home....check out the links to Retro Cafe Art Gallery. I love them both. 

Links to Mixed Media Place - Finnabair's Site 

Finnabair Stencil-Floral Net -

Finnabair Tissue Paper- Musica 

Finnabair - Art Basics - Mixed Media Silicone Brush 1”

Finnabair Art Basics-Soft Gloss Ge

Finnabair Art Basics-3D Matte Gel 

Finnabair - Art Extravagance Paper Paste 

Finnabair Art Ingredients - Mica Powder Pale Silver 

Finnabair Art Ingredients - Glass Glitter- Pearl , Platinum

Finnabair Mechanicals - Antique Labels, Vintage Snowflakes

Finnabair Cling Stamps - Beautiful Story 

Finnabair Art Alchemy Paints- Liquid Acrylic Deep Turquoise , Tiger Orange, Umber 

Finnabair Art Alchemy Paints - White Pearl , Mermaid Teal, Amethyst

Finnabair Art Alchemy Paints-Sparks-Magical Pond 


Links to Retro Cafe Art Gallery-USA
Finnabair Tissue Paper-Musica
Finnabair Mould-Fairy Garden
Finnabair Soft Gloss Gel
Finnabair Soft Matte Gel
Finnabair Antique Labels
Finnabair Metallique Acrylic Paint-Mermaid TealWhite PearlAmethyst
Finnabair Liquid Acrylics-Tiger OrangeDeep TurquoiseUmber

Monday, October 19, 2020

My Witch Shall Have Wings

 Hi Friends in ART!

This has been a challenging time for us all. But we still need to roll up our sleeves and dig into our ART stashes to create projects that take us to a different plane. I finally got myself together, so to speak, and created a Halloween piece that was much needed therapy. 

I hope you have the time to play, create, and recharge your batteries by 
Creating ART.

This is a Medium Articulated Brush Doll that I changed the wings on to make her just a bit more diabolical looking. 

I used several different cut-outs from black chipboard and masonite. I painted the Spells and Engraved Pumpkins with different acrylic colors. The ferrule of the brush was painted with Amethyst metallique paint, and the German Dresden is glued on top with a heavy white glue. 

The really, really cool Witch Boot stickers were perfect for the bottom of the brush. Sadly they're no longer available that I am aware of. 


Here you see the painted handle of the brush. I used 2 colors of acrylic paint and added tiny German Dresden around the edge. The wonderful green glitter is used on the Steampunk Wings, and the spider has 2 colors of Sparks. I layered gold paint to one strip of the larger German Dresden. 

Use a White Pen to outline the Cat and Bats.


I used some heavy black paper to cut out the hat that had to fit over the rather large head of the Witch. She is actually a vintage graduation picture of a graduating class that is over 100 years old. (if I remember correctly) She needed to be "lightened up" a bit, in my opinion, so I added the black brad glasses. 

The 2 colors of black glitter are from Finnabair. I love her fine glitter. 


The Graphic45 Steampunk Spells paper was perfect for the bodice of the Witch. It's definitely one of my all-time favorite collections from G45. I always use Tombow pens to add shadows and more color.

A rhinestone and metal stud give the spider some dimension, and the black glaze dots around the body just add to the papers. Alcohol Inks can change the color of the brads. 


I gathered up some torn tulle and added a bit of a skirt to soften the look. The carved ivory skull brings you right back to the Halloween mood. 

Stamps were used to add the look of netted gloves and a checkered edge to the doll body.


So put it all together with a heavy white glue and you're done. Since there's a hole in the top of the paintbrush, you can easily hang this gal anywhere you want. I hang mine on the side of my shelf unit in my studio, or above a light switch would be a cool idea as well. 

I hope you're inspired just a little bit to create and play. I'm sorry I am posting this so late in the game, but there's always next year, right?!? Or just use your imagination and create a Christmas doll. 

Give it a go. It's always good to 
CREATE ART. 

Linda

Products Used from RCAG:

Other Products:
Witch Boots Stickers
Black Tulle
Graphic45 Steampunk Spells Paper
Colored Rhinestones
Black Glaze Pen and White Pen
Purple Acrylic Paint
Various Background Stamps and Black Archival Ink
Green Alcohol Ink