Tuesday, January 22, 2019

An ATC Cottage House with Metal Roof

Hi everybody!!!

It's been way too long. A lot of water has gone under this bridge, but the most was when my old computer died and I decided to go to a new system....a Mac....and it's so much different than I'm used to working with. Old dogs...new tricks phrase comes to mind.

Anyway, it's a new year, and I'm sure I can get back into this blog stuff again with the latest, and pretty much favorite, kit of all time from Retro Cafe Art Gallery!!! Kristin REALLY knocked these little guys out of the park.

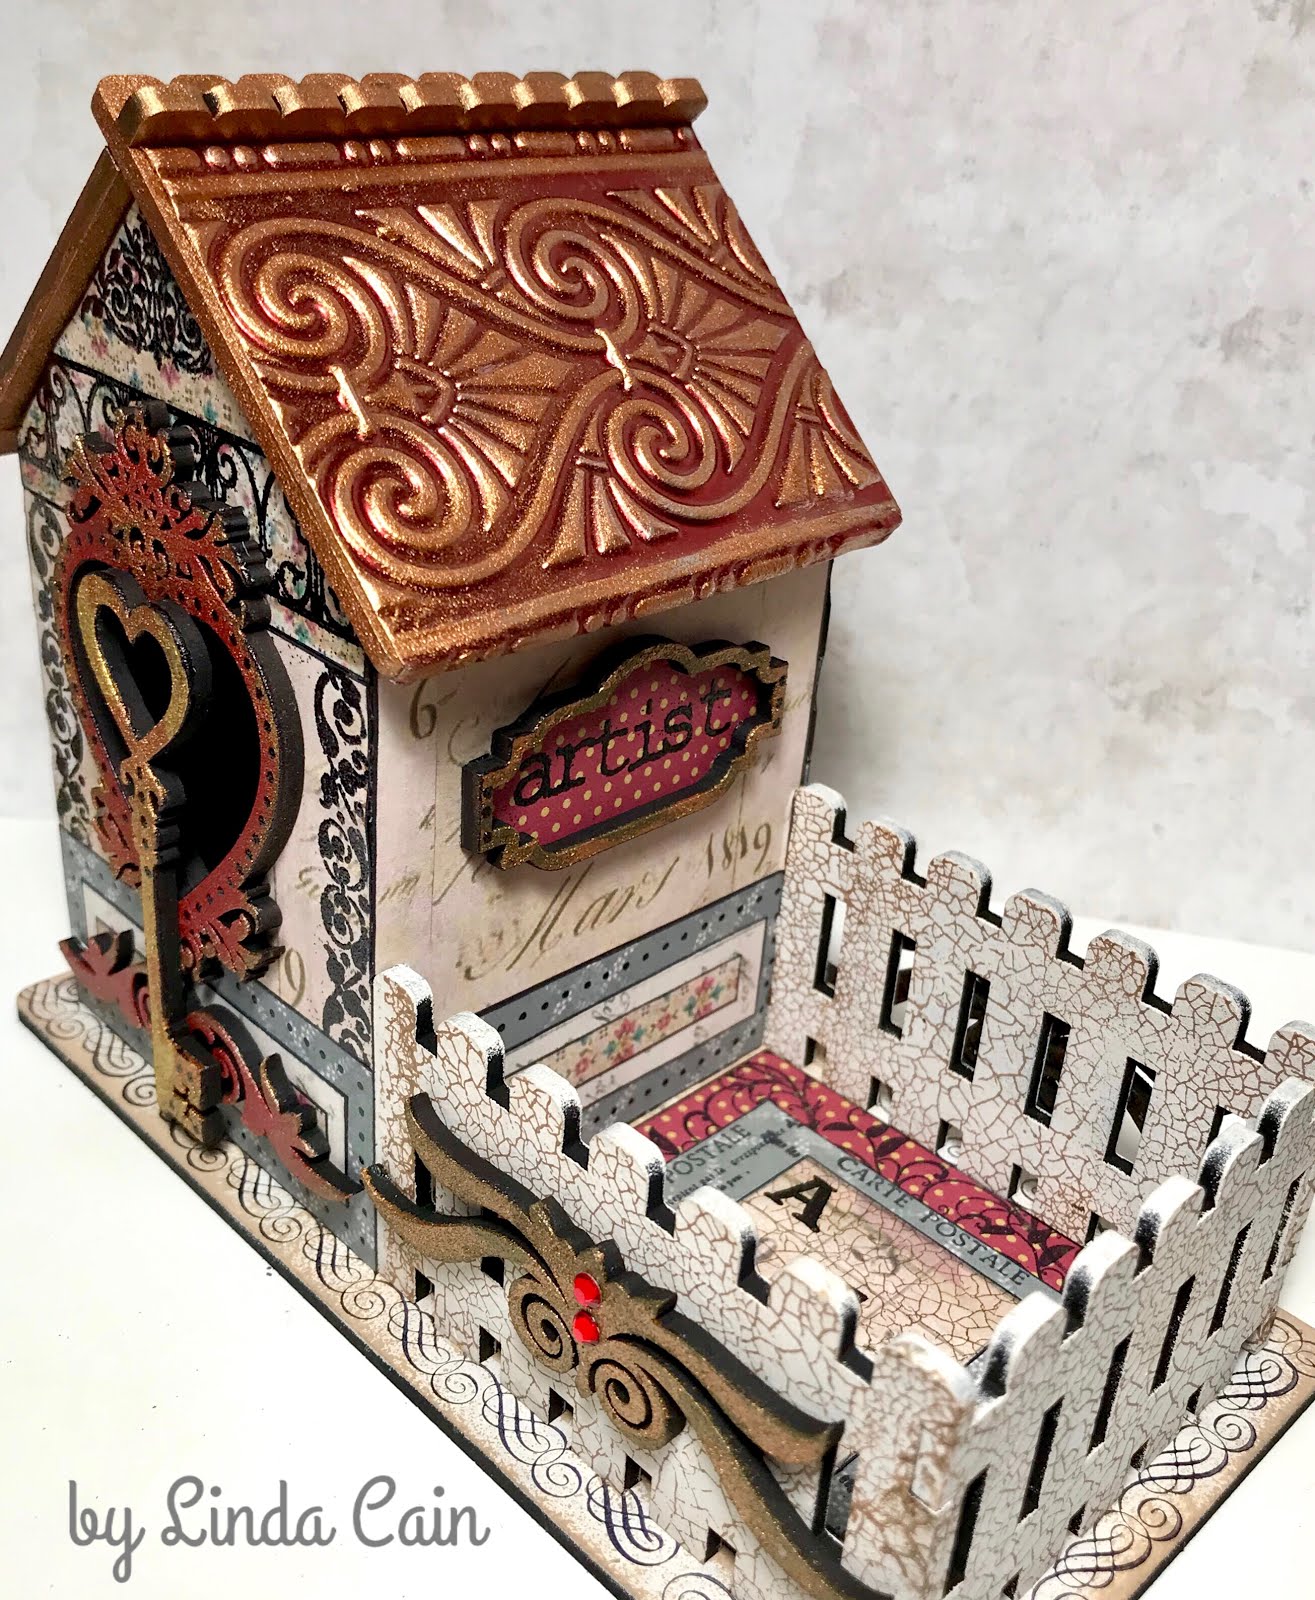
This is the Style 2 with the heart opening. There are 3 styles so check them out.


I used PaperArtsy Fresco Paints for the light colors on the base and fence and added stamped images with black and sepia archival inks.

The ATC coins and cards will fit perfectly in the "courtyard" area of the kit.


Stamped papers are added in layers all around the pieces before gluing. This also can be done after you put the house together, but I've always tried to challenge myself to doing it before. It works either way.


The Metallique paints from Finnabair painted on the cutouts for the front and back add just a bit of shine. I also stamped and heat embossed images to the papers to create a really dark contrast on the lighter colored papers.

The Heart Skeleton Key is perfect with Victorian Flourishes and Label Pull Style Frame Cut-Outs as added embellishments.


Little signs with ARTIST stamped in the center go perfectly on the two ends.


The crowning glory of the piece is of course the metal embossed roof that I accidently ran across in a box while looking for another project. It was hidden behind other pieces on my shelf unit and I hadn't opened it in maybe years.

 The metal is either hand-embossed with a paper stump on a plastic mold, or run through a die-cutting machine. The metal is already colored red, and you remove the color from the raised area to show the silver underneath. But I wanted copper, not silver, so I lightly brushed on copper paint to change the look. Both metal and mold are from Ten Seconds Studio.


The strange thing about finding the metal was there were 2 pieces almost the exact size I needed for the roof and one actually had the red-line tape all ready to go!!!

So a bit a trimming, and on it went. I rolled the metal under the lower edge, and it was done. 

I believe in luck and amazing unknown guidance.


You can take the roof off and store all sorts of things in the base.....or not. The choice is up to you.


I hope you're inspired just a little bit to go and create something that just makes you feel good. It's freezing cold here, and dead of winter, so it's easy to stay inside and have some fun. Thanks Kristin for a great new set of kits!

As always, any comments and questions are welcome, and I remain,

Your Friend in ART,

Linda

Monday, September 3, 2018

Be Brave in your ART - Create Moments from your Heart

It's been a while since I've posted a Finnabair Ambassadors post. But here you'll see I'm still very much in love with Rust Pastes, especially since there are 4 new sets to play with!

This is a tag with several elements and layers that I shared along the way on FB and IG. I'll pull it together for you today and show you how it ended up in a frame,


The tag itself has a simple arrangement of simple pieces that are enhanced with paint, inks, embossing powders and metal ephemera. The Quote Chip is from Tim Holtz.


  I started with a Honeycomb stencil and Plaster Paste and a #8 tag.  I spread the paste randomly, but on most of the tag.

Then I added a Heavy White Gesso over it all. The next layers are from the Camouflage and Metal Rust paste sets. I used only a couple colors.

Then I got my hands on the new Texture Fantasy Sets - Anemone & Coral, Northern Lights, Junkyard Treasures, and Old Walls. Now....... I'd drive you crazy with all the colors I used, and I'm not even sure myself, but I must say I am drawn here to the oranges, browns and blues. However a must is the Cream and Lavender.

The edges were colored with Rocky Road Baked Texture Embossing Powders from Seth Apter. I threw in some Ancient Amber and Patina Oxide here and there, too.


 Then I decide I need to lighten certain areas up. I added some white gesso and the lighter colors of the Fantasy colors. Gold Rush, Royal Red and Brass Hardware Metallique paints were dry-brushed onto top layers.


Here is a plain chipboard square that had layers of the pastes added with a palette knife. When dry, I added some metallique paints as highlights.

I used a scrap of corrugated cardboard as a background piece for the chipboard square. Distress and Archival inks were brushed on to add more color and a few spots of acrylic paints were splattered on. I painted the Tin Heart with some Brass Hardware and glued into place.


The tag is layered onto a piece of brass painted chipboard. I used Mechanicals - Wings, Mini Hardware, Tin Hearts, and Mini Knobs. The Chipboard Tiles are used to hold up the Wings and Zipper Pull. It's all put together with Heavy Body Gel.

You can see the subtle touches of the Lavender and Brass here.


The last thing are the little pieces at the top that are layered onto more distressed cardboard. I added more color with Brass Hardware and black paint to get a better contrast.  It was glued to a piece of painted chipboard as well,  and a jute cord was tied into a knot at the top.

It's all glued onto a hoarded piece of scrapbook paper from years ago that I really love and wish I'd bought several more sheets. That's life, right?


This little frame is a discount store find that I removed the glass from and added a few pieces of chipboard to build up. It's cheap and easy to work with.

I take the title from the words on the piece - ART, Be Brave, Moments and a Heart.


I hope you've enjoyed this walk-through of my project. Let me know if you have any  questions or comments.

Your Friend in ART,
Linda

Sunday, August 26, 2018

Blog Hop Album-Come Join the Fun

Hi everyone!!!

I'm so honored to be included in this great Blog Hop.  We're celebrating embossing powders from Seth Apter/Emerald Creek, Seth's Paint from PaperArtsy and Eileen Hull's Wrapped Journal die from Sizzix.  I hope you'll enjoy the hop and follow along with all the Artists sharing their amazing talents and projects created just for you.....here's mine.

I'll show you just how easy it is to enhance simple chipboard and paper. So here we go.

The cover is layers of paper that were stamped with archival inks and paints. Edges are created with Rocky Road EP, and the chipboard pieces are embossed with layers of Baked Textures.


This is the back and spine of the book. This die cut produces one long piece of chipboard that wraps around perfectly to create a brilliantly designed small journal.

Here I've used paints Midnight and Buff from Set 1 of Seth's collections before stamping with archival black ink. You will not find a better paint to stamp on - anywhere! I simply love to stamp on Fresco Paints.

BUT, the other wonderful feature of these paints is that some are opaque, some are translucent, and some are semi-opaque. That's the magic. You can stamp an image with archival ink, use translucent paint over it, and NOT lose the clarity of the stamping!!! Pretty cool.

Here I stamped small and large images on the paper. Then I painted highlights with translucents and watered down opaques and semi-opaques. Finally the piece of paper is completely covered with 2 layers of Chunky Beeswax before gluing to the back of the journal. I love how it turned out!


This signature is a great example of Seth's 4 Fresco Paint colors from PaperArtsy. I used mini clear stamps to stamp onto scrapbook paper. The middle image is a stamp with Deep Sea BT. The chunky powder really changes a detailed stamp by adding texture. The edges of the paper are enhanced with Rocky Road BT embossing powder.

All Seth's Baked Texture Powders from Emerald Creek are amazing.


Add a chipboard saying with pop dots and your signature cover is done. Another great PaperArtsy stamp is on the back of the other signature.


The number stamp is used with Patina Oxide powder and the splashes are with Rocky Road on this signature page.

The stencil work is created with texture paste and a mixture of paint colors. The pen nibs stamp have highlights painted with Fresco Paints.


 The True North is embossed with Chunky Beeswas and the Diary page stamp is embossed with Deep Sea. Diluted paints add color to the snail-looking images.


Now, here's adding color to metal. I painted this Grungy Butterfly from Finnabair with Buff, Midnight, Mahogany, Terra Cotta, and Smoked Paprika Fresco Paints.


Then I added the Baked Texture EPs in several layers of colors and clear Beeswax.

Is that cool, or what?!?!


This is the inside of my book before the signatures are added.  I painted the inside of the spines with Seth's new paints, and then stamped with archival ink.

Again you can see the color added to the stamped images. More to come with this section later.


Now I decided to add paint and EP to some plain wooden beads....you be the judge. 

They are strung onto the ends of the elastic cord that holds the signatures in place.


Here you see the dimension that comes with BTs on plain chipboard as you begin to add more layers to your project. The piece on the right also has micro beads embedded when the powders are still hot.


More examples of the embossing powders and stamps on plain chipboard. Simply push the chipboard face down into the embossing ink pad and add the embossing powders. When they're still hot, sprinkle more colors on top and let them melt in. Add a stamp to this "hot mess" and you get even more texture.


This is the last signature that has the key and plate added. I used the Deep Sea BT to emboss stamp the India Ink piece and a bit of distress inks for more color.


So there you have it. You put these 4 signatures together with elastic cord through the 4 holes that come punched with Eileen's fantastic die. I punched two holes in the journal to add vintage material as a ribbon tie. Copper eyelets fit into all these holes and just give it a bit of shine. Always love my metal.

To enter, leave a comment on each of the blogs for your best chance to win $150US prize package from Emerald Creek, Seth Apter, Paper Artsy and Eileen Hull Designs. Giveaway closes 8/29 and winner announced 8/30. Good Luck!


Now check out the rest of the "hoppers" here for more tips and designs.
Leave a comment for a chance to WIN!

Your Friend in ART,
Linda
Linda Cain (You are here)