Showing posts with label Tim Holtz-Stampers Anonymous. Show all posts

Tuesday, August 7, 2012

Go Fly a Kite Challenge

This months Challenge at the Inspiration Journal Blog was Go Fly a Kite. Check it out to win here.

So using some Dylusion Spray Inks on Manila Cardstock I began the journey.


I added Stencil work with the Chequered Dots and pen work to enhance the background.


The Kite itself is on Manila cardstock that has the new Tissue Wrap Melange from Tim on it.
I added Distress Inks underneath and on top...and of course some Distress Markers add color to the Moths.


The kite string and tail are made using Tim's new Paper String-Solid from Idea-ology.

You know the fun part is digging around in your old stamp sets to find something that works with the new.

The Umbrella Man from Creative Muse was perfect here, as was the saying.

And the tree from Regal Findings was great for some background.

Check out the blog and make your contribution...you could win!

Linda

Saturday, March 24, 2012

The Bird and the Butterflies Tag- Doodling and Layering

HEY, EVERYONE!

Wow, I've finally gotten some time to watch the last 2 episodes of Creative Chemistry 101 with Tim!! And of course, he never fails to inform and teach. You cannot go wrong with these lessons, they are a mini Ranger U for sure. Click on the link above for supplies from Inspiration Emporium and start taking the classes.

Now for a bit of Tag Fun from me!


The Bird and the Butterflies


I think I've found my niche.

This tag and my journal pages make me happy.

And it's just a piece of paper....if you don't like it....wait a day and add something else.

That's what happened here. I made the background. Didn't care for it. A week later it called my name!

I had added color to the tag with watercolor crayons and reinker sprays.

 Then after using the unknown number stencil with the white paint dabber on another tag, I used Dyan Reaveley's technique of pressing the excess paint onto this tag...hence the backwards numbers here and blobby paint spots.

There's wonderful tutorials on her blog!

You can also see Stencil work here. I LOVE The Crafters Workshop Stencils!!!! Julie Balzer is amazing. I actually used one of her earlier stencils, Punchinella, but it has a mini section of the Chickenwire stencil that is linked above.

Tim used her Numbers Stencil in Lesson 4. Love it!

If you want to see a great ARTIST at work, check out her blog.


This  Bird is by Collections. I sprayed it with a long ago concoction I found in a Mini Mister.

Added a stamp from Artistic Outpost-Whimsical Melange and some white pen to make it stand out.

The  Tim Holtz Papillon stamps  were stamped over the sprayed background with Jet Black Archival Ink.

You can see the Butterflies and Numerals that have been highlighted with white ink.

I drew a few leaves in the top left corner and painted color with the  Distress Markers  on them.


I like my tags to lay flat. Therefore I mount them on heavy chipboard. Here I used plain old gray chipboard that I dabbed around some color with Distress Stains. Make it blotchy.

Then when it's dry you can glue your tag to it, trim leaving a small edge,
 and it will have a cool border.


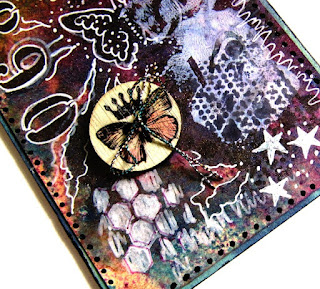
This is one of the new Prima Wooden Buttons. I started to add color on the right, and decided to take a before and after picture.


This is the button after I added layers of color with the Distress Markers.

Cool, eh??? (For my Canadian Ranger U friends, yes, I am still prone to saying it years later.)


Here you can see lots and lots of doodling and pen marks. I freehand drew stars and outlined the butterflies with white pen.

The white paint blob has the new Tim stamp Mixed Media over it that added a really fun layer.

So if you want to practice journal backgrounds....try it on a tag to get your feet wet!

It's JUST A PIECE OF PAPER!!!!!!

Linda

There were so many products used here, I decided to try a different layout of them. I've yet to work on setting up my inLinks, so click for Inspiration Emporium links below.

Still $5 shipping within the US!!

Products used:
Distress Markers Ranger- Barn Door, Dried Marigold, Pine Needles, Forest Moss and Weathered Wood
Distress Stains Ranger - Broken China and Chipped Sapphire
Distress Re-Inkers Ranger - Fired Brick, Dusty Concord, Peeled Paint
Perfect Pearls Powder Ranger - Sunflower Sparkle
Snow Cap Paint Dabber Ranger
Wood Buttons Prima - Natures Garden
Balzer Designs Stencils/The Crafter's Workshop - Punchinella
Jet Black Archival Ink Ranger
White Gelly Roll Pen - Sakura
Balck Glaze Pen - Sakura
Tim Holtz Stamps Stamper Anonymous - Mixed Media, Little Labels, and Papillon
Whimsical Melange Stamp Artistic Outpost
Mini Mister - Ranger
Manila Tag #8 - Ranger
Chipboard Bird Collections


And lastly, here is where my Vagabond is located. Right where I need it!

Monday, January 23, 2012

A Little Bit of Color on a Dark and Gloomy Day

Sometimes we just need a little bit of color!

And sometimes we need a little bit of heat!

Today, both would be nice here.....the furnace quit working last night and it's only 62 degrees in here.

The repairman is on the way....at least it wasn't on a Sunday.

So, now for the color....you're asking yourself, is that thing REALLY that bright?????

And the answer is a resounding YES it is! The colors are gorgeous in person.


 So we've all had that wonderful LARGE fragment stashed away somewhere, just waiting for a project to add it to, right?

Well get out your Alcohol Inks and lets get started.

You've seen the technique before, but if not, here goes.

Select a few colors you would like to work with. Use a combination you like. I'll tell you what I used for this project.

1.       Using Alcohol Inks apply Wild Plum, Bottle, Espresso and Eggplant Ink with an ApplicatorTool and Felt to the Large Fragment.

2.       Using a dabbing motion, add inks in a pleasing pattern.

3.       Let dry and add more until you like the color combination. The darker colors blend and bleed. And the 2nd application makes the gorgeous backruns.

4.       Take a detailed stamp and stamp onto Alcohol Inks with Jet Black Archival Ink. Here I used the Flapper Fashion set from Artistic Outpost.

5.       Immediately blot ink with soft cloth. Continue with CLEAN area of cloth until all black ink seems to be gone.


IMPORTANT: Always have a CLEAN spot to pick up the black ink or it will smudge your work.


6.       Buff the area and the ink will all disappear and leave you a clear image of your stamp.

7.       Apply Glossy Accents around the edge of the Fragment and glue to white cardstock.

8.       Trim around Fragment when dry.


Faux Epoxy Sticker

9.       Stamp onto Manila cardstock with Pine Needles using Papillon stamp set from Tim Holtz. Heat set with Heat It Tool.  Trim around words as you like in curved fashion.

10.   Add Old Paper Distress Ink all over the Manila paper. Use black permanent marker around the edges.

11.   Cover paper with Clear UTEE. The Distress Ink will act as an embossing ink and grab the UTEE. Heat with Heat Tool until it is completely embossed. Repeat if you like it thicker.

12.   Add the phrases to the front of Fragment layering up with chipboard.

13.   Layer-up onto Core’dinations cardstock in various colors.

14.   Add to front of card.


That's it for today. CHA is right around the corner....as soon as I can, I will upload some of my projects for Ranger and Tim.

They were so much fun to make this year. WAY, WAY over the top in some cases.

Can't wait to show them to you!!!!

Linda 

Thursday, September 22, 2011

Kraft Tag and Picket Fence Distress Stain Fun


It was a pristine day on the lake. Blue skies and the trees are turning. I got some great shots of the sunset on the lake. I'll post them later.

Gotta eat the goodies from the bakery in Cold Springs. It's a must stop whenever we are here.

Enjoy the tag. I did!


One of the new products from Ranger that were showcased at CHA was the new Kraft Tags.

These are really fun to work with, especially when you add the Picket Fence Distress Stain.

I LOVED working with the smaller tag and adding the new colors in the Distress Stains over the great opaque-looking Picket Fence. I used Dried Marigold, Broken China, and Dusty Concord.

I sprayed with a light mist of Pewter Perfect Pearls Mist and heat set.

Then stamp with one of my favorite Tim stamps of all time, Lost and Found and Urban Chic using Jet Black Archival Ink.

The Maya Road trim at the bottom gives you a good base and the Shabby Accoutrement in the lower left corner brings your eye into the piece for a starting point. I tied waxed linen through the button.

The Lavish Trim is died with Worn Lipstick, Wild Honey, and Dusty Concord   Distress Inks dried with the Heat It tool.

Add a small pearl Bauble, Type Charm, and gold Chain Tassle with a Jump Ring to the ribbon and tie in a bow to the top.


Have a great day and hope to hear what you think of the new products!

Linda

Wednesday, August 10, 2011

All 3 New Classes for Fall!

The week has really flown by. Putting together 3 new classes for a deadline, writing instructions, taking and editing pictures, ordering supplies, typing up student supply lists and store lists.

And getting ready for Stamper's Ink classes in Shawnee, Kansas along the way took some time, too.

Judy and I are ready to go!!!! So look out Kansas....we'll be seeing you on Friday!!!


Here is a really bright and cheerful 6x6 canvas that's got the new Cabinet Card Die and others to create a fun wall hanging to give as a gift or keep for yourself. Each flower has 5 layers of material to create dimension. Love the colorful Poppy Fields here from Graphic 45.

The surprise is the lighter paper I used here. Who remembers what saved the Trio from the affects of the Poppies in the Wizard of Oz? Well ....... perhaps that's what's on the surprise paper here under the flowers.


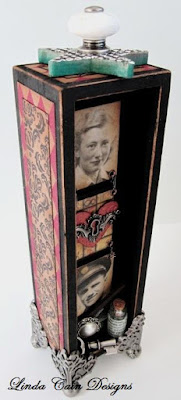
This class has the new Canvas Corp papers in it plus many Tim Holtz products that make a very fun Standing Curio. This is the most asked-for class I've had since I made one of these for Tim's booth at CHA. You can see we have some Metal on the top, too!!!

This class is so fun. And you can really make it your own with your personal photos if you like.


This is another peek at the Standing Curio class. The bottom of the box has several pieces of ephemera. I LOVE how the new t!m stamp for the Little Labels collection fits perfectly on the little vial.


I LOVE these Tool Caddys! I have 3 on my desk to keep track of different sets of tools. If I'm really good and put them back where they belong each time, (what I tell my kids, right?) I can always find the right tool when I need it!  .................RIGHT!

I spend half of my life looking for something.........every day. Anyway, this is a kind of "get your feet wet" class. Make something you'll enjoy every day that's a good starter experience if you've not done this kind of work before. You'll see how much fun it is to combine papers, paints, wood, metal and glue!!!

And yes, that's embossed Metal Foil Tape on the front! COOL stuff! AND my favorite Steampunk Debutante from Graphic 45 all around the box plus the Staples Metal Flowers. The back is as cool as the front!

The 3 new classes are scheduled for Creative Cuts and Crafts and Memory Bound right now. The boxes are hard to get for the Standing Curio, so the size will be limited. Get your place early, cause I won't be able to add more spots.

Check out the sidebar for links.

Linda

Sunday, July 31, 2011

7Gypsies Tray..........Finally Done!


If you know me, you know I'm slow......I have a VERY hard time making up my mind. The hardest thing for me to do is to FINALLY get the nerve to GLUE!


I overthink, and change things a LOT!


BUT, I took yesterday.....and night..........and early this AM to finish this baby up...once and for all!


And I LOVE IT!  So, mission accomplished.


These 2 faces will be incorporated into one of the new fall classes coming up. We'll make plain photos look like old picture booth photos. Most everything here is from the OUTSTANDING 7Gypsies class I was lucky enough to attend at CHA.

Great products, great project.....fantastic teacher. Not an easy task when you're limited like you are at CHA. My hats off to all involved.

LOVE the Bottles and the Rub-ons here. Papers, hangers, chipboard pieces, corners, and trim studs.


This has several pieces I added, of course, one being the Bauble from Tim Holtz and some stamps from the Papillon set. I used several different colors of Alcohol Ink to color the pearl.


To add to the great Rub ons theme, I used Tim's Tissue Tapes around the tray as well. And Glossy Accents to most of the numbers and letters.

I used lots of Distress Inks, well I had to, it's just what I do.

And more Tim stamps.


I had to do something with the great heart we made in the Melt Art class with Tim and Ranger....so here it is on the end of the Balloon or Kite string. You decide.

And a wonderful flower from KaiserCraft!!!!!


I LOVE this section. Layers of Rubons on a tag and then a piece of Shrink Plastic I made with one of my favorite ATC stamps from Stampers Anonymous and Tim. And some vintage measuring tape with stamps (of course).


Just one more Shrink Plastic piece that was sitting on my desk. The bird stamp needed to know how lucky he was to be free and not in a cage.........so there ya go!

This last section is a book that opens when you undo the elastic hook across it.  Brilliant design by the teacher here! I may have to take some pix of it later...

I love it, it was fun, and it puts a smile on my face.

Great stuff from the Gypsies.

They were WAYYYYYY ahead of their time. And I've always, always loved everything they come out with. 

Let me know what you did with yours, if you were in the class, or just send pix of what you've been doing with 7Gypsies.

Be well and be good to each other!!!

Linda

Sunday, May 22, 2011

How I stamp on metal .....

Everyone has their way of stamping on various substrates. But the new Archival Inks on the Metal Foil Tape was a fun challenge for me.

I told you earlier you can stamp and seal.

Well, here's an even easier way to do it....at least for me.


I used the new Metal Foil Tape from Ranger, Glossy Accents and an old brush.  Put a bit of Glossy Accents on your metal and spread evenly and very thinly on the metal.

Be sure to keep working it evenly until all the bubbles are gone. The thinner you spread it, the less the bubbles show up.

Let dry and stamp with Archival Ink colors of your choice. I used a Haberdashery stamp here from Tim. Very VINTAGE looking!!!!


The middle one has gesso on the chipboard and Rose Madder Archival Inks lightly added and wiped off. Heat set to dry.


I also used Claudine's Gesso on the metal, let it dry, and then stamped images from Adverts Stamp set from Tim.


Be sure to HEAT SET your inks with the Heat Tool or they will not dry.

I used a scallop pair of scissors to trim and added to heavy black chipboard.


These fun labels can be added to little bottles of anything you find around the house. I used Jet Black Ink here.

Enjoy and happy CREATING ART!

Linda

Friday, May 20, 2011

Tim's District Market @ Inspiration Emporium! And Ranger's new Archival Ink Sample

Well, I got my Studio cleaned up a bit. Filled the waste basket full of stuff I could part with after experimenting with the new Ranger Archival Inks.

They are very cool on Glossy Card Stock!!!! Vibrant colors and gorgeous combinations.

This one didn't make the cut, but I thought I'd show you some learning experiences.
"Embrace the Imperfections."
"Then throw them away..."
Maybe that's not exactly what Tim said.


I tried several things here. One that was fun was shadow stamping. I used the lighter colors first as the shadows, and the Sepia over the top. It takes some practice to make sure you get the 2 stampings even.


Needless to say I threw several away.  This one wasn't too bad. Got the Deep Purple guy a bit too dark. So I went with a lighter color next.


The Butterflies and Moths stamps up perfect over the background of Chrome Yellow. Colors used here are the new Viridian, Venetian Orange, and Deep Purple.

You know me, I don't clean my stamps, I just twist the color off on scrap paper. So I found the colors blending to form even richer colors after that. Works for me!


District6

AND I just got word that Inspiration Emporium has Tim's new District Market line for pre-order!!!!!!

I LOVE the Totes and Tissue Wrap.....


District2

These products are to die for!!!!! LOVE the Notecards....Lost and Found.

District3

And the Burlap Panels....so cool! Check them out @ Inspiration Emporium. They have them all coming soon! So PRE-ORDER now.

So many new Finished Products.....so little time.


Thursday was Kindergarten Graduation. What a hoot! Nothing like a stage full of celebrities with a chance to speak into a microphone! Emma did great! Here Poppie straightens her hat.


Have a great weekend. We're probably going to have a washout here!

Linda

Friday, April 22, 2011

Packaging, Alcohol Inks and Butterflies and a SALE!!!

It seems like ages since I got to get my little fingers INKY. But here's a little something for you to try.


At Inspiration Emporium we are working on a theme....Packaging!

The Butterflies are cut from packaging you get from all the wonderful products you buy.   Here I used Tim's new Mini Butterflies Movers and Shapers die.

Then I used Alcohol Inks to color the backs...add permanent black pen to the body and Aqua Rhinestones from Kaiser on the front. I LOVE Kaiser's Rhinestones!!!!


It's extremely hard to shoot a good picture in the Midwest gloom recently. No sun today...just rain and more rain. So this is shot under and Ott light trying not to get any glare off the plastic...difficult for me.

The Large Manila tag is sprayed with Perfect Pearls Mists....Turquoise and Perfect Copper. I used the cutout section of the plastic to make a stencil, so the butterflies are shadows on the tag. They do not show up well here...sorry.

You have to have a very light background for the butterflies to show up well, in my opinion.

An old favorite stamp from Nature's Moments is used for the background with Jet Black Archival Ink. You can see the stamps right through the butterflies.

The Alcohol Inks I used on the Alcohol Ink Applicator Tool with Felt were: 
Cranberry, Bottle, Sunshine Yellow, and Wild Plum.  I started with the yellow first and added layers until I got the look I wanted. Just Play!

I also added this to a black chipboard cutout using Tim's Tag die. A Plaquette over some ribbon and a bow at the top.

The pen marks just add something extra. I'm sorry, I don't know who made the little words stamp...if you do, let me know.

There's $5 shipping to the US and $10 international right now at Inspiration Emporium!!! Take a look and shop. AND because it's Joy's and Jay's mother's birthday...

enter "bigmama" in the coupon code area and get 15% off your entire order until April 30th!!! And don't forget to check out the blog for tips and tutorials!

Have a great EASTER!

Linda

Sunday, April 10, 2011

Want a fun and easy thing to make you go....Aahhhhh!


My friend Jen Crossley is an accomplished Artist. She makes over-the-top pieces with etched metal. She's giving classes at Art and Soul in Portland Sept 29-Oct 1. She is one of the most talented Artists I've ever had the honor to call "my friend." (sorry not Art Unraveled)
Her Etched Metal book class is something that will knock your socks off!
If you are in the area and have the chance to take her classes, you will not regret your time or money spent...I'm positive.


She just loves what she does with a passion....check her out, and look her up.

Anyway, I was playing with the same stamps she was the other night when she posted this fantastic book on her blog.

I was checking them out using black ink....on paper....cool. OK. But nothing as cool as Jen's etching...OMG! Sorry, but it just ROCKS!

So, I thought, what could I do in my little studio that would do justice to these fantastic stamps......OH! I know!!!!!

So I got out the embossing ink and powders and started stamping and embossing on black paper like you wouldn't believe!!! I used Bronze, Copper and Gold. I do not know who they were made by...sorry. Way long time ago that I bought these.

Easy, peasy..........I LOVE these new stamps!!!! Book Covers by Tim Holtz.

I'm going to make a book with them and add some "junk" (as Jen calls it)to the sides. I'm thinking black Chipboard would be good. But it will never be as stunning as Jen's. Still fun.

Check them out.......check out Jen's book on her blog.........Check out her classes....then start stamping!!!

Have a great day....CREATE ART!

Linda

Friday, April 8, 2011

Sticky Back Canvas...Stamps ...and Paint


A couple of years ago Bill and I visited my friend Fran and her husband Jim at their new home in South Carolina. We took a day to walk around Charleston...one of my favorite cities in the South.

The Architecture and gardens are amazing there. The history of the city, and of course the museums are fabulous.

In our walk around town I found this window that just really caught my eye. The ironwork done by local artists is just breathtaking. As you can see in the picture below.


I love the gates and fences.....anyway. I took the window picture thinking I would do something with it some day.

So yesterday I was looking at Donna Downey's video using Matte Medium on canvas to transfer a picture....and I decided to try it.

So, long story short........I used:

Claudine's Sticky Back Canvas.
Golden Regular Gel Medium (Matte), Golden Fluid Acrylics-Iridescent Copper(Fine)-Iridescent Bronze(Fine) and Titan Buff.
Tim Holtz Papillon Stamp Set, Urban Chic, and Mini Classics
Ranger Jet Black Archival Ink
Versafine Vintage Sepia Archival Ink and Olympia Green


Yes, I'm a real sucker for the new Papillon Stamps set....they are just GORGEOUS. The copper and gold show up differently. It really has a light blue inked edge that just escapes my camera for some reason.


And here are the results of my playtime....I love it. It's the most artsy thing I've done in a long time! Thank you Donna for the inspiration. See the window in the background? The copper and bronze are hard to see. Tilting it changes the metallic colors each time.


I added black permanent pen and white paint . (The lines are really straight, it's the photo that's off). It took longer to get good photos than to do the PROJECT!!!! I  finally just gave up.

The Green stamped images were added to the borders.  And I free hand wrote Architecture with white highlights.

A bit of Distress Ink blended onto the sides for shading.


Just an ink jet print on plain old copy paper.

Check out the difference she references to different Matte Mediums as far as letting one dry and the Golden not letting it dry.

I took her experience to heart, and haven't tried the Claudine Matte Medium yet, just different steps, she said you have to let it dry.

Since I had the Golden I tried it.

I was at Ranger U with Donna. What a hoot! Check out the video.


That's it from here...have a delightful day.

Create ART!

Linda