Friday, September 27, 2013

Another Tag - I DO Love Making Them

Time again for a Halloween Tag for Inspiration Emporium.

Tags are something you can incorporate into a Card,  a Wall Hanging, a Plaque....the same techniques you use here can be used on many different things.
 
But it's easiest to lead you through a tag, so you can take it to another level of your choosing.
 
And if you don't care for the Theme I use, pick your own, and just use the ideas learned here.
  
 
There are links to all the products throughout. So click on and check them out!

 
Start with a #8 Manila Tag and Distress Inks...Mustard Seed, Seedless Preserves, Spiced Marmalade, Ripe Persimmon and Mowed Lawn.
 
Then drop some water droplets into the ink and blot.
 
Very Important....HEAT SET to dry the Distress Inks before the next step or your embossing powder will stick to everything!!!
 
 
I embossed the tag with Halloween Night Texture Fade and added Black Soot Distress Ink very carefully to just the raised areas.
 
Some will get around the cat and the crow to add a "slightly grungy" feel. That's OK.
 
Then I added Clear Super-Fine Embossing Powder.... use a brush to knock off any you don't want to emboss.
 
Heat with the Heat-it tool to emboss.
 
This is a night time shot that shows best how the Embossing Powder hit the high points.
 

The next layers are added with white paint on the script stamp from the Mini Halloween 3 set, as well as with Coffee Archival Ink.
 
I used the Vintage Lace Sizzlit Die to cut some Metal Foil Tape for the bottom edge that I colored with Purple and Gold Sharpie Pens. REALLY cool color blend here. Hard to see I know.
 
I added some Autumn Tinsel Twine with the Tiny Attacher.

I also added  Inka Gold colors here and there.
 
The Inka Gold on the embossed 31 was still not showing up as well as I'd wanted, so I outlined it in white...and then it popped.

 
You can see several things here.... Gold and Green Yellow-Inka Gold rubbed onto areas of the card.
 
The Crinkle Ribbon was spritzed lightly with water and then I added Distress Inks Marmalade and Persimmon, heat set and stamped the larger script stamp from Tim's Apothecary set with Jet Black Archival ink.
 
Add the White Extra Fine Point Sharpie pen marks that accentuate the tag.
  
 
And lastly I added the tag to chipboard and put white stitch marks around the edges.
 
Check out the links to Inspiration Emporium and make a tag of your own.
 
Layers and Layers to create a fun tag!
 
Hope you enjoyed the trip.
 
Linda


Monday, September 23, 2013

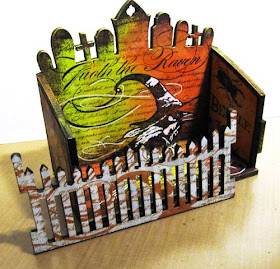
Gothic Tombstones and Halloween ATC Fairy Box

Is this just too much fun, or what?????
 
I had a blast making these little lovelies. I show you a few steps to them here.
 
The Gothic Tombstone ATC Swap is under way, and they need to be in by Oct. 7th. So get them in the mail people. There's still time.


 The box has been painted with Fresco Paints and stamped with Jet Black Archival Ink.
 
A Label Pull Frame and 2 Victorian Flourishes are painted up and added, one to the back and one on the front.
 
 
I used the Raven Background stamp on the back and bottom of the box with some white pen accents.
 
The Fence was coated with Viva Bronze Crackle Paint. When dry I added Inka Gold - Green Yellow and Gold. This stuff is really cool!

 
The fence back is just painted white with Fresco Snowflake and stamped with the Raven again in an orange ink.


I added a few pieces of Graphic 45 Steampunk Spells paper on the ends - inside and out, and glued it together. Viola!

 
Now for the Tombstones...I LOVE how this one turned out.
 
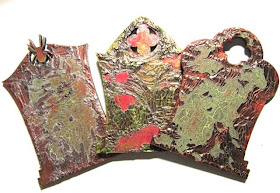
The 2 Antique Skeleton Paper Cuts  are sitting on mini tombstones that are the punchouts from my Gothic Haunted House Shrine. Never throw away anything that looks interesting!
 
Paint the little tombstones and stamp them up. Too cool!


I'll try to show you how to make the fascinating background that I stumbled onto.
 
I start with 2 colors of Fresco Paint...I tried a couple combinations. And heat set to make sure it's dry.

 
Then I globbed (literally) on the Bronze Crackle and let it dry. It's supposed to dry over night, but here's the thing.
 
I thought it "looked" dry. So I tested it, of course. In the middle where it's thick, you can scratch some of it off as shown. When you like how the pattern looks....stop. Heat set it, or let it dry over night.
 
It leaves this really terrific pattern on the green paint.

 
Then to make sure more didn't come off, I added Metallic Glaze, or any clear glaze you'd like to seal it.

 
Now it has a glimmer to it, but I wanted more contrast....so add some Copper Inka Gold.
 
Let it dry and buff to a shine.....amazing!
 
These are just 3 of the ones I used for backgrounds.


And this is the cute little stamp I used for the back of one of the Tombstones from the Mini Halloween Set 3 by Tim Holtz.
 
Inka Gold is added around the edges.
 
That's a lot of pictures, and a lot of fun to check out, so give it a go!
 
Check out all the links here to Retro Cafe Art Gallery for great supplies.
 
Linda


Wednesday, September 18, 2013

Halloween Spider House

Hey everybody!
 
 
I used Eileen Hull's really adorable Sizzix ScoreBoard XL Birdhouse 3D die.

 
This is how my little "bird" house changed into a Halloween Spider House.
 
Sorry if it "creeps you out!"
 
We start with plain old chipboard, Metal Foil Tape with sticky backing, and Vintaj Patinas.
 
The Patinas are perfect for applying to metal. Here I used them on the DARK side of Cut-n-Dry foam. It's less absorbent than the WHITE side and really makes a smooth application.

 
First I ran a few pieces of metal through the Vagabond using a couple of Halloween Texture Fades.
 
Then I started adding different colors of the Patinas with a thin amount of the ink. If you get too much on it will seep into the embossed areas.

 
This shows how I added just a very thin line on the foam. You need to re-ink  it several times per color as it dries very fast.

 
I used the lighter colors first, and then added the darker colors over the edges where the color meets.
 
I heat set for a few seconds. Don't torch it or the glue on the back won't like it. And remember...METAL GETS HOT WHEN YOU HEAT IT!
 
I'm just sayin'.....you don't want to BRAND yourself.
 
 
Find the sections you like best from your pieces. This is one of the sides.

Trace around the sections of your embossed metal, cut out the shape, and add it to the house. I cut my metal about 1/8" smaller so the black edges create a frame.


This shows how I  run a Chisel Tip Sharpie marker around all the edges making a large border. This will make your colors pop and give you room to bend your chipboard.
 
I also edge the metal with the Sharpie.


Trace the birdhouse hole onto the backing paper for that piece. I used a hole punch slightly larger to keep with the black framing around each side of the house.


I cut the piece for the roof leaving the cute scalloped edges alone so I could add Stickles to them.

 
 Next you add Wonder Tape to the edges per the Sizzix instruction information.
 
This is how the house looks with all the metal, and with the Wonder Tape added.
 
I also added some Alcohol Ink to the "31" Plaquette, punched holes, and added it with brads before I put the house together.
 
 
The Spiders are easy to attach with black foam squares.
 
So there you have a fun little house. Make a Village or add a name on the front as a Place Card for a Halloween Dinner.
 
Put a piece of Fishing Line through a hole in the middle of the roof line and hang it from your Studio lamp. I have several on my lamp of different sizes, shapes and styles!
 
Check out the links below for Inspiration Emporium and have fun!
 
Linda
 
Products Used:
Ranger - Vintaj - Patinas-Rusted Hardware and Weathered Copper
Tim Holtz Idea-ology - Plaquettes
Tim Holtz - Texture Fades - Halloween Words and Cobwebs
Tim Holtz - Adirondack Alcohol Ink - Sandal
Ranger - Stickles Glitter Glue - Copper
Ranger Inkssentials- Metal Foil Tape
Ranger Inkssentials - Cut-n-Dry Foam
Ranger Inkssentials - Wonder Tape
Scrapbook Adhesives - 3D Foam Squares-Black
 
Other Products:
Plain chipboard
Chisel Tip Black Sharpie Permanent Marker
Retro Cafe Art Products - Furry Spiders and Mini Dried Pumpkins
Hole punch

Monday, September 16, 2013

Tim Holtz Stencils are in the House!

Just a few pictures of the 6x12 piece I made with the new Stencils from Tim Holtz.


This is on Manila Cardstock and the base is Distress Inks of various colors.
 
 
Then I used the stencils to add a layer of Grunge Paste or stencil paste, here and there.
 
You can also see the Copper Inka Gold here, but not the wonderful shine it has.


 The stencils were used again with Distress Ink and Clear Embossing Powder.

Distress Markers add the shadows.


More Stamps, Inks, and several Distress Markers show up here with a side angle.
 
I layered it onto a piece of Black Chipboard.

 
Looking down you can see the texture of the Grunge Paste, with inks and stamps added over them.


The last thing I added was Inka Gold. The only way I know to show metallic paint is to have another light source hitting it.
 
So this is a shot under a regular candescent light that shows the Inka Gold...Gold and Copper on top of the stenciling.
 
I LOVE how this turned out. Stencils are so much fun to play with.
 
Linda
 
Products Used:


Friday, September 13, 2013

Blog Hop with Seth Apter's StencilGirls & A Giveaway!

Hi everybody!
 
 We're having a  BLOG HOP  at  StencilGirls Products!
 
A few weeks ago Maria asked me to be a Guest Designer, and since I LOVE Maria dearly, I said yes immediately!
 
So, I'll be a GD on Oct. 4th!!!
 
But then, I was lucky enough to have her ask me to join this Blog Hop today, and this is my Canvas Bag Project with a Seth Apter Stencil design. 
 
 
I'm so happy with the way this turned out.
 
 
This is the stencil we'll all be using - L183.
 

I start with a plain canvas bag. It is rather course, so detail will not be extremely crisp, but I love how it took the colors.

 
We start with a pile of products including paints, stamps, inks and pens.


First I laid down a base of Irish Cream Fresco Acrylic paint with Cut-n-Dry foam. (I did not get a picture of the bag at that point. Sorry.)
 
Then I start taping down my Stencil and adding white paint. Use tape to make a border around the section you want to stencil.

Move your stencil around making several different sections.
 

If you want the color to POP, stencil in white paint and add color on top. This keeps your colors bright, as shown here with the  shades of green Fresco, and then Silks to add shimmer.
 
Next I outlined with Tulip Fabric Pens and added drawings around the bag.


The Silks are added here over the Frescos to brighten up the chalk paints.
 
You can see the Silks on the green accents as well. It's very hard to show their true beauty in a photo.
 
 
Script stamps and white paint are stamped around the center section.

 
I kept adding the Fabric markers to outline the stenciled parts.
 
I also did some freehand painting around the bag.
  
 
  The last thing I did was use several foamie stamps and Fresco paint to create a trim around the edges with opaque Baltic Blue.
 
 
This is a detail of the stenciling, painting and stamping.
 
Hope you enjoyed this...and now leave a  COMMENT here to enter the Giveaway.  Then HOP to the next blog!

Maria will be having a giveaway on StencilGirl Talk.  All comments submitted on the ENTIRE HOP (all blogs) are eligible to win. So leave a comment on each blog for more chances to win!!!

Good Luck to everyone!
 
Linda
 

Monday, September 9, 2013

Some Halloween Jewelry From Reto Cafe Art!

 Who wouldn't like to wear some fun Halloween Earrings this year???
 
These are way too much fun!!
 
So check out the links at Retro Cafe Art!


These are the little Coffin Charm Tiny Trinkets.  A tiny Graphic 45  Mr. Seymore Bones adorns the insides.
 
Glossy Accents and Inka Gold  make them really easy to put together.


This is a picture of the back of the earrings with Viva Crackle and Inka Gold.
 
So easy....so cool!
 
 Bet I know who would want these to wear in her Haunted House stint.....
 
 
These are pretty simple. The Spiders come just like you see them here. I just added some silver link chain and ear wires.
 
Done!
 
At first glance this picture looks like the Skeleton has Mickey Mouse ears on....I was going to change it, but ah, maybe it's just me and I'm easily amused.

 
Some charms and Cutouts with just Inka Gold added to them...really!
 
 So get your "Halloween ON" and create some great little trinkets to Wear or Share!
 
Linda
Retro Cafe Art Products: