Is this just too much fun, or what?????
I had a blast making these little lovelies. I show you a few steps to them here.
The Gothic Tombstone ATC Swap is under way, and they need to be in by Oct. 7th. So get them in the mail people. There's still time.
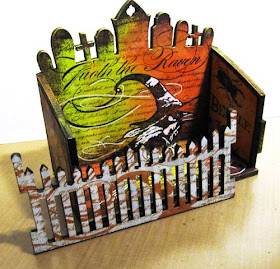
This is the Halloween ATC Fairy Box kit with a couple of small chipboard Skellies and 2 Gothic Tombstone ATCs in it.
The box has been painted with Fresco Paints and stamped with Jet Black Archival Ink.
A Label Pull Frame and 2 Victorian Flourishes are painted up and added, one to the back and one on the front.
I used the Raven Background stamp on the back and bottom of the box with some white pen accents.
The Fence was coated with Viva Bronze Crackle Paint. When dry I added Inka Gold - Green Yellow and Gold. This stuff is really cool!
The fence back is just painted white with Fresco Snowflake and stamped with the Raven again in an orange ink.
I added a few pieces of Graphic 45 Steampunk Spells paper on the ends - inside and out, and glued it together. Viola!
Now for the Tombstones...I LOVE how this one turned out.
The 2 Antique Skeleton Paper Cuts are sitting on mini tombstones that are the punchouts from my Gothic Haunted House Shrine. Never throw away anything that looks interesting!
Paint the little tombstones and stamp them up. Too cool!
A Vintage Newspaper Word, a Black Chipboard Cut-Out Bat, and a Halloween Lantern decorate this piece.
I'll try to show you how to make the fascinating background that I stumbled onto.
I start with 2 colors of Fresco Paint...I tried a couple combinations. And heat set to make sure it's dry.
Then I globbed (literally) on the Bronze Crackle and let it dry. It's supposed to dry over night, but here's the thing.
I thought it "looked" dry. So I tested it, of course. In the middle where it's thick, you can scratch some of it off as shown. When you like how the pattern looks....stop. Heat set it, or let it dry over night.
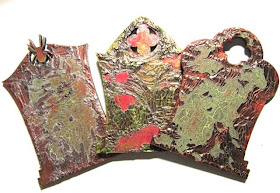
It leaves this really terrific pattern on the green paint.
Then to make sure more didn't come off, I added Metallic Glaze, or any clear glaze you'd like to seal it.
Now it has a glimmer to it, but I wanted more contrast....so add some Copper Inka Gold.
Let it dry and buff to a shine.....amazing!
These are just 3 of the ones I used for backgrounds.
And this is the cute little stamp I used for the back of one of the Tombstones from the Mini Halloween Set 3 by Tim Holtz.
Inka Gold is added around the edges.
That's a lot of pictures, and a lot of fun to check out, so give it a go!
Check out all the links here to Retro Cafe Art Gallery for great supplies.
Linda


this is wonderful Linda - I love the tombstone - the peeling crackle is fabulous!!
ReplyDeleteWow, what a fabulous project. All the elements in this create such a super effect.
ReplyDeleteToni xx
So much Halloween eye candy!!! Everything is so amazing!!! xoxo
ReplyDeleteOooh my love of Halloween has just intensified! I adore this project, Linda and love how the "mistake" became something really cool. This is great!
ReplyDeleteCutest ever. You are making me really start to like Halloween! xox
ReplyDeleteyour house must be such fun to live in Linda! :)
ReplyDeleteSo spooky and creepy. I love them. What a wonderful accident. Thanks for sharing.
ReplyDeleteI was already impatiently screaming "how did she make that cool background" when it was just a scroll down for me. I can't wit to try it. Thanks for all the photos, Linda, and the how-tos. Spooktacular!
ReplyDeleteWow. Totally fabulous! Thanks for all the photos and explaining your process!
ReplyDeleteThe backgrounds are outstanding! Love the crackled, aged look! And your pieces for the swap are just amazing, as always!
ReplyDeleteI think you are having way too much fun with Halloween!
ReplyDeleteSandy
I am really amazed. Today I spent a lot of time searching for something interesting on this topic. Finally I found your blog. Thanks for that!
ReplyDeleteCardsharing Server | Cccam Server
Fantastic! Wonderful! Spectacularly gorgeous!! Yep, I love them hugely.
ReplyDeleteFabulous creation, just amazing! I love the backgrounds and the characters to each tombstone! The box is awesome too. Thank you for the tutorial on the crackle now I need to try it out!
ReplyDeleteJust love it. And the techniques. thanks as always for sharing.
ReplyDelete