Oh, it's been so long since we chatted. So much water has gone under that bridge. After looking at houses for years in our old stomping ground, we fell into a deal where all the planets seem to have aligned. We've since sold our house and are nearly done building a new one 100 miles north in the small town Bill grew up in. So, in other words, we're going home. We're thrilled. However, packing away all my art supplies aka "happy crap" (my daughter's term) it became too hard to find time or supplies to create any reasonable art....until Finnabair , our friend Anna Dabrowska, came out with a new release that showed up just when I needed it. All these lovely products can be found at Retro Cafe Art in the States and Finn's site Mixed Media Place in Ireland.
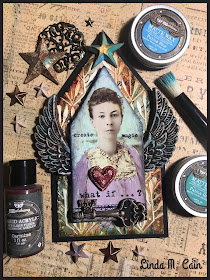
This is almost exclusively done with Finnabair products. (and a bit of chipboard)
This is almost exclusively done with Finnabair products. (and a bit of chipboard)
This is the wonderful goodie box I received from the lovely Finnabair. She has new matte waxes and the most gorgeous stencils. The beautiful decorative papers, aka tissue papers, are detailed and easy to work with.
I started with a house shaped chipboard piece that I painted with heavy white gesso. Then I used a UHU glue stick to add the tissue paper Notes and gently smooth it down. I trimmed the edges and rolled them to the back. This has the pretty red writing at the bottom .
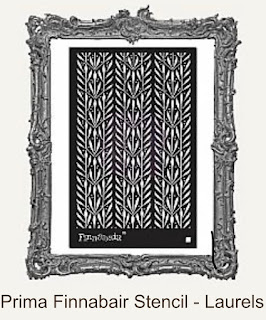
Next I added Plaster Paste with the new Laurels stencil on the majority of the house. The antique staining is already part of the tissue paper and it looks gorgeous at this stage....I always hate to cover up backgrounds......
The next step when the plaster paste is dry is to add color with the Liquid Acrylics and a spritz of water to get them to run and blend. Just drop in the color, spritz, and let it move around. I added Old White Matte Wax, Rusty Brown and Charcoal Black to the edges and high points.
The girl was cut from the tissue paper and painted with acrylics on the back. Then she was glued to a smaller piece of chipboard that was painted with Mint Impasto Paint. I used stamps from Now is the Right Time and Dream On from Finnabair with black archival ink. The little lace stamp at the bottom is a long ago clear stamp from Finn.
The wings were cast using paper clay and the Wing and Locket silicone mould months ago and sealed with heavy black gesso. Then comes the magic adding the Patina Blue, Patina Green, and Old White Matte Waxes. When they're dry, add a bit to Brass Hardware Metallique paint for some highlights.
The Keys and Keyholes mould created the key, and the star is from the Stars and Moons mould. The Heart, from the Anabelle mould, is painted with Metallique Rusty Red paint and distressed with the White Matte Wax.
This is how beautiful the Notes Decorative Paper really is.
And this is a full shot of the Laurels Stencil. They are all truly gorgeously detailed.
Put it all together with a bit of 3D Matte Gel and layer it onto a piece of black chipboard. I think I've covered it all. It's been quite a while since I've written a blog post. If I've missed something, or you have any questions, don't hesitate to leave me a note and I'll try to answer it.
Now I'll get back to all the wonderful things that have to be figured out to pack up and move to the new house. Yesterday we put together 4 new bar stools and 2 lamps. Tomorrow it's a headboard. Here's the latest outside picture, the door will be red and the Craftsman pillars white. My little Studio has the arched window! And soon we'll have some sod. (fingers crossed for early spring)
Hopefully all the selecting colors and doorknobs are done. It's been exhausting, but fun none the less.
Be Well and Be Good to Each Other.
Linda
Retro Cafe Design Team Member
and
Finnabair Ambassador


Great to see you creating again, love the project. Your new home is so exciting too, hope it all comes together soon and you are happily moved in!
ReplyDeleteThanks so much Helen. We’re on our way!
DeleteA Stunning piece, Linda . Those liquid acrylics with the laurels stencling - oh my! And as always you embellish superbly.
ReplyDeleteIts great to see you back creating.
Good luck with the final stages of your new home build and with moving in . Its looking fantastic and how wonderful that you have your own creative space .
So happy for you and your hubby.
Love x
Thank you so much Amanda. It’s been a challenge that’s going to be great. ❤️
DeleteBeautiful Linda!
ReplyDeleteSo good to hear from you Nancy. We’re seeing light at the end of the tunnel. Be well.
DeleteSo happy to see you’re creating again, I missed your awesome art. This is fantastic Linda.
ReplyDeleteYou’re so sweet Ann. Thank you. ❤️
DeleteGorgeous art and a great tutorial! And I'm so excited for you getting a brand new place! woot!
ReplyDeleteSeeing light at the end of the tunnel today❤️
DeleteHappy to hear about the new nest!! Thanks (as always) for the awesome tutorial and inspiration. ❤
ReplyDeleteThanks Kitty, you make my day! ❤️❤️❤️
DeleteWonderful art & fabulous house news. Enjoy!
ReplyDeleteThanks so much Vic. It’s been an adventure. ❤️
Delete