Saturday, March 30, 2013

Fairy Cottage ATC Hutch-Tropical Style

Is this a bright little addition to your desk or shelf, or what???
 
I am so having fun with the little Fairy Cottage ATC Hutch here and the GORGEOUS Tropical Travelogue 8x8 paper pack from Graphic 45. But you can use this tutorial with any papers.
 
The colors are BRILLIANT to say the least. I do add more color and shadows here and there, but basically, what you see is what you get!
 
 
The top of the Hutch just has Smoked Paprika  Fresco Paint from Paper Artsy on it, no base coating. Using the Cut n Foam squares and a tapping motion creates a stucco affect with little bumps.
 
I initially painted the front edges Limelight, but had to add markers to make it even brighter. I did this to create the color of the paper since I didn't base coat it first. Whatever works is what I say!
 
 
I traced and cut the papers laying them out and seeing which areas would be "glued" areas. This helps to see how it all is going to fit together as well.

 
I decided on this combination for the sides. Lay them out, and then glue papers together and set aside.

 
The Stars and Gear are base coated with Snowflake (see the white one) and then colors are added with the Foam. You can definitely see the difference in the colors when they have the White base coat first.
 
Then I added Beach Hut and South Pacific for the blues, and Haystack with Smoked Paprika for the yellow star. I eventually used a "naked" gear instead of the blue one.

 
I fussy cut the pieces I wanted to hang on the fence and add colored markers to enhance even more richness and shadow.
 
When I glue paper to paper, I use Glue n Seal. When I glue paper to Masonite, I tend to use Matte Multi Medium. But glues are personal; use what works for you.

 
Here you can see the sides after the papers are layered. The papers are added BEFORE putting this piece together. That really makes decorating easy!

 
I cut extra layers of the Flowers inside. The fish and other flowers are added with foam dots for dimension.
 
Here is a detail look at the Stars. I like leaving the top ones the Masonite brown color. That really makes the other layers pop.
 
The Gold Glittered ball in the center and Key Lime Liquid Pearl drops are the last touch for contrast.

 
As you can see, I've added various Markers using oranges, greens, blues and golds to the flowers and fish. I just wanted a brighter orange to start with and got carried away!
 
 
This is the back section with a layer of orange paper under it. I only added markers to the flowers that I fussy cut over the lady, and some blue and gray shadows on the lady.
 
That's it for today. Hope you go and get yourself a little Hutch or Shrine to make up from Retro Cafe Art. You won't be sorry.

Oh, and the winner of the Medium Theatre Ornate Shrine Kit and Much More is....

41Powered by RANDOM.ORG
 

Oh, this is darling! I would love to give a theater a try - my penchant for creating scenes in tins would translate well, I think! Thanks for the inspiration and a chance to win!

Cheers,
Susan

So Susan, send me your Address and I'll get this out to you next week. Congrats!
 
As always, know you can ask any question or advice from me here, or in an email.
 
I'm here to serve!
 
Linda


Friday, March 29, 2013

UPDATE.....last day for a chance to WIN!

Today is the last day to leave a comment on my previous post to win a Theatre Plus goodie bag from Retro Cafe.
 
And I've thrown in some fun pieces from Graphic 45.
 
I've so enjoyed reading all the wonderful comments. You're so sweet.
 
We'll have a drawing at Midnight tonight and a new little Shrine using both these products will be up.
 
My home decorating project should be done today, and things HOPEFULLY will be back to normal.
 
Whatever normal is around here.....none of us in my family have ever professed to be that.
 
Have a great day!
 
Spring seems to finally have sprung here, the tulips are back from their 7 inches of snow they had dumped on them last week.
 
Let's get on with it!
 
Linda

Friday, March 22, 2013

A Ladies Diary & Retro Cafe Art + A Give-Away

Well you all know I LOVE  Graphic 45. And the Theatres from Retro Cafe Art are so much fun to work with. So I knew they would be perfect together for this project.
 
Now I want you to know how you can make these. They take a little time, but the rewards are great. I know anyone can make one, and I'll try to show you a few steps along the way.
 
Of course, G45 papers practically put themselves together and need very little else to make them special. To make the colors just a bit richer, I add markers here and there. I also edge my papers with black permanent pen.
 
 
 Kristin has these very cool little Theatre Character Stands that were just perfect for these lovely ladies. They're made out of Masonite as well, so you can move them around anywhere you want like paper dolls. I fussy cut the gals, the roses on the drapes, the Sign on the top, and the Roses behind it. Everything else is straight cut here.
 
This starts with the Large Ornate Theatre Shrine Kit. I didn't paint it or anything....I like the dark brown color of the Masonite as it is. The finished theatre here is 7" wide, 8" tall (including the legs added) and 3  3/4" deep.

 
I used Karen Burniston's Fancy Frame (again, I seem to love it everywhere) for the lady on the end here. It's hard to see, but it's Rock Candy Distress Stickles Dry Glittered up.
 
For paper to paper I use Glue N' Seal, and for adhering paper to the Masonite, I use Matte Multi Medium applied with a large brush.
 
You can see I've cut out and layered a small stamp as filler at the bottom corner, and the end has 2 layers of paper 1/2 inch in difference for the framing affect. The flowers are added over the top of the frame for depth. 

 
 This is what started this whole project....we think this looks like Lady Mary from Downton Abbey, in the Oval Frame. Isn't she gorgeous??? More fussy cut flowers and 3D Black Foam Squares are used here.
  
 
 This is the floor, or base of the theatre. Here I show you how I traced the first layer, then took off about 1/2 inch all around for the 2nd layer. The other pieces are found in the trim page of the 8x8 paper pack. LOVE the lace, don't you?
 
I've also found Tea Dye Distress Ink added to these papers makes the color a little bit richer. So I add it sparingly to edges and lighter colors.

 
 And this is the back wall. Using a darker paper to make a framed piece always makes the colors pop. I also added a few flourish stampings with Coffee Archival Ink for contrast.
 
Distress Markers or water based markers add more color and shadows.
 
 
This piece of paper only has the one green edge (the top) in the paper pack. I trimmed extra edges off and used them to frame in the back piece of paper. You can frame anything you want using trim like this.

 
You can see in this detail shot of the side and front, how the flowers and frame are raised with foam squares to add dimension.
  
Once you get all the pieces decorated, a little bit of glue puts these together. Easy-Peasy. And it's so much easier than trying to get my fat little fingers inside a pre-made piece to measure and glue!
 
Truly!
  
 
The Drapes and front are all one piece traced and glued to that section. I layered another contrasting paper on top of it..a bit smaller, and then the fussy cut Roses as the top layer.
 
The sign on the top is added over the Roses with Black Foam Squares.
 
I painted the stands white after painting them brown didn't work well for me. The lady in the Theatre just has a piece of cardstock folded like an easel stand and glued to the back to keep her in place.
 
To raise the Theatre up I used wooden pieces painted brown.
 
AND.....WHO WANTS TO WIN A FREE Retro Art Cafe piece to make for themselves????
 
Kristin is sending me a box of goodies and we've decided someone should WIN one of their own Shrines/Theatre and a few goodies to go with it.
 
Soooooo, leave me a comment here on my blog and we'll have a drawing for a great prize!
 
Linda 

Thursday, March 21, 2013

I Saved the Best for Last ....IMHO !!!

I've got to say, I LOVED making this Theatre Shrine! The PaperArtsy Fresco Paints work perfectly on these Masonite structures from Retro Cafe Art.  Leandra agrees, so she asked me to use one for the blog.
 
The Tutorial will take you right through the process of this terrific little piece. You've just gotta love these STAMPS, too!!!
 
 
This is all Fresco Paint for the background. You will love how they work, I promise!
 
 
Isn't this just the coolest stamp???
 
It's so "us" in the Art World...or just my entire family, for sure! Huh, Brit?
 
For my United States and Canadian friends, you can see store's links on the right of my blog. ------>

Click on them and it should take you right there for PaperArtsy products.
 
I hope you've enjoyed my projects as much as I've enjoyed doing them. And don't forget to join the Challenge to win 3 FREE FRESCO PAINTS!!!
 
Jump to the PaperArtsy Blog here!
 
Anyway, check it out, and I'll be back again next month, 3rd week, for more fun!
 
Linda
Come back tomorrow for a project using a really gorgeous paper collection from Graphic 45!


Wednesday, March 20, 2013

Day 3 at PaperArtsy Blog with a Canvas !!!

I love this stamp....as you can tell, since I used it again today on the PaperArtsy Blog.
 
But it has so many rich details and Lynne Perrella makes the most gorgeous stamps.
 
 
I'll take you through the whole process here and you can be amazed with this great technique Leandra  has developed with this paper.

 
Does this look cool, or what???
 
So go check it out, ask any questions you have, and don't forget to enter the Challenge to win 3 FREE FRESCO PAINTS!!!
 
What more could you ask for???
 
Go there now and see how it's done!
 
  
Linda

Tuesday, March 19, 2013

Day Two of my Tutorials at PaperArtsy Blog

Which one of these pages do you like the best???
 
Pretty Bright, huh??? It's a Water Soluble Oil Pastels by Portfolio background. Two different color combinations. Two different affects.
 
The Tutorial is over on the PaperArtsy Blog today so go have a look-see!
 
 
This one is using lots of darker colors with more intensity......
 
 
and this one is a little less dramatic with more light in the middle.
 
This week if you join the Challenge, you can win 3 FREE FRESCO PAINTS!!!
 
You be the judge, check it out, and let me know what you think!
 
Linda

Monday, March 18, 2013

Back at The PaperArtsy Blog !!! Free Paints???

Hi everyone, it's my week again at the PaperArtsy blog. YAY!!!


So if you want to see the tutorial on how I made this really fun tag, jump over there and take a look.
 
It's a lot of paint, and stamps and a bit of fussy cutting....


.....and we'll go through the really great possibilities of the background. It's almost too pretty to cover up!!!
 
Don't forget to enter the Challenge for a chance to win  3 FREE Fresco Paints!
 
It's all there, so what are you waiting for???
 
 
Linda
 
UPDATE: They're not on DST yet, so I'm an hour early....sorry!!! Check them at 2PM CST.

Wednesday, March 13, 2013

Happy Easter Tag and Tutorial

Let's start with a tag today.
 
 
A #8 Manila tag is our base. I sprayed it with Dylusions sprays using Fresh Lime, Lemon Zest, Bubblegum Pink, and a touch of Vibrant Turquoise and Crushed Grape....very little of the last 2.
Then I blotted with a roll of paper towels, and dried with the heat tool.
 
 I created 4 of these tags to get different effects and went with the lightest one for this project.
 
 
 I stamped the Mixed Media Chicken Wire stamp using Snowflake Fresco Paint with a rolling technique. Don't completely stamp the entire image everywhere.
 
I did the same with the Roman Print stamp from Artful Artifacts using Olive Archival Ink. Edge the tag with Pine Needles Distress Ink.
 
 
Then I stamped the Easter Egg stamp from Mini Blueprints 2 onto the tags I didn't use, 3 times, embossed them with Super Fine Black Embossing Powder, and cut them out. I added some colors with various Distress Markers for a bit more color and contrast.

The Bunny is overlooking the process!
 
 
I stamped Mr. Bunny from the Mini Blueprints onto Specialty Stamping Paper.
This stuff is amazing!!! Then I added a few colors with Distress Markers.


I used the Fancy Frame by Karen Burniston and Sizzix to die cut a piece of White Specialty Stamping Paper. I then pushed it face down into the embossing ink pad and covered it with Sticky Embossing Powder. Heat it to emboss and immediately cover it with distress Stickles Dry Rock Candy Glitter.
 
I used the back of the Frame, Fancy die to cut a piece of Manila Cardstock and covered it with Dusty Concord Distress Stain. Stamp a bit of the hatch marks from one of the Mini Stamps with black.
 
I printed out Happy Easter on my computer and traced around the frame, then cut out the phrase. Squeezed Lemonade and Ripe Persimmon Distress Inks were added for color. Glue together.


I glued some green ribbon in 2 strips to form a sort of frame for the greeting and used foam squares to add the Happy Easter frame.
 
Add the Eggs and the Bunny with foam squares and glue as you like. The flowers at the bottom are Petaloo Darjeeling and Mini Pearl Daisies.
 
I layered it onto black chipboard, punched a hole and added a yellow Crinkle Ribbon. I initially thought I wanted a died ribbon....
 
 
...which was pretty cool using Distress Inks in bright colors, but it just was too dark. So I opted to go with just Squeezed Lemonade Distress Ink to brighten it up. I liked it better, but to each his own.
 
Have a great day, make some tags or cards and have fun!
 
Linda
 

Thursday, March 7, 2013

Happy Birthday Card for Alex

There's a story behind this card.


My one and only Grandson, Alex, loves music. He's loved it forever and is Majoring in it at college. He is a choral person, sings in the Choir at church,  made All-State Choir, and went to sing at Carnegie Hall his Senior year of HS.
 
So.........when I told his mom that I'd take her to see The Book of Mormon for HER birthday, he could hardly contain himself from waving his hand that "he too" wanted to go for HIS birthday, please!
 
Anyway, long story short, today is his 19th birthday, and we loved the Musical. When I saw this conductor paper in the Graphic 45 collection Curtain Call, it made me think of him, and his dreams of helping people through music.
 
Therefore, I made him this card to remember how we celebrated.


This month the challenge over at the Inspiration Journal is Pop-N-Cuts.
 
I cannot make a simple card to save my SOUL!!! It is literally torture for me. I'm serious.
 
But thanks to Karen Burniston and her wonderful dies, this was fun, and served a purpose as well.
 
I used the Pop n Cuts Base (Card, Horizontal A2 w/ Circle Label 3-D), the Magnetic Insert Die - Label 3-D, and the Frame, Fancy for the inside greeting.
 
 
There are several layers of paper with the tickets, the music score, and the piano keys. The 19, using the film strip countdown, is subtle, but a link to the birthday milestone.
 
I also used the On the Edge - Ornate die to break up the straight and perfect lines of music and keyboards with a different sort of pattern by using the die-cut waste to make the plain brown background jump out even more.
 
 The music paper on the front of the tag is from Tim, the rest are from Graphic 45.
 
Enjoy the Show is stamped using some Mini Alphas.
 
This is my favorite color combination ever...I love using it. The Pop Up conductor just really makes me smile with his baton held high in the air! (Had to cut it off a bit to keep it inside the card, but who cares?)
 
So check out the Inspiration Emporium Add a Little Pop Challenge and enter to win $50 in Emporium Dollars!
 
 
And this is the Bank of America Theatre and the gorgeous stage. We had great seats, but it moved so fast I'd definitely have to see it again to catch all the lines.
 
I know....no photography allowed!
 
Linda
 

Monday, March 4, 2013

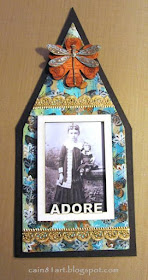
Adore House From Red Lead

 This is going to be a Red Lead post. Sharon and Chris sent me a whole box of wonderful goodies last month and I've finally gotten some time to give them justice.


So here we go!
 
 
will be used on the top.
 
I base coated the flower, the frame, the house and the flourish using Snowflake Fresco Paint and a Cut-n-Dry foam square.

 
 Next I used Beach Hut all over it again. Then I added South Pacific all around the edges as a shadow.

 
 I wanted contrast, so with a dry-brush technique only using the foam, I added streaks of Guacamole to the edges and down the middle trying to keep them straight.

 
 I placed the Swirly Leaves Stencil over the house.

 
 Then I added Irish Cream Fresco paint with the foam pad. The 2 wooden pieces had Autumn Fire and Smoked Paprika and a touch of Brown Shed painted on them.

 
 The next part is so cool!!! I stamped the Vintage Butterfly background stamp 2 times with Jet Black Archival Ink. I LOVE this stamp!!!!!

 
 Then I painted in the butterflies with a brush and Smoked Paprika paint. This paint is a Translucent paint so the stamping shows through...it is BRILLIANT!!!!!!
 
When it's dry, stamp the flowers from the Vintage Sewing Lesson collection using the Opaque paint Snowflake. Since it's opaque, it covers the underlying colors. Ya gotta love this paint!

 
 I cut a piece of black chipboard the size of the frame and glued my Vintage Photo to it. This picture comes with the frame so it's PERFECT!  Then glue the chipboard to the frame. This makes it studier to work with and less chance of the photo buckling if you glued directly to the house.
 
 
 I like to layer my pieces onto black chipboard. It creates a framed look. So just use a ruler and draw about 1/4 " around the house and cut it out. Glue together with a sturdy glue.

 
I decided not to use the flourish. I just didn't need it. But the flower was stamped first with the Rose Tea Cup stamp and Coffee Archival Ink. I wanted more color, so I added the Button stamp from the Vintage Sewing Lesson set on each one of the petals using Jet Black ink.
 
The Patina Dragonfly was sanded using the Vintaj Metal Reliefing Block and polished to make the raised areas shine. I bent the wings upward a bit and glued him to the flower with a strong glue. I use Crafter's Pick - the Ultimate...it never fails me.


I loved layering the paint and ink to make this background. It really is hard to cover it up sometimes.
 
Come back again and I'll share some more projects with you, and thanks so much for all the sweet comments. They let me know I'm not just talking to myself!
 
Linda