Tuesday, February 26, 2013

Vintage Accordion Card

 One of the fun boxes I received this month came from Karen Burniston with a fabulous stack of dies from Sizzix!!!. It killed me to go on vacation the next day and leave them behind...almost untouched. But I did get to start this project and got it finished today.
 
It is snowing like crazy. My daughter and grandson are here and we're going to Chicago tomorrow to see The Book of Mormon....hopefully. Cross your fingers for us, as the tickets are bought!
 
 
 This was a real treat to make. I started with Manila Cardstock and cut the 4 sections using the Sizzix Bigz Die - Accordion Flip 3-D. It's coming in a few days at IE!
 
 
The little frames are cut from My Minds Eye paper, and the Sizzix - Pop 'n Cuts Magnetic Insert Die - Frame, Square Ornate 3-D (Pop-Up). You can find this die at Inspiration Emporium.


 The little people are from REDlead.  The girls and the 2 boys are from Collage Sheet Anchestors 5 and the boy with the hat is from Collage Sheet Paper Quilt 1 that is on sale, by the way!
 
 The Word Bit Charmettes also from REDlead are all in one package, and I added little gold nailheads over the holes.


I didn't link the 4 frames together with the little tabs like your supposed to, I just cut them off the sides to let them float a bit freer. I backed up the frames with black cardstock to make the holes stand out more and added black Rhinestones at the top and sides.

The backgrounds are made with Fresco Paints and several different stamps. I used Archival Ink and roll stamped smaller images with the paints.
 
Some Distress Inks - Tea Dye and Vintage Photo were used on the boys frames and the girls paper was stamped using a script stamp and Broken China.
 
The white stamped image on the girls background is from Urban Chic, and the boys frame is stamped with my favorite script from the Apothecary set. Both from Tim Holtz. The boys background also has the compass from the Classics #1 set.
 
The large background stamps are Stamp Blocks from years ago...Old Typewriter and Vintage Text.
 
Think how cool this would be to make for Mother's Day!!! She could set it up and look at special pictures from the past or present.
 
So check out the links and break out some paper to play.
 
I am SOOOOOOOOOOOOO ready for spring!
 
Linda


Wednesday, February 20, 2013

House Hooks Project

You're gonna love this one!

Another tutorial that will take you right through this project is on the PaperArtsy Blog today.


I have to say, this is my favorite project in a long time. I love houses, and vintage images of kids are just perfect for the front of this little piece.

House Hooks

This is the wooden plaque that is just too cute to believe. It's approximately 14 x 7 inches and ready to go.


The tutorial will take you through the layout and prepping of everything using chipboard to Masonite fences and frames  from Retro Cafe Art....start to finish.


This is the House #1.


 And here's House #2.
You'll be able to dig in your stash of chipboard pieces, trims, and little bits of ephemera to make this project your own.

This is a detailed picture of House #3.


And this is House #4 that we'll put together to wrap it all up.

So ask questions and leave comments if you have any.

I'll get back to you with answers and I'll cheer you on!
So get ready for some Mixed Media Stamped FUN!
Let me know if you have any questions or comments here. I'll be traveling, but I'll do my best to get back to you. So I'd love to hear from you as I'm touring around!
Linda

Tuesday, February 19, 2013

Vintage Lady Triptych Tutorial

If you like Mixed Media Artwork, you'll love this project on the  PaperArtsy Blog  today.

I'll take you from beginning to end with a wooden triptych that's painted, stenciled, stamped and embellished with all kinds of fun products.


The Fresco Chalk Finish Paints are perfect on wood and chipboard here. And we'll stamp on METAL, too.

Wooden Icon Triple

We start with this 7 x 81/2 inch Wooden Icon Triple, and add layers of paint as a base.


Embossing on PaperArtsy gold and copper colored metal, then adding color to enhance it will really spark up the Mixed Media fire in you.


Chipboard is perfect for stamping these highly detailed stamps from Lynne Perrella that are just gorgeous with the Fresco Paints.

And remember, for those of you on this side of the pond, you can find links to USA PaperArtsy DEALERS that carry these products on my sidebar over there ---------> check them out!

So grab a cuppa, and head over to the PaperArtsy blog for a walk through this project at 1PM CST, or 7PM GMT with pictures and tips.
Again, play along and you could win some stamps of your choice at the end of the week.
Linda

Monday, February 18, 2013

Take Time to Smell the Flowers Tag

Today starts my second month for PaperArtsy Design Team. I haven't had so much fun in a long time! Seriously...so many products to play with...and STAMPS...OMGoodness!

So if you want to see the adorable stamps by Jo Firth-Young...aka JOFY, go to the PaperArtsy Blog here today and see the step out instructions for making this fun tag using her JOFY09 set.


AND at the end of the week, if you play along, you can win STAMPS!


I'll lead you through the background with Distress Stains.....


Distress Markers.....and stamps.

(Remember they post at 7pm GMT or 1pm CST)

So, check it out, play along, and let us know if you have any questions or thoughts!

Your Friend in ART,

Linda

Friday, February 15, 2013

Darla Tag from REDlead

Got a box of goodies the other day from Chris and Sharon at REDlead in the St. Louis area.
So of course I had to try my hand. I experimented with various inks on the Photo Stamps. They are so sweet!

This one is on a #7 tag that I painted with Snowflake Fresco Paint using Cut-n Dry Foam in the center. Then I stamped Darla with Jet Black Archival ink. I love the distressed look that came out on the painted tag.

 The measuring tape stamp from the Vintage Sewing Lesson set is stamped at the bottom and the Butterflies are roll stamped in Coffee Archival Ink.

Then I put ink from Spun Sugar and Tumbled Glass Distress Pads on my Craft Sheet and picked up the color with a brush to paint in the photo stamp.

The Butterfly Flight stencil is added with Victorian Velvet and Seedless Preserves Distress Inks at the top and bottom. Details are added with Glaze Pens.


I used some Tunbled Glass, Tea Dye and Victorian Velvet Distress Inks around the outside edges of the stamp, and added some Black Glaze Pen dots and stitches.
 
 
The Ribbon is from REDlead and it's colored with a dab of Dusty Concord Distress Stain, crumbled and heat set.
 
 
I stamped the  Cherish stamp onto a piece of Manila cardstock and cut it out. It's added with a bit of foam tape.
 
This little cutie is too adorable for words!
So check out REDlead and see all the fun things they have to offer.
Linda

Monday, February 11, 2013

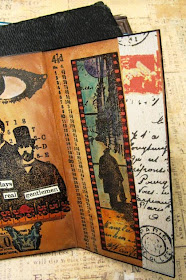
Vintage Gentlemen Card

I have been extremely lucky lately. I've received lots of fun new things to work with, so I thought I'd share a bit of what I've come to learn with you.
 

This is the Giant Manila Tag from Ranger. I scored it at 2 3/4 inches on both sides and folded it inward to form a gated card.
 
 
If you've been following along lately, I've come onto the PaperArtsy DT and learned to use the gorgeous Fresco Chalk Paints as a background for stamping. This is the Irish Cream Opaque applied to the tag with Cut-n-Dry foam...front and back.
 
 
Then I added Cinnamon (Opaque) and Autumn Fire (Translucent) in layers to the tag. When dry I started to stamp with the Vintage Sets  01,  04,  05  and  08

All the links for the stamps are highlighted and will take you to the sets on their site. Just click on them.


I used Versafine Inks Vintage Sepia, Olympia Green and Onyx Black that I heat set with each stamping. The added Snowflake Fresco Paint was stamped with Mini 58 here. The Minis 62 and 74 were also stamped with Versafine inks as well as the script stamp from the Vintage 04 set. The shadowing of the tags on the Gentleman were done with Beach Hut and South Pacific...love how they turned out.  The card ends up arched when you close it, so it stands up on it's own.
 
 
I stamped the Gentlemen on the inside of the card, and stamped again onto a clean piece of Manila cardstock to cut out and glue over the original words.
 
 
The Eyes and Tiny Numbers along the sides are from the 08 set and the No.Tag at the bottom is from set 05. I used Translucent Fresco Paints to add the color to the stamped images. The Snowflake on the Eyes is an Opaque so it must be diluted. The Tissue Tape along the edge covers up the back of the Graphic 45 brad put into the tag hole.
 
 
This is the back of the smaller Metal Brad. I broke off the brads and added a small black foam square and stuck it on the right side of the card. On the left side I added the larger brad through the tag hole and tied waxed linen to it. This creates the closure.

 
This also shows more stamping with the Postal stamp and script from the set. I used Guacamole and more Versafine inks to fill in area. The Create was stamped with Hot Picks 1105 and embossed on Manila cardstock.(Doesn't this remind you of Gentleman Jim???)

 
This shows the blending of the paints inside that does not damage the clarity of the black ink. IT'S AMAZING to me.
 
 
Now I'll leave you with this thought. I created this without color. Took the photos and everything. Then I decided to take a chance and add color since I'd used it on the inside. The Fresco Paints are new to me, and I thought, why not? So, this is how it was before I started. I like it just as well, but both are different.

 
Let me know what you think....before.... or after?
 
Take care and have a great week! And don't forget to click on the PaperArtsy Badge on the sidebar here to see all the designer's works. A new person every week with lots of different ideas to share. At the end of the week, there's a drawing for those who contribute for free stamps!
 
My week is always week 3 of the month...for 2 more months. I'll keep you posted!!!
 
Linda

Monday, February 4, 2013

Valentine Tag

I've been lucky to have had a gob of new products to work with in my Studio, but sometimes just going back and making a tag is more fun than anything.
 
So I got out my new, and never been used yet, set of fun stamps Mini Blueprints 2 from the talented MJ3, aka Mario Rossi III, and had some late night fun!
 
This is definitely a Mixed Media Tag in that I use several layers of inks, embossing powder, stamps and paint.
 
 
I started with the 3 stamps and Black Soot distress ink plus clear embossing powder. Then I added Worn Lipstick, Picked Raspberry and Victorian Velvet trying to blend together to get the "reddish-pink" that I wanted around the tag. Last add some Broken China and Seedless Preserves to the edges.
 
Next I painted in the 3 main areas with a brush and Dylusions Crushed Grape and Bubblegum Pink, a few Distress Markers, and the above Distress Inks. Using a brush again I added a few tiny spots of color and shadows. Then, just for fun, I gave a light spritz of the Crushed Grape to the tag.
 
Contrast....needed contrast, so I added a phrase from Odds and Ends stamp collection with Majestic Blue Versafine Ink, and stamped out the Valentine ticket with Black Soot.  Paint the ticket with the Dylusions and Victorian Velvet Distress Marker. The background stamp from Papillon was roll- stamped with Coffee Archival Ink.
 
I added the Pattern Stamp from Stampers Anonymous and the wonderful Script from Apothecary with Snowflake Fresco Paint from Paper Artsy. LOVE that stuff.
 
 
Here you can see the detail of the shadow added to make the image pop and the white script stamp that breaks up the color. I added the tag to black chipboard and did a version of x and o along the side. Then punch a hole in the black chipboard for a ribbon.
 
 
Lately I've been using the Crinkle Ribbon in it's natural state that goes well with the white penmarks. As a last thought I added Glossy Accents to the ticket to give it a little shine and added the Heart Charm with a jumpring.
 
Valentines Day is fast approaching. I've done more Valentine posts than I've ever done in my life...maybe the stamps just speak to me, maybe I'm just getting sentimental this year!
 
Be Well and Be Good to each other, we're all we've got!
 
Linda
 
Products Used:
Distress Markers - Various blended colors and Aged Mahogany, Fired Brick, Dusty Concord.
Stamper's Anonymous - Tim Holtz Mini Blueprints 2, Papillon, Odds and Ends, Apothecary and Patterned Stamp JS-643 from years ago.
Paper Artsy - Fresco Chalk Paint - Snowflake
Versafine - Magestic Blue


Friday, February 1, 2013

Vintage Valentine Shrine

Well it's been awhile since I wrote a tutorial for my blog. But there were 4 over at PaperArtsy. If you missed them, check them out here.
 
But I thought I'd run through a great little ATC Shrine Kit - Adore,  from Retro Cafe Art. This stands 5 3/4 inches tall and it perfect for Assemblage ART.
 
There are LOTS of links here for you shopping pleasure....just sayin'. And new stores started carrying Paper Artsy supplies in the USA!
 
So, let's get started!
 
 
The kit comes flat and is wonderfully easy to paint and put together. The fact that it's unassembled makes it so much easier to stamp and decorate!
 
Really!
 
 
 I start by base coating all pieces, front and back, with Snowflake Fresco Chalk Paint. I use a piece of Cut-n-Dry foam and dab it on. You can see the overlapping here onto my work surface. The paints come in opaque, semi-opaque, and translucent that determines your type of coverage.
 
Here by using the Opaque Snowflake, you get complete coverage!


Then we switch to a semi-opaque Eggplant. See how the white shines through a bit. This is the back.
 
 
Now add the Claret, a translucent, and you get a blending watercolor-type layer. I LOVE it! So different from any other product I've ever used. This is the inside front.

 
So when you stamp with Versafine Onyx Black and heat set, you get wonderful images. (back)
 
Versafine ink works best for the fine detail stamps here.
 
 
Some pieces are darker than others in the centers where I used London Night.
 
 
This shows the outside pieces after being stamped. I used HP 1104 and HP 1105 from Paper Artsy stamp sets for the hearts. And my favorite Imagination stamp  Ink and the Dog Mini 48.
 
 
This is the insides. I used some London Night all aroudn the outside edges.
 
 
Now you can start gluing with just a touch of Crafter's Pick the Ultimate, or your favorite white glue. I use a Pick to apply the glue. I used one of Tim's Mixed Media stamps and Majestic Blue Versafine ink on the inside walls.


I added some stamping with Smokey Gray Versafine and Mini 74...another Fav!
 
I added white penmarks to the top piece. Stamped with Rose Madder Archival Ink on the Heart Wings and added black pen dots. (check out the Rose stamp is upside down, but it won't madder...get it?)
 
The Wings were some I picked up in Minnesota that I cut the charm rings off of and sanded down. Then I used Butterscotch Alcohol Ink to paint them gold...they were silver.

 
The Red heart is painted with Claret 2 times and embossed with clear Ultra Thick Embossing Enamel. It's domed really, not sunken as it looks in the main picture.
 
 By base coating the Masonite pieces with Snowflake, you can make it any color you want....VERY cool!
 
 
I've had this picture FOREVER. It's from my 1st class in Altered Art with the talented Michelle Charles....years ago. She was an amazing teacher!
 
Anyhow, the bottlecap is painted with Alcohol Ink and dotted with a Black Glaze Pen.
 
Punch a hole with a 2 hole drill punch and hang a Heart Charm.


I stamped a label from Tim's Apothecary Set and added No. 9 for the middle sized bottle. The tall vile one and smallest one are decorated with tissue paper from Collections. I tied some twine and fibers around them for a bit of color.
 
Stamp a piece of Manila cardstock with love and edge with some Distress Inks and put in a Memo Pin. I wrapped a wooden spool with gold wire and stuffed some black tulle into the center.
 
The flowers are from Petaloo Darjeeling Mini Pearl Daisies and Mini Daisies.
 
 Sooooooooooooo, whatdaya think??? Let me know if you have any questions.

Hope you enjoyed the tutorial. Like I said there are lots of links here for you to check out and use to shop.

And if you want some wonderful tutorials, I highly recommend Leandra's over at the PaperArtsy blog. Just listening to her is a real treat!

Linda