Monday, April 30, 2012

Life is about creating yourself...it's a Secret and Fragile process

This is a tag showcasing Adirondack Products...Inks and Paints.

It's done almost entirely with just that line from Ranger.


I used Dylusions and Tim Holtz Stamps to lay down a resist with Clover and Lemonade Pigment Inks and Embossing Powder.

 I applied Dye Inks with pieces of Cut-n-Dry Foam all over the top of the embossed images.


The Pen Nibs are painted on with a brush and Alcohol Inks .

The Word Key was really fun.

I used Clear Embossing Powder, Alcohol Inks and a touch of Snow Cap Acrylic Paint Dabber.


Some Eggplant Alcohol Ink and Snow Cap Dabber shabbied up the Word Band.

And the really cool thing I love about this Pigment Ink is the way it embossed onto metal.

Just push the Ornate Plate into the Bottle ink pad and then covered with clear embossing powder. The effect is amazing!!!


It keeps the dark ridges and turned out VERY cool.


Then I used the Dye Inks to dye the Crinkle Ribbon.


The added black numbers and letters were stamped here and there with Jet Black Archival Ink and Pitch Black Paint Dabber.

Use the Dabber if you want to push the stamping to the background since it won't adhere to the embossing.

The Archival Ink brings the stamping to the foreground since it WILL stamp onto the embossing as the TOP layer.

The Fragile stamp is stamped onto Manila cardstock and cut to fit the Plate.

I thought the Commute Tissue Tape helped to accent the Word Band.

Sooooo, all in all it was a new experience for me and just using the Adirondack products.
Give it a try and let me know what you think!!
Your Friend in ART,
Linda


Products Used:
Adirondack Pigment Inks - Bottle, Clover, Lemonade, Snow Cap, Pitch Black
Adirondack Dye Inks - Eggplant, Purple Twilight, Terra Cotta, Peach Bellini
Adirondack Paint Dabbers - Pitch Black, Snow Cap
Adirondack Alcohol Inks - Butterscotch, Eggplant, Purple Twilight, Terra Cotta
Archival Ink - Jet Black
Idea-ology - Word Bands, Commute Tissue Tape, Ornate Plates, Crinkle Ribbon, Word Keys, Pen Nibs
Tim Holtz Stamps - Little Labels, Mixed Media
Dylusions Stamps - Basic Backgrounds
Ranger - Matte Multi-Medium, Heat it Tool, Clear Embossing Pad, Clear Embossing Powder, and Cut n'Dry Foam

Wednesday, April 25, 2012

It was a Dylusion-al Day !

What fun it is to get Stencils in the mail 2 days in a row!!!!

Stamps, Stencils, Spray Inks....yes, it's a great day in the Studio to play.

And thanks again for all the kits you ordered. They're all mailed out!!!

 
These are the end products....but how did they begin???

Let's get to work!


You remember the other day I showed you how I created 3 tags here?

OK, I used the one on the left for the Balloon Tag tutorial.

So I had the other 2 left to play with.


Let's start with the one on the right.

Using the new Dotted Flowers Stencil and Seedless Preserve Distress Ink, I added the image to the tag.

I LOVE how the stencils come alive with Distress Inks!


Onward....we need some contrast.

Add white dots with Snow Cap paint dabber.


Needs a bit more contrast.

Get out the Numbers Jumble stencil and the Black Soot Distress Ink.

Then maybe go a bit crazy with the White Sharpie.


Lastly, a bit of black pen and a stamp from Background Love with Jet Black Archival Ink.

And it's done!

You can do with it whatever else you want ....or just like it as it is.


Now the one with the Walnut Stain drops on it was fun, too.

Stamps, Distress Inks, Pens, and Stencils here as well.


The eye was my favorite on this one from the Pondering Petunia Collection.

I also used Stamps from Around the Edge, Background Love, and Basic Backgrounds from Dyan Reaveley's Dylusions.

Check out her tutorials...they are fantastic!


I added them to some black cardstock and let them be.

Let me know what you'd do with them....I'm all ears!!!

Linda

Products Used:
Ranger - Dylusions Stencils - Number Jumble and Dotted Flowers
Ranger - Tim Holtz - Black Soot, Seedless Preserves, and Walnut Stain Distress Ink
Ranger - Archival Ink - Jet Black, and Snow Cap Acrylic Paint Dabber
Ranger - #8 Manila Tag


Sunday, April 22, 2012

Embossed Metal Tag and Prairie Art Stamps Class

What a gorgeous day it was yesterday!

Good friends, great weather, fun times, and awesome treats!

What more could anyone ask for????

We worked with METAL, but first I'll show you a tag from CHA...yeah, just got the OK to let you see it. But always fun to have something back there to draw from.

This is in the Ranger Booth highlighting the Metal Foil Tape.


The Distressed Doily is cut twice from Metal Foil Tape on Grungeboard.

Then emboss it all with the Damask Texture Fade folder.

Pop out the little flowers from the diecut. Add tiny pearls colored with Stream Alcohol Ink.
   

Using a Manila Tag, add Aged Mahogany,Seedless Preserves, and Dusty Concord to the tag. Stamp a few little background stamps with Jet Black Archival Ink.

Add the fantastic Paper Whimsy vintage picture of the sweet little girl and clip the Doily die cuts to fit around her.

I strung some beads onto brass head pins to add to the ribbon with a jump ring, and added the Plaquette with  Long Fasteners to the bottom.


Of course it's layered onto a piece of black chipboard for stability.


Now some shots taken by my dear friend Linda Broom after class Saturday at Prairie Art Stamps.

Here I am with Donna and Sue.


Linda Broom and I...sorry I'm in all these shots. I didn't take any pictures, but Linda took several with my camera. Also sorry I didn't get pictures of everyone in class...I'm bad.


And here with the delightful Helene. She made me this gorgeous card from a favorite paper line of ours...Graphic 45.

(I'm only 2 weeks older than Helene...same year born, same year graduated!)


And what fun to see Rhonda again in class. She was the winner of the fun doorprize of the G45 Toolbox.


And here's all of the April Birthday girls together....Helene, the talented Ms. Judy, Rhonda, Donna and myself.

Good food+ great people and a wonderful hostess= a delightfully ARTful afternoon!

Thanks again to Terri who made lunch, and Pam's fantastic daughter who made the most out-of-this world treats!!!

NOW....save June 23rd for out next class at Prairie Arts....


the Standing Curio


This is probably my most favorite class. Bring your own vintage pictures or use these 2.

Some people brought their parents pictures, grandparents, and one brought her 4th grade picture of her husband and herself.

It's always so much fun to see what people create!

Call for your spot here.


AND...speaking of what people CREATE...I'm a Guest ARTist on Erika Taylor's Blog. She is so sweet and talented. PLEASE check out her fabulous blog here and leave her some LOVE!


And one last note...

This is the finished piece that Helene did in class. GORGEOUS colors and it's her grandparents. I snagged it off her blog.

Just one Embossed Metal Canvases kit left, if you're interested, email me.

And the Poppies kits are down to just 3 left...thanks so much for all your orders!


Have a wonderful week!


Linda

Products Used for Tag:
Tim Holtz - Distress Inks - Aged Mahogany, Seedless Preserves, Dusty Concord
Tim Holtz - Alcohol Ink - Stream
Tim Holtz - Idea-ology - Plaquettes, Long Fasteners, Jump Ring

Thursday, April 19, 2012

---------------Adirondack Inks and Paints--------------

This was a challenge.

Use Ranger Adirondacks products - inks and paints.

I had several Dye Ink pads, a few Pigment Pads, lots of Paint Dabbers and a whole bunch of Alcohol Inks.


So where to start. Add some white paint with a dabber and a stencil.

Flip it over and smoosh extra paint on the other page.

Then I rubbed all kinds of color all over a journal page using Direct to Paper and Cut-n-Dry foam.


 Needless to say some of the colors were really bright like the Clover, Bottle and Terra Cotta.

I added some stencil work with Distress Inks and Paint dabbers.

The Seedless Preserves, Gathered Twigs, and Chipped Sapphire Distress Inks really made the stencil work pop.


Gold paint dabber on the stenciled raindrops added some shine.


I love the Lemonade and Terra Cotta background with contrasting Distress Ink here.

Can you see the eyes coming from the corner....just a happy accident.


Some silver raindrops here and lots of white gel pen.

I traced some of the leaves with the stencil and added outlines and shadows.

This was a fun project, and a real learning experience on combining different types of inks and paints.

Explore and Expand!

I'm off to Prairie Art Stamps this weekend...can't wait!

Linda

Products Used:
Adirondack Dye Inks - Aqua, Stream, Peach Bellini, Terra Cotta, Eggplant
Adirondack Pigment Inks - Lemonade, Juniper, Clover, Bottle
Adirondack Paint Dabber - Snow Cap, Gold, Silver
Distress Inks - Seedless Preserves, Dusty Concord, Chipped Sapphire,
                        Gathered Twigs, Pine Needles
Distress Markers - Broken China, Pumice Stone
Stencils - Dylusions Lusious Leaves and Crafter's Workshop Daisy Doodad

Other Products:
Sakura White Gelly Roll Pen
Sharpie Black Permanent Fine and White Opaque Poster Pen

Sunday, April 15, 2012

Beeswax Collage - From CHA....and Class Kits

Yes, this is a project that made it to the Ranger booth for CHA-W.

It was so much fun to get out the wax and the Melting Pot again.

Just the smell of the beeswax is amazing. Now that I've said that, it makes me want to get it out and play again!

Anyway.........this is on a canvas board with papers, and stamps, and Perfect Pearl powders.


The trims are dipped in to the wax and layered on as well as the paper flower.

The picture is from Tim's Lost and Found paper collection and the buttons are Idea-ology Accoutrements.

Perfect Pearls are brushed over areas after the wax is dry to give more color.

All in all.......lots of fun!!!


Earlier this week I stumbled onto this picture that had made it's way to Pinterest.

I'd forgotten about it, but it is poignant in that I'm teaching this class again next Saturday.

The shadowbox frame isn't included in the class, but it's a really a great find (and cheap) that worked perfect for displaying the project from class. It's probably my favorite one to teach.


Hope to see you at Prairie Art Stamps next Saturday to make this. We always have a great time in Springfield, Ill.!!!

Don't forget to bring your own little pictures to personalize this project, or use these 2 little cuties from me.

A few seats are still available...give them a call to join in the fun.

If I have kits left over, I'll be selling them after the class. Let me know if you'd be interested. First come, first serve!

It is on an 8x8 canvas board with 4 mini 3x3 canvases that you add to the piece. The metal is already embossed for you. You add your own colors of Alcohol Inks. Kits plus shipping totals $40 to US.


my email is cain81@mtco.com


POPPY CANVAS

These kits are available now for $29 in US. This is a 6x6 stretched canvas with many die cut layers of chipboard, paper, a vintage button, and ephemera. It has 15 die cut flowers and would be a great Mother's Day present!
The papers are from Graphic 45.


Have a great week!

Linda

Tuesday, April 10, 2012

Thanks Everyone...I had a great day!

First of all.....thanks to everyone for all the wonderful Birthday wishes yesterday.

I was completely blown away on FaceBook!


I was out and about having lunch with Bill, shopping for garden ideas, enjoying the day and I came home to a real treat in the mailbox!


So for the rest of the day I got to play and Bill watched the ball games.

I posted a bad picture of this on FB.

Then I had a few questions about how I did this, so I thought maybe I'd do a post on what I used...this is for you Linda P.xxx 


I had done a single page with a large stencil using white paint dabber.

Then, with the paint still wet, I pushed the stencil down on another page letting the paint you usually wipe off the stencil go onto the page. Dyan Reaveley technique there.

See all the cool spots that have no paint...very distressed looking.


When it was dry, I used dark Distress inks all over it...Vintage Photo, Pine Needles, Wild Honey, Walnut Stain, and some Mustard Seed in spots.

Wipe the Distress Ink off the white paint gently with a baby wipe.


I got out my new Number Jumble stencil from Dylusions and used it all around the page with Vintage Photo and Black Soot.

PRETTY DARK...

Stamped my new flowers from Background Love and the fun alphabet from Bordering on the Page.

STILL pretty dark.

Then........out comes the White Gelly Roll Pen.

And the Distress Markers!!!!!

Let the magic begin!

Last was the Numbers from Basic Backgrounds with Coffee Archival Ink.

Never give up...just keep swimming!

Thank you Dorie.

Have fun....I did!

Linda


Products Used:

Sunday, April 8, 2012

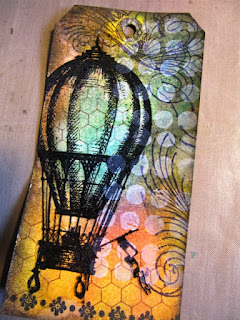
Up, Up, and Away Tutorial with Dylusions Inks

Happy Easter to everyone! Here's a fun tag tutorial to play around with.


The Balloon kinda looks like an Egg and the background tags are SO Easter in their colors.


I am in love with the new Dylusions Ink Sprays from Dylan Reaveley.

The colors are brilliant....but what would you expect from the perfectly names sprays like...Bubblegum Pink or Squeezed Orange?

So let's get started with our little tutorial on a tag!

I started with a #8 Manila Tag and spritzed it lightly with water.


Then the magic begins.

I sprayed the middle tag with several different colors of Dylusions Ink. Patted with a paper towel and dried with the Heat tool. Then I spritzed it with a bit of Walnut Stain Ink. Picked up some drops from the Non-Stick Craft Sheet and dried again.

Then I thought....try Dylan's technique of spraying one, then blotting a second one on top to capture the excess ink....

So the ones on the sides are that process.

I wasn't sure what I was going to do, didn't want to ruin the "cool" tag, so I started with the dark one on the left. (who says "it's just a piece of paper???) I'm a chicken sometimes.


So off we go! I used the Picket Fence Distress Stain on the dots in the Mixed Media stamp set from Tim Holtz.

Works like a charm!


Then I stamped the Balloon from the Remnants set with Jet Black Archival Ink and embossed with Super-Fine Clear Embossing Powder...LOVE that stuff.

You can still see the white dots underneath the Balloon...amazing!


Here I used a tiny border stamp I got a couple of years back at CHA...sorry I am not positive of the brand. Just stamped, not embossed.

Then the WONDERFUL Chicken Wire stamp from Mixed Media with Coffee Archival Ink went over the top using Dylan's "roll the stamp" method rather than putting it on a block.

The Flourish was stamped with Deep Purple Archival Ink.


NEXT LAYER!!!

White Gelly Roll Medium tip pen.....no Sharpie here.

Add the color around the stamped images at the bottom, and around the Flourish to make it look like the wind blowing.


I added pen to areas of the Balloon and in the middle of the Chicken Wire.


Have you tried the new Specialty Stamping Paper from RANGER????? OMGosh!

Amazing stuff. I'm not easily impressed, but I'm here to tell you that stuff is a Totally Different Animal to stamp on...WOW!

So, off my soapbox. Stamp the Air Mail stamp using Venetian Orange Archival Ink on the paper.

Here I used the Deep Purple, then a Venetian Orange (not too cleaned off stamp) and a CLEAN stamp with Venetian Orange. (see the darker difference)

The ink wasn't completely dry on the paper and kind of pooled here and there, so I decided to EMBOSS them all with the Clear embossing powder.


It gave them a really cool mottled edge. I cut them out and added Broken China to the edge, and Old Paper to the middle, with Distress Markers to soften the stark whiteness of the paper.

Then a thin black pen line made the whole piece stand out.


Now here's something I learned from Michele Charles YEARS ago in a class I took from her.

I used my Pumice Stone Distress Marker to add an edge to the Balloon and Flag. This creates a shadow and makes the figures have dimension.

The edges are darkened with Walnut Stain and Black Soot Distress Ink, and the tag is layered onto a piece of Black Chipboard. At this point I was going to add a ribbon, but I liked it just the was it was.

Enjoy and let me know what you think.

New products are coming in every day at Inspiration Emporium, so check them out!

Linda