
Thankful, I am so very thankful for all my blessings, especially my wonderful family and friends.
So, for you peeps out there who want to CREATE, here's a tutorial using some fantastic products from Ranger and the talented Mr. Tim Holtz.
I love using my favorite Tool-the Vagabond to die cut and emboss for this tutorial.

First I took a #8 Manila Tag, spritzed it with water, and swiped several colors of Distress Stains over the tag letting them blend slightly.
I used Chipped Sapphire, Barn Door, Broken China, Tea Dye and Pine Needles. Spritz a bit more and dry with a Heat It tool.
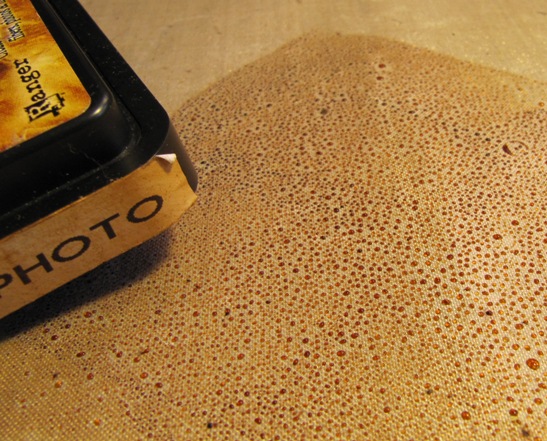
Then swipe your Distress Ink Pad Vintage Photo on your Craft Sheet and spritz with water. Dip the tag in it, heat set, and pick up a few more dots of color for interest. Dry again.

Then I sprayed a slight mist and drops of Espresso Adirondack Color Wash. Dry again.
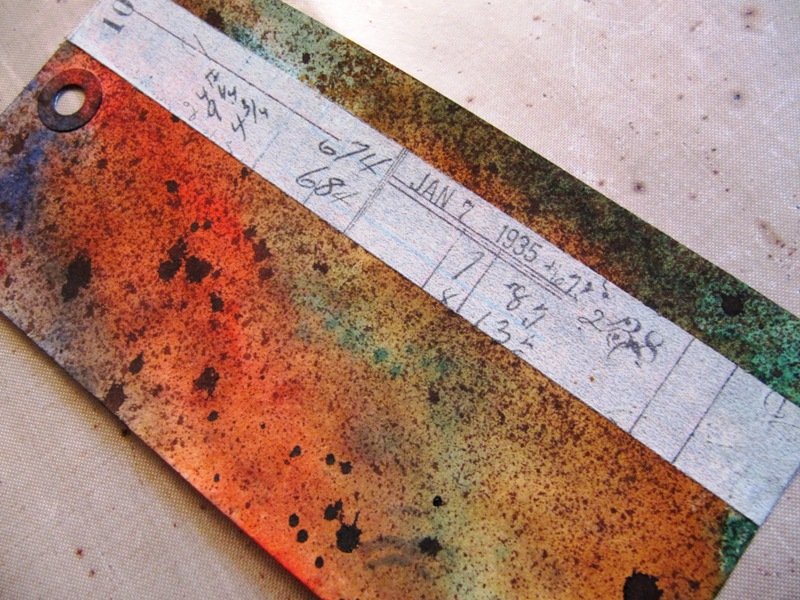
Add a strip of Traveler Tissue Tape to one side. If you're really reading this...you don't have to dry here....that's a joke.

OK, this is upside down to some people...I used the new Thankful Texture Fades on the tag. Then carefully...carefully swiped Black Soot DI across the raised letters with the Blending Tool.

You've seen this technique before, but here it is again. Die cut leaves from packaging plastic with the Tattered Leaves die.
Add Alcohol Inks to the back.
I used Terra Cotta, Sunset Orange, Sunshine Yellow, Butterscotch, and Pitch Black. A bit of Silver Metallic Mixative was also used.
Then add Copper, Gold and Lettuce paint dabbers OVER the Alcohol inks....this is all on the back of the leaves.

Flip it over and add vein lines with a permanent pen. I like the Write4All by Stabilo. Add a bit of Gold Paint dabber to the edges, too, for contrast.

A dash of heat from the Heat It Tool and you can curl the leaves as you like.

I added Gold Acrylic paint dabber over the embossed area...kind of hard to see the contrast here.
The cool stencil is from Julie Balzer -Time Travel, (they have a whole ton of new stencils in at Inspiration Emporium in the Just In section) added with Jennie Bowlin Malted Milk paint dabber.

I pushed the Spinner into embossing ink, then into the jar of Spruce Green UTEE and hit it with the Heat gun.
Sprinkled a few bits of Butterscotch Adirondack embossing powder. And heated it again.

Then I decided it needed better contrast, so I took the top off the Copper paint dabber and painted the word Thankful.
Now you wonder, why then should I go to all the trouble to add the Black Soot DI???
Because it has created the perfect shadow outline to the raised letters!!!!
I would like to tell you I planned it that way all alone, but it's just a happy result of constant layering.

Since there's a lot of metallic color and plastic, there is a lot of different colors that show up in different angles of shooting the photos.
I think the copper lettering and the gold paint on the leaves shows up best here.
Layer up your leaves, a Timepiece and brad with your spinner. Add some Copper paint dabber around the edge of the tag.
I like to add my tags to a piece of black chipboard for stability.
And a row of Gold nailheads from Mark Richards is at the bottom for one last section of Bling.
That's my Thankful Tag Tutorial.
What are you thankful for??????????
Type a comment and let me know. Do you want to see more tutorials or just pictures?
It's no fun talking to yourself....all you bloggers out there know what I mean.
Your Friend in ART,
Linda

39 comments:
I love a tutorial and this one is great!! I'm going to try and do something similar. Yours is very very cool!!
This tutorial is perfect just like these tag. Thank you so much.
AWESOME TUTORIAL AND GORGEOUS TAG !
Keep the tutorials coming please! I love them and this tag is so gorgeous. Thank you!
oh wow hun fantastic gosh you have some talent hun,this is amazing,bless you for the tutorial too,hun hugs cherylxx
Corrrrrrrr, that is LUSH that is! THANK YOU for taking time out to do tutorials ... I love them!!! Thanks xx
I'm thankful there are bloggers like Linda Cain who I can learn from! More tutorials, please!
WOW... Linda you continually amaze me... your work is stunning and this is an awesome tutorial! I'm thankful for YOU!
Ellen xxx
Thank you for the tutorial...I can't wait to get home to try this!
Linda, this is beautiful! I love your tag...the background looks like an autumn leaf that has hung onto the tree as long as it possibly could! Really cool. Love your leaves and the design. Thanks for the tutorial! <3 Candy
Linda, You have opened the tutorial door. It is unanimous. Run with it. Thanx for sharing, my friend. can't wait for the next one.
A fabulous tag, Linda, and I love the tutorial.. I read every word!!!!
GORGEOUS TAG!!! I loved the leaf wreath you made last year, in fact, you are the main reason I went out and bought Tim's leaf die. This one even tops that... the leaves are stunning and I love all the different levels of color. You MUST continue with the tutorials. You are a good teacher, have so much to share and we all appreciate your talents so much. Thanks!
After all that... I forgot to tell you what I am THANKFUL for! People like you who are gracious enough to share their talent with the rest of us. Thank you, Linda!
LOVE this tag, Linda - and the tutorial! Thank you for sharing it!! And now I have to get this embossing folder...! (lol)
Totally fab tag and a great tutorial, thank you for the reminder about the leaves, I had totally forgotten how great they look done this way. x
I LOVED this tutorial and your tag. Hope to see more tutorials!
great tutorial and beautiful tag-yes more tutorials!
Fantastic piece of art!
Linda -
Fabulous Tutorial! Thank you so very much for sharing it. I love all the different layers and techniques. It was so worth doing the black soot by the way. And I LOVE the leaves, way cool (as the kids say). Keep the pictures please and throw in some tutorials too when you have the time!
Elaine Allen
Holy rockets, girl, this is INCREDIBLE! Those colors... those cool speckles... those magical leaves-- WOW! I'm completely in awe and inspired!
Love the tutorials please do more. That tag is great.
It's gorgeous, Linda! I love what that strip of tissue tape adds to it... very cool. I enjoy your tutes!
Wow, how fabulous is that! I love how you did the leaves.
Tutorials for sure!!! I love all of your work so knowing how to do it would be great! Love the leaves on this!
Oh, Linda, this is beautiful - and I would LOVE to see more tutorials - it helps us out here in the hinterland (read: Iowa) believe we can actually DO this stuff!!
Thanks for sharing
I'm thankful that Scrapaganza gave me a shot with selling my little clay buttons in their store. 2 years later and I've got a pretty good following.
I like the tutorials. I like to see how things get looking like they do, especially from you.
I loved the tutorial. thank you for sharing and I'd love to see more tutorials.
Beautiful tag, just beautiful! Keep those tutorials coming, please. Even without having all the products shown, I learn from the ideas and techniques that you share. Thanks so much!!
Thank you so much this is a wonderful tutorial, I wouldn't have known how you did the spinner, for instance, without it. Your tag is just gorgeous!
So awesome! Obviously I need more supplies :) Thank you for the tutorial! Happy 11-11-11!
Thank you for such a detailed tutorial! I look forward to trying some of the things I learned from it!
Gotta LOVE those leaves!
hugs Lynn
Oh my, this is fabulous. I love the colours. Thank you for sharing this with us.
Toni xx
I love your tag. Its so beautiful! I love tutorials. It's always better than just pictures!
I came over from ScrapScene. Thanks for a great tutorial. Love the tag and the leaves are terrific!
I love it and it is really beautiful and detailed. I need the tutorial honestly because I wouldn't think of adding all of the different layers. Thanks for sharing.
Michelle
That is cool. Love how you used the plastic for the leaves. I will have to try this. Thanks!!
Post a Comment